

About
Recycled Jug Skeleton How-To:
Tags
-
 Creature of Whim favorited Recycled Jug Skeleton
04 Oct 19:59
Creature of Whim favorited Recycled Jug Skeleton
04 Oct 19:59
-
 Abby C. favorited Recycled Jug Skeleton
02 Apr 21:14
Abby C. favorited Recycled Jug Skeleton
02 Apr 21:14
-
 Rainbow Wyvern favorited Recycled Jug Skeleton
05 Mar 20:35
Rainbow Wyvern favorited Recycled Jug Skeleton
05 Mar 20:35
-
 Calah L. added Recycled Jug Skeleton to HOME
06 Jan 22:05
Calah L. added Recycled Jug Skeleton to HOME
06 Jan 22:05
-
Cathy B. added Recycled Jug Skeleton to day of the dead
10 Dec 17:04
-
 Banndit1 added Recycled Jug Skeleton to Upcycle/Recycle
26 Oct 19:21
Banndit1 added Recycled Jug Skeleton to Upcycle/Recycle
26 Oct 19:21
-
Banndit1 favorited Recycled Jug Skeleton
26 Oct 19:21
-
 Melanie S. favorited Recycled Jug Skeleton
02 May 11:18
Melanie S. favorited Recycled Jug Skeleton
02 May 11:18
-
 Susi S. added Recycled Jug Skeleton to dio de los muertos
13 Nov 19:13
Susi S. added Recycled Jug Skeleton to dio de los muertos
13 Nov 19:13
-
Susi S. favorited Recycled Jug Skeleton
13 Nov 19:13
You Will Need
-
 Step 1
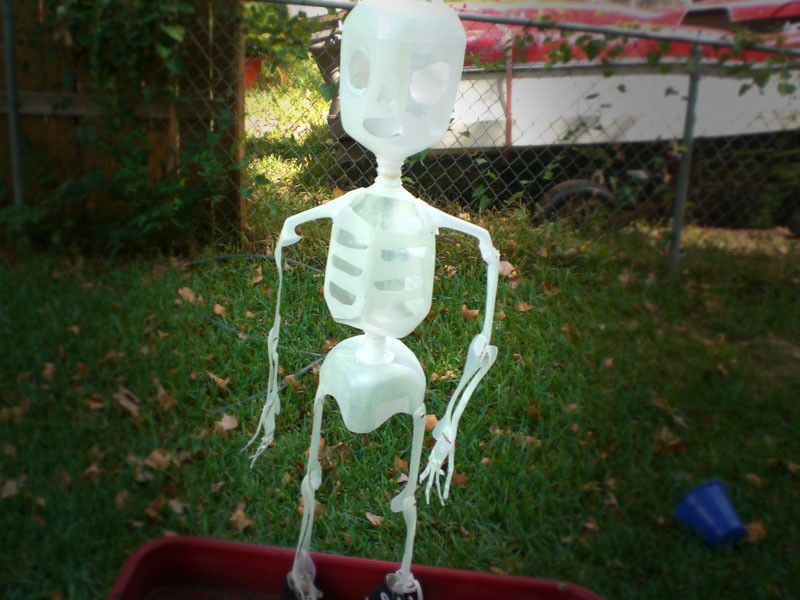
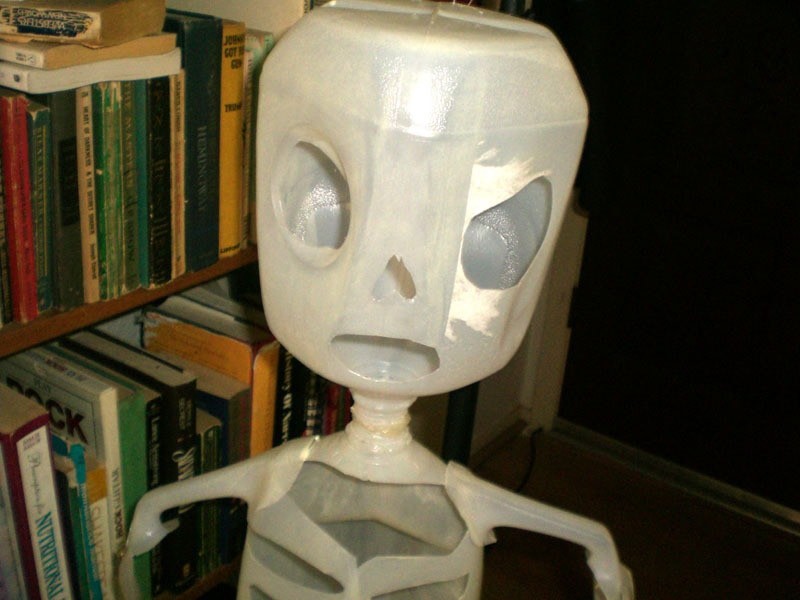
Draw a face on the opposite side of the first jug from the handle. Cut out the features with an exacto knife and/or scissors. Set aside.
-
 Step 2
With a new jug, cut a semi-circular piece out (straight side on the bottom) about an inch and a half below the mouth of the jug, then make a long slit ending about an inch and a half from the bottom of the jug.
-
 Step 3
This piece will be the ribs. Cut slits on both the left and right sides and cut long oval shapes to create the rib bones. The bottom cut out below the rib bones will look approximately like a triangle. Set aside.
-
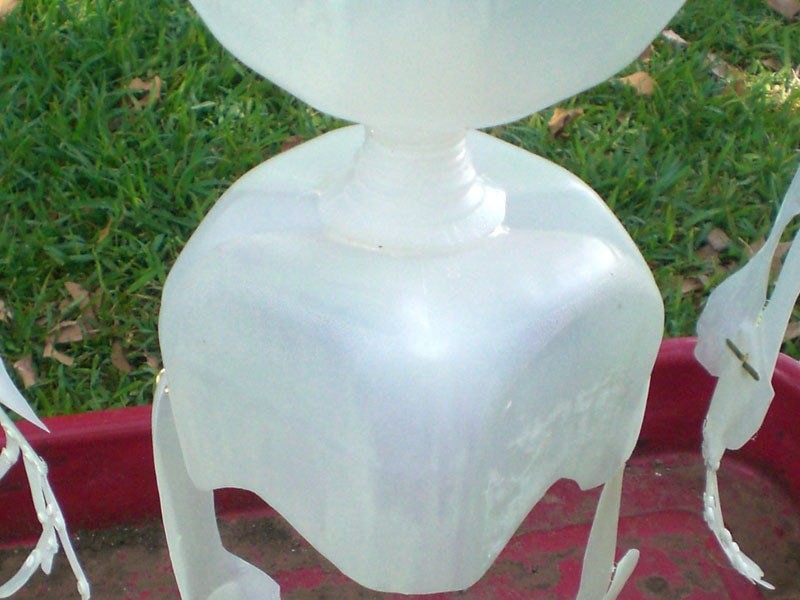
Step 4
With the third jug make the hipbones by cutting out four round corners: front, back, left and right. (It’s hard to explain, please refer to the picture of the hips!) Punch holes in each sidepiece to attach the legs to.
-
Step 5
With the fourth and fifth jugs cut off one of the spouts to use for the waist and both of the handles to use as collarbones, set aside. The rest of the jugs can be used for the arm and leg bones and for the hand and finger bones.
-
Step 6
Cut out arm and leg bones by making long “dog bone” shaped pieces. You will need eight and half of them will be the lower arm and leg pieces. With these four pieces cut out the centers. (long cylinder pieces)
-
Step 7
Cut out two palms about 2 ½ inches long and then small finger bone pieces. You will need three pieces for each finger: a long piece for the base of the finger and two knuckles. They will total about 2” long, varying the lengths to make each finger. (a longer thumb and middle finger, small pinkie, etc.) Set aside.
-
 Step 8
Time to put the skeleton together! Glue the head to the ribs by lining up the spouts and hot gluing them together. Let dry.
-
 Step 9
Glue the spout to the bottom of the ribs to form a waist, then glue the hip spout to that one to form the pelvis.
-
 Step 10
Glue the collarbones to each side of the top of the ribs, punch a hole at the bottom of each collar bone to attach the top of the arm bones.
-
 Step 11
Punch a hole in the top of the arm bone then attach the arms to the collarbones with a large brass brad.
-
 Step 12
Punch a hole in the bottom of the first arm bone to attach the bottom arm bone. Punch a hole in the bottom arm bones to attach the palms.
-
 Step 13
Poke five holes in the palms: one at the bottom corner where the thumb will be, four at the top where the other fingers will be. Enlarge the holes with the awl or the point of a small pair of scissors.
-
 Step 14
Assemble the fingers: poke holes into the tops and bottoms of the long and medium sized finger bones. Enlarge with the awl. Using the small scrapbook brads, attach the fingers. Each finger will have the long bottom piece, medium middle piece and small top piece. You will use three brads per finger. One attached to the palm, the others attaching the digits.
-
 Step 15
Punch a hole in the top and bottom of the upper leg bones, attach to the hips with a large brass brad.
-
 Step 16
Attach the bottom leg bones to the top leg bones.
-
 Step 17
If you want to make feet (I got a bit lazy after making the fingers and opted for shoes instead of feet, plus I wanted the skeleton to be able to stand once it’s hanging up.) do the same process as for the hands or trace a foot shape in one of the scrap pieces, punch a hole in it and attach to the bottom leg bones with a large brad.
-
 Step 18
That’s it! Customize as desired! You can paint the “fingernails” and put a Carmen Miranda-style hat or a wig on it, you can put a fedora on it and attach an Uzi water gun to make Al Capone. The possibilities are endless.
-
Step 19
18. I used two of my leftover jugs to make skulls for my boys. (Who were impatiently waiting to play with the skeleton) Just follow the directions for the head and let the kids (or young-at-heart ;) play pirate with them!


What a great web site
Mel