About
The papercraft version of these sweet and trendy plants are made with basic quilling techniques for the beginner crafter.
Succulents are so sweet and a bit trendy, and they translate perfectly to quilling!
I’ve seen a few examples online that are incredibly beautiful, but a little tricky.
Being that I love simplifying my crafts, I spent some time figuring out a way to make quilling paper succulents that any quiller can do!
Tags
-
 Alex Z. added Quilling Paper Succulents to Интересное
12 May 16:16
Alex Z. added Quilling Paper Succulents to Интересное
12 May 16:16
-
 Roxyandboys favorited Quilling Paper Succulents
14 May 15:37
Roxyandboys favorited Quilling Paper Succulents
14 May 15:37
-
 Nahina Nizam favorited Quilling Paper Succulents
23 Apr 01:34
Nahina Nizam favorited Quilling Paper Succulents
23 Apr 01:34
-
Pamela J. favorited Quilling Paper Succulents
10 Apr 10:34
-
 Crafterella featured Quilling Paper Succulents
01 Apr 23:00
Crafterella featured Quilling Paper Succulents
01 Apr 23:00
-
 The Dark Vixen added Quilling Paper Succulents to Really Cool Stuff
28 Mar 01:53
The Dark Vixen added Quilling Paper Succulents to Really Cool Stuff
28 Mar 01:53
-
 Jennifer P. favorited Quilling Paper Succulents
27 Mar 14:59
Jennifer P. favorited Quilling Paper Succulents
27 Mar 14:59
-
 Meredith A. published her project Quilling Paper Succulents
27 Mar 09:00
Meredith A. published her project Quilling Paper Succulents
27 Mar 09:00
You Will Need
-
 Step 1
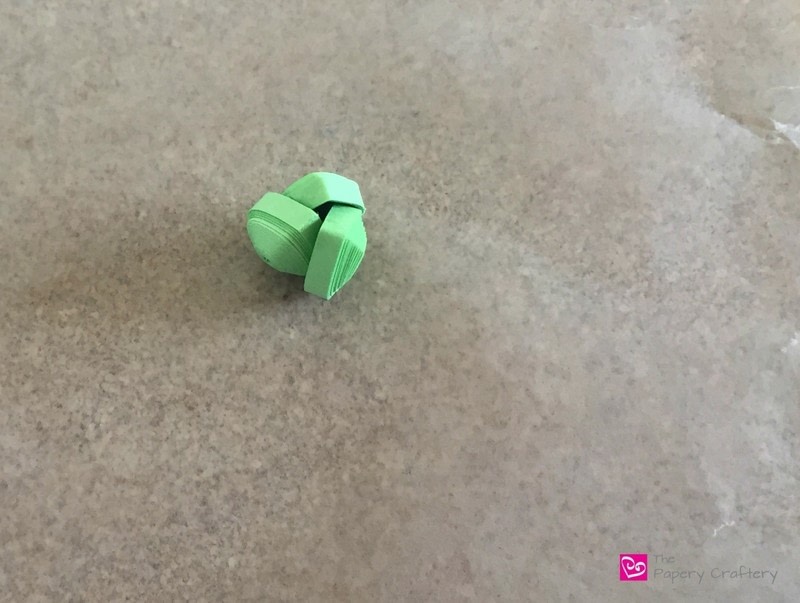
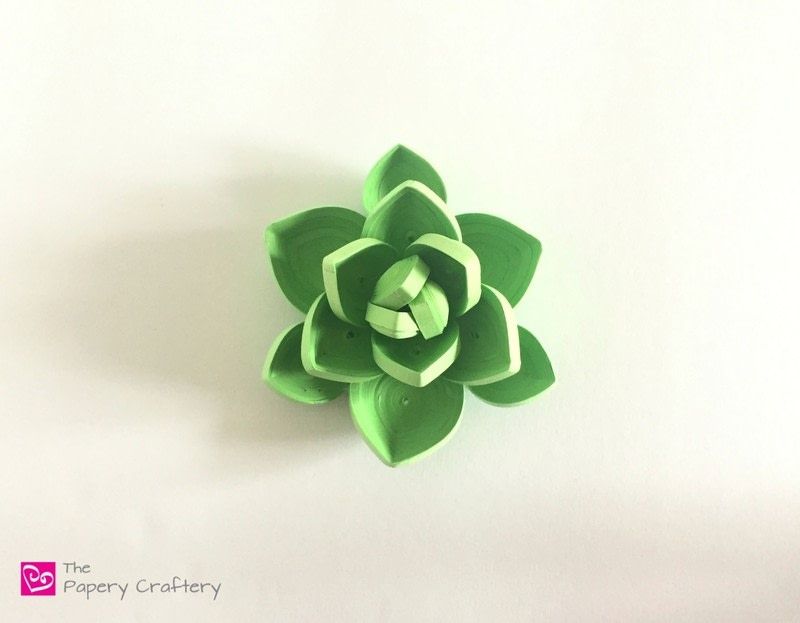
These succulents are created by 5 layers of increasingly larger leaves.
Starting with the smallest leaves, roll a tight coil made from 34″ of quilling paper in the color of your choosing.
Gently push the middle out of the coil to form a small dome.
-
 Step 2
Pinch one side gently, making sure not to lose the domed shape.
Apply a little white glue to the inside of each coil with a small paintbrush.
Repeat these steps to make 3 domed teardrops of the same size.
Once the glue is dry, the teardrop will be strong enough to start forming the succulent.
Glue them together in a way that shingles them around each other.
-
 Step 3
While the center is drying, start rolling the rest of the leaves.
Like I mentioned above, each layer will be made of 3 leaves, each layer larger than the last.Here’s the breakdown of the leaf sizes:
Second layer: 51″ each (or 3 strips of 17″ paper)
Third layer: 85″ each (or 5 strips of 17″ paper)
Fourth layer: 119″ each (or 7 strips of 17″ paper)
The fifth layer is slightly different.In order to avoid a triangular succulent, I added three smaller leaves at the end.
They were each 68″ (or 4 strips of 17″ paper).
-
 Step 4
Now you’re ready to finish your quilling paper succulent!
Glue the next layer of leaves to the center.In order to keep the succulent with a natural, open shape, try to keep the glue towards the bottom of each leaf, and line each one up so the center of the leaf is where the two in the layer before it meets.
Because each leaf is only glued on the bottom, you’ll want a glue that dries quickly so you don’t have to hold each one for a long time.
I used a pen or two to keep the leaves balanced in place as they dried completely.
Continue adding the third and fourth layer of leaves in the same way.
The last smaller layer of leaves will be glued in the space between the largest ones.
This will help the succulent look more finished and more rounded.