


About
From Disney's Club Penguin comes a crochet version of the adorable pet puffles
From Disney's Club Penguin come these fun-loving, adorable little pets! They are a bit lopsided and in need of a flat surface so starting at the bottom of the puffle is a small rectangle base. The amigurumi rounds after that are irregular at times. Just be sure to count and you'll have this cute, little 3" puffle in your hands in no time!
Tags
-
 Key West Witch favorited Puffles: Crochet!
07 May 15:03
Key West Witch favorited Puffles: Crochet!
07 May 15:03
-
 debbie.holmes.568 added Puffles: Crochet! to cro patterns
24 Jun 22:38
debbie.holmes.568 added Puffles: Crochet! to cro patterns
24 Jun 22:38
-
 jaco.pieterse.14 favorited Puffles: Crochet!
11 Nov 14:01
jaco.pieterse.14 favorited Puffles: Crochet!
11 Nov 14:01
-
 Mrs_Sullivan10 favorited Puffles: Crochet!
26 Oct 14:58
Mrs_Sullivan10 favorited Puffles: Crochet!
26 Oct 14:58
-
 abbi.thornton.31 favorited Puffles: Crochet!
07 Aug 23:05
abbi.thornton.31 favorited Puffles: Crochet!
07 Aug 23:05
-
Step 1
PUFFLE BODY (use Main Color)
**note for rows 1-3: After you chain 1, turn the row and sc in the second chain from the hook**
Ch 7
Row 1: sc 6, ch 1
Row 2: sc 6, ch 1
Row 3: sc 6, ch 1
Row 4: sc 6 -
 Step 2
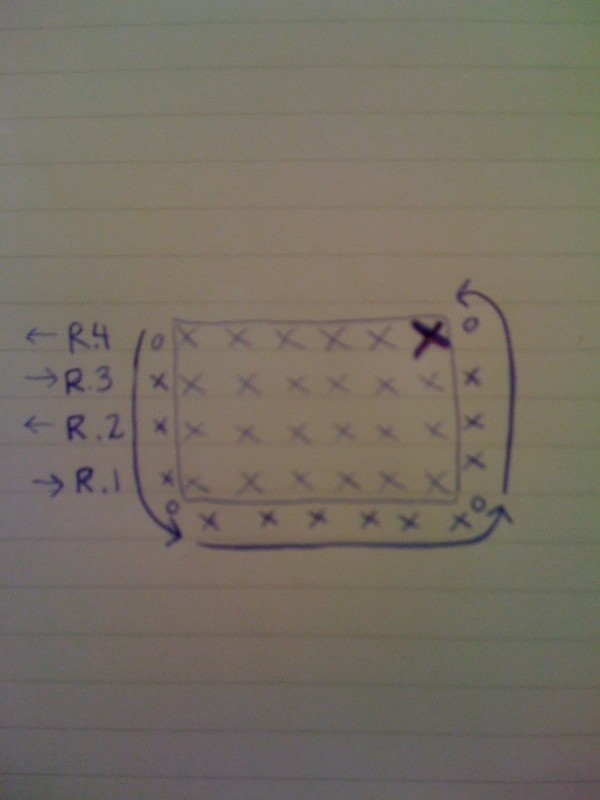
Begin working in the round on short side of rectangle as shown in illustration.
Key for Illustration:
o = ch 1
x = 1 sc
follow arrows around 3 sides of the rectangleWritten explanation for Illustration:
1st short side: ch 1, sc 3, ch 1
1st long side: sc 6 (on back stitches of foundation chain)
2nd short side: ch 1, sc 3, ch 1Continue working in the round (total number stitches per round found in parenthesis):
Rnd 1: *sc 1, 2 sc in next st* 11 times (33)
Rnd 2: sc 33
Rnd 3: sc 33
Rnd 4: sc 33
Rnd 5: sc 33
Rnd 6: sc 33
Rnd 7: sc 33
Rnd 8: *sc 1, invdec* 11 times (22)
Rnd 9: *sc 2, invdec* 6 times, sc 2 (17)
Rnd 10: *sc 2, invdec* 4 times, sc 1 (13)
***Put weights in bottom and begin stuffing firmly. Continue stuffing as you go.***
Rnd 11: sc 13, sc 1 or 2 more (to make the platform parallel with the rectangle bottom)
Rnd 12: sl st together to form a platform for the hair to attach to as shown by illustration 2
F.O. and weave in endsThis brings us back to the first stitch of Row 4 (the BOLD X in illustration ).
-
 Step 3
Illustration shows how you sl st 2 tog with 13, 3 tog with 12, etc. to make the "Platform"
-
Step 4
HAIR (using furry yarn):
This part is very much free form. Attach fur string onto the platform and here's what I did:
loose dc
1 sc three or four rows down away from platform (down the "scalp")
loose dc
1 sc back on platform
loose dc
1 sc three or four rows down away from platform (down the "scalp")
loose dc
1 sc back on platform
Repeat around circumference of head and when you are satisfied with the amount of hair
F.O. and weave in ends -
Step 5
Change to back to Main Color:
Attach to one side of platform
ch 6, attach on platform
ch 6, attach on platform **do this a total of 4 times around the front and 5 times around the back, connecting the first and last stitches with a sl st**
Because it's worsted weight yarn, you can make it stand up in little arcs around puffle's head. This creates the cartoon feel of puffle's hair, almost like it's the outline for the fancy fur to fill in. -
Step 6
EYES (make 2, in white)
Magic Circle (5)
Round 1: 2 sc in next st around (10)
F.O. and weave in ends
To finish eyes:
Using embroidery needle & thread, satin stitch the pupils in desired color
Pin eyes in place, overlap slightly making sure not to make them perfectly round
Using yarn needle sew on with white yarn
Outline the OUTSIDE ONLY of eyes in black yarnUsing yarn needle sew on other details in black yarn (mouth, optional eyebrows, etc)
Each Puffle has it's own personality and expression so have fun making yours unique! -
 Step 7
ALTERNATE IDEAS FOR HAIR / DARK COLORS
I wanted to note that when I made black puffles there was the extra challenge of how or if to highlight the eyes and mouth. Black puffle is known for being the "strong, silent type" and is shown wearing a sneaky smile on his face and squinty eyes. I decided to outline the eyes by making a foundation chain long enough to circle the eyes after I'd pinned them in place. I then sewed the chain onto the eyes and puffle body at the same time. The goal was to make the eyes a bit smaller. As you can see one turned out more "squinty" than the other). Even though it's black on black it still gives some definition and texture to the eyes in person. I chose white for the boys mouths and pink for eyelashes and mouth on the girls. There was a request for a flower for her hair, too...cute right?
I didn't have any black fancy fur so I did latch hook style knots with short strips of yarn all across the platform and scalp. I didn't have the latch hook tool, but a crochet hook works well enough for this short project. The kids like that they can play with the hair and style it a bit :)


thank you for t he sharing as well;-D