About
Release your inner Chell by creating and donning this tank top!
For Halloween this year, I'm dressing up as Chell from Portal. Prices for the tank tops online are too steep for a stingy person like me ($20.99 on thinkgeek.com) and I don't trust online sizing anyway (not since I bought an adult small sweatshirt and got one the size of a house...). Thus, I decided to make my own. This tutorial will show you how to make your own Chell tank top for just a couple bucks.
Bonus: I'll show you a really neat way to transfer designs onto fabric without the hassle of stencils. ;)
-
 gloomy-smiles favorited Portal: Chell's Tank Top
13 Jul 20:50
gloomy-smiles favorited Portal: Chell's Tank Top
13 Jul 20:50
-
 Lea Bee favorited Portal: Chell's Tank Top
05 Dec 22:04
Lea Bee favorited Portal: Chell's Tank Top
05 Dec 22:04
-
 kiaravalentine favorited Portal: Chell's Tank Top
01 Oct 20:46
kiaravalentine favorited Portal: Chell's Tank Top
01 Oct 20:46
-
 Ellen R. favorited Portal: Chell's Tank Top
06 Aug 17:50
Ellen R. favorited Portal: Chell's Tank Top
06 Aug 17:50
-
 Ëdy F. favorited Portal: Chell's Tank Top
17 Nov 04:15
Ëdy F. favorited Portal: Chell's Tank Top
17 Nov 04:15
-
 Brielle J. favorited Portal: Chell's Tank Top
07 Aug 19:38
Brielle J. favorited Portal: Chell's Tank Top
07 Aug 19:38
-
 Conn entered her project Portal: Chell's Tank Top to Petits Pixels
03 Jul 05:48
Conn entered her project Portal: Chell's Tank Top to Petits Pixels
03 Jul 05:48
-
 Jenna C. added Portal: Chell's Tank Top to Clothes/Acessories
30 Jun 23:47
Jenna C. added Portal: Chell's Tank Top to Clothes/Acessories
30 Jun 23:47
-
 sew_some_buttons added Portal: Chell's Tank Top to Clothing
04 May 01:40
sew_some_buttons added Portal: Chell's Tank Top to Clothing
04 May 01:40
-
Emmy S. favorited Portal: Chell's Tank Top
14 Feb 20:06
-
 Step 1
Gather your ingredients.
The tank top only costed me $2.58 because I had a 40% off coupon for the store, and I already had all the supplies at home so this was a pretty cheap project for me. *fist pump* -
 Step 2
First, grab your sheet of thin paper and trace the Portal design onto it. The way I did this was by finding a picture of the design, zooming in to the size I wanted (about 8.75" horizontally), putting the paper onto the computer screen, and lightly tracing the design onto the paper. You could also print out the design and trace it onto your thin paper; up to you.
-
Step 3
Then place your tank top on a flat work surface and put the magazine, cardboard, or newspaper inside so that when you use your fabric marker or paint, the black won't seep through to the back of the tank top.
-
 Step 4
Take the thin paper with the design and position it so that the design is in the spot you want it to be on the tank top. It's a good idea to put on the tank top and make a little pencil mark at the bottom of where you want the Aperture logo to be. Once you're happy with the positioning, grab your sharpie and trace the pencil marks of your design. Press down hard enough that the ink goes through, but not too hard that the paper tears. Occasionally check that the sharpie ink gets through the paper and onto the tank top; you may need to go over sections twice. You don't need to make sure that every line is transferred to the tank top because you only need a rough sketch to give you an idea of where to color.
-
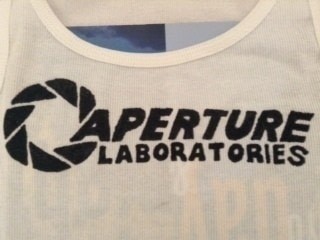
 Step 5
This is what your tracing should produce. Notice that you don't need to make sure that every line is transferred to the tank top because you only need a rough sketch to give you an idea of where to color.
-
 Step 6
Now that you have a rough outline of the design, it's time to color it in! Take your fabric marker or fabric paint and start filling in the outline that you transferred onto the tank top.
With fabric paint, what I suggest is to use the tip of the handle to outline the letters before using the brush to fill those outlines in. That way, the outline of the letters will be neater and straighter than possible with a brush. Then again, my brush skills are horrendous so maybe that's just me. *sheepish grin*
With fabric marker, I used pointillism (using dots to fill in the design). Trying to rub the marker on the tank top never works so I put dots where I wanted the black to be. Yes, it's time consuming, but do it during a movie (How I Met Your Mother reruns...) and it's not so bad at all. The result will be worth it! -
 Step 7
This isn't a problem for fabric paint users, but if you used fabric marker and a ribbed tank, the ribbing will have spots of white in your otherwise black design when you stretch the tank top. You need to go over the design one last time.
-
 Step 8
To do this, use two fingers to stretch out the fabric horizontally, revealing the white spots you should color in. Doing this step is worthwhile because otherwise, your body will stretch the ribbing and reveal the white parts.
-
 Step 9
Now your logo is done! Feel free to start an impromptu dance party. ;)
-
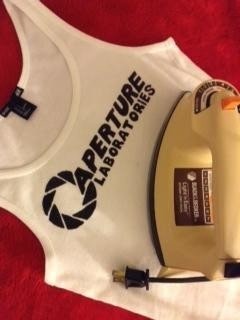
 Step 10
Again, this is not a problem for the folks who used fabric paint. Those people can flop on the bed like flying squirrels waiting for the paint to dry (check the details on your bottle of paint for how long to wait and when to wash the tank top) while fabric marker users like me deal with this step.
To make your lovely Aperture design permanent, you need to heat set it with an iron. There's also the option of throwing the tank top into the dryer , but check the instructions for your fabric marker before trying that. For the ironing, just run the iron over the back side of the design for a few minutes. Be sure to follow any directions that came with the marker before blindly doing that though (there are some heat requirements and timing instructions).
-
 Step 11
You're finally done! Put on your new Portal tank top and strut your stuff, basking in the glory of creating this with minimal moans from your wallet!
-
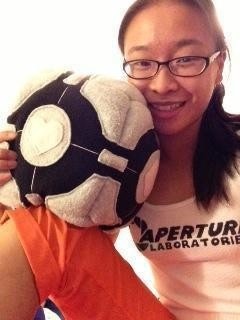
 Step 12
This is a picture of my complete Halloween costume. I couldn't find prison-orange pants so my lovely mother made me a pair from some orange fabric. I love how everything turned out though!