


About
Take your ironing anywhere!
Make a custom sized ironing board so you can take it to sewing classes or do projects in any room in the house. Simple to make with a few supplies.
-
 Inger Marie K. favorited Portable Ironing Board Tutorial
18 Mar 03:57
Inger Marie K. favorited Portable Ironing Board Tutorial
18 Mar 03:57
-
 emmilou p. commented on Portable Ironing Board Tutorial
24 May 11:41
emmilou p. commented on Portable Ironing Board Tutorial
24 May 11:41
-
 Amanda A. favorited Portable Ironing Board Tutorial
26 Oct 18:12
Amanda A. favorited Portable Ironing Board Tutorial
26 Oct 18:12
-
 heather r. added Portable Ironing Board Tutorial to To-make list
13 Oct 19:37
heather r. added Portable Ironing Board Tutorial to To-make list
13 Oct 19:37
-
 Steph. commented on Portable Ironing Board Tutorial
13 Oct 11:39
Steph. commented on Portable Ironing Board Tutorial
13 Oct 11:39
-
Steph. added Portable Ironing Board Tutorial to Boxes and Storage
13 Oct 11:38
-
Steph. favorited Portable Ironing Board Tutorial
13 Oct 11:37
-
Christine P. favorited Portable Ironing Board Tutorial
07 Oct 05:56
-
 Crafterella featured Portable Ironing Board Tutorial
02 Oct 09:43
Crafterella featured Portable Ironing Board Tutorial
02 Oct 09:43
-
Heidi D. favorited Portable Ironing Board Tutorial
28 Sep 13:32
You Will Need
-
 Step 1
Materials needed:
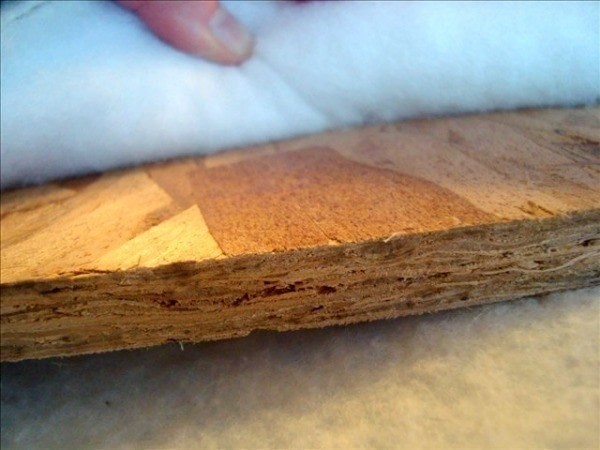
wood board 1/2 inch – 3/4 inch thick {not to thick or it will be heavy}
batting
muslin, duckcloth or canvas
staple gun or hammer and tacksFind a piece of scrap wood. You might want to hit a lumber store and get yourself one.
You definitly want something that is not treated, but it doesn’t have to be perfectly smooth- you will be covering it.
-
 Step 2
Cut it to the size you would like. Mine is cut 36″ X 36″ I wanted it to fit in the crossbars of my quilting machine. I use it every time I sew.
-
 Step 3
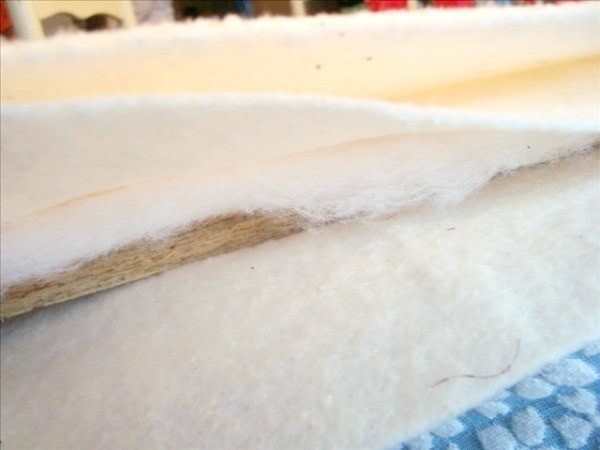
Wrap your batting. Taking the measurement of the board cut the same size out of your batting. If you would like you can wrap the sides a bit to help cushion those edges. You need this batting to be just a bit thick, so if it is thin– you might want to double it.
If it is wider than your board– just tuck it under. You will be pulling the fabric tight and this will help flatten it down a bit. If it bothers you– trim it so it wraps the sides. You can do a few staples here to keep it all in place if you need.
-
 Step 4
Wrap your fabric. Taking the measurement of the board cut the fabric that you have chose about 4 inches larger than board on 3 sides and double the length size on one side.
With your batting in place, put the fabric on the board and wrap that long tail around the board to the other side. Take the 3 other sides and fold over. {this is where a budy crafter is nice to have around}
Hold these sides down {tuck in the raw edges} and start stapling them into place. -
 Step 5
Staple a few in one side –go to the opposite side and staple a few there, pulling it a bit tight. Then do the other 2 sides the same way.
-
 Step 6
Those are the sides that are shorter….the long side you do last. This cover the whole backside and gets stapled at the other end and along the sides. Makes the back all pretty like.
-
 Step 7
I think my favorite part is the customability of them. Make them the size you really need. They are wider than a typical block and a typical ironing board too– so everything fits when you are ironing it!! I love that.


Comments


