About
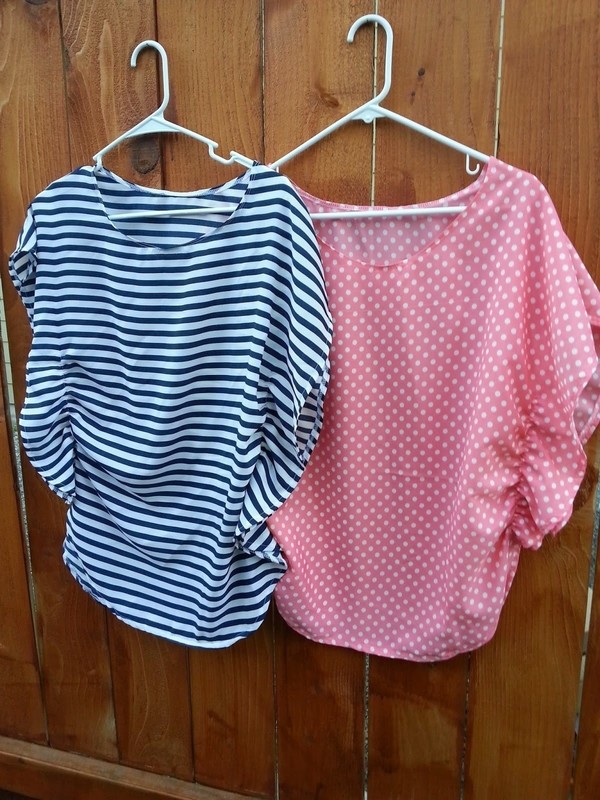
Easy and cute! Can be worn alone, layered with a long sleeve under or a cardigan and belt over.
I have 6 sisters and one brother. Don't pity him. A boy's favorite thing to do is tease, and he had (and has) all the teasing he could ever want. Anyway...
Two of my sisters have birthdays this month, so I decided to get back into sewing gear (I haven't done much during summer break), and make them something.
This idea for a poncho shirt has been swimming around in my brain for a while. I have a shirt from Charlotte Russe that is similar to these, but is not as long as I would like it to be. I looked at the basic construction of that shirt to come up with my plan for making these. They are easy and fast to make, and oh-so versatile. I could see them with a cardigan over or a long sleeve under in the fall and winter. Enjoy!
Downloads
- 104858_2F2014-10-12-233841-20140808_165951.jpg 1.67 MB [ Download ]
-
 witterings favorited Poncho Shirt Tutorial
14 May 03:29
witterings favorited Poncho Shirt Tutorial
14 May 03:29
-
 Lauretta C. added Poncho Shirt Tutorial to sewing
22 Apr 16:31
Lauretta C. added Poncho Shirt Tutorial to sewing
22 Apr 16:31
-
Lauretta C. favorited Poncho Shirt Tutorial
22 Apr 16:31
-
 Nancy P. favorited Poncho Shirt Tutorial
10 Mar 11:08
Nancy P. favorited Poncho Shirt Tutorial
10 Mar 11:08
-
 Orsolya K. favorited Poncho Shirt Tutorial
26 Aug 12:33
Orsolya K. favorited Poncho Shirt Tutorial
26 Aug 12:33
-
Leona F. favorited Poncho Shirt Tutorial
05 Aug 12:44
-
 Laurinda P. favorited Poncho Shirt Tutorial
02 May 00:42
Laurinda P. favorited Poncho Shirt Tutorial
02 May 00:42
-
 Lee S. favorited Poncho Shirt Tutorial
20 Apr 17:50
Lee S. favorited Poncho Shirt Tutorial
20 Apr 17:50
-
 Tasia Whitney favorited Poncho Shirt Tutorial
15 Apr 17:11
Tasia Whitney favorited Poncho Shirt Tutorial
15 Apr 17:11
-
Emma favorited Poncho Shirt Tutorial
12 Apr 21:36
-
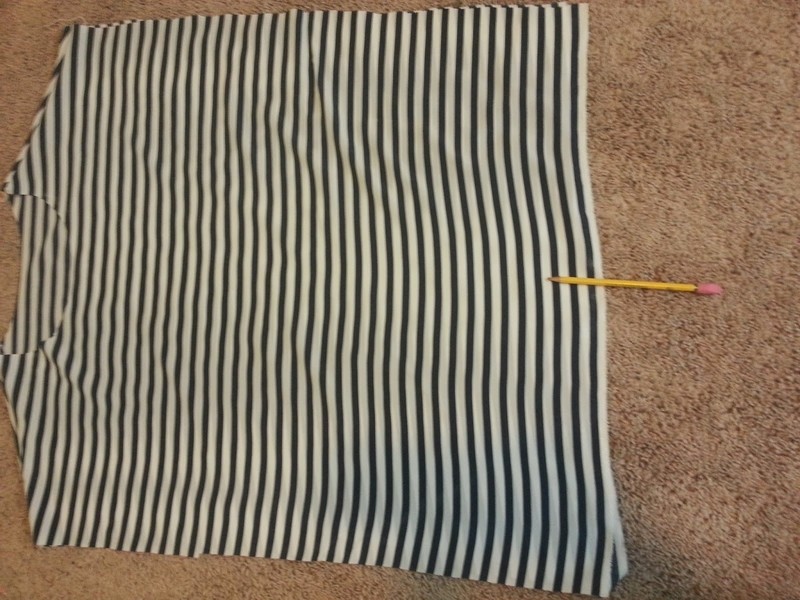
Step 1
Begin with a 27" x 60" piece of fabric. I used a chiffon. A knit would work well too. I would not use anything too heavy or stiff. You will also need coordinating thread, and elastic thread.
-
 Step 2
Fold the fabric in half so it is a 27" x 30" rectangle, with the fold at the top. Find the center of that top line and mark it with chalk. Draw out a front neckline as shown--about 8" in diameter (I know it's light--but it is there in white chalk, I promise!).
Draw the back neckline (not shown). This will dip only about 1/3 as low as the front line does. Both can be drawn on the top layer of the fabric. -
 Step 3
Use two rulers to draw out shoulder lines. Start at the ends of the neckline, and angle the rulers down as shown (about 2 inches at the widest part of the triangle above the rulers).
-
Step 4
Cut along the the shoulder lines through both layers of fabric.
-
 Step 5
Cut along the back neck line through both layers of fabric (it is the neck line that doesn't dip very low). Here I have already cut the back neck.
-
 Step 6
Cut ONLY THE TOP LAYER OF FABRIC across the front neckline. I cut mine halfway, then folded it across as shown and continued cutting, using the folded piece as a guide so it was sure to be symmetrical. This is what it will look like after this step.
-
 Step 7
Turn the fabric right sides together and pin the shoulders together. Stitch in place with a 1/4" seam allowance.
-
 Step 8
Once the shoulders are done, turn it right side out again. Find the middle of the base of the shirt and mark it. Carefully draw and cut a curved line from the base of the shirt to 1/3 of the way up the side. -
-
 Step 9
Here you see one side cut. Notice how I left some flat at the bottom so it doesn't come to a point.
-
 Step 10
Fold the half that you have cut over to the other side and use it as a guide to cut the other side. - See more at: http://somuchtomake.blogspot.com/2014/08/poncho-shirt-tutorial.html#sthash.0WbD5jeM.dpuf
-
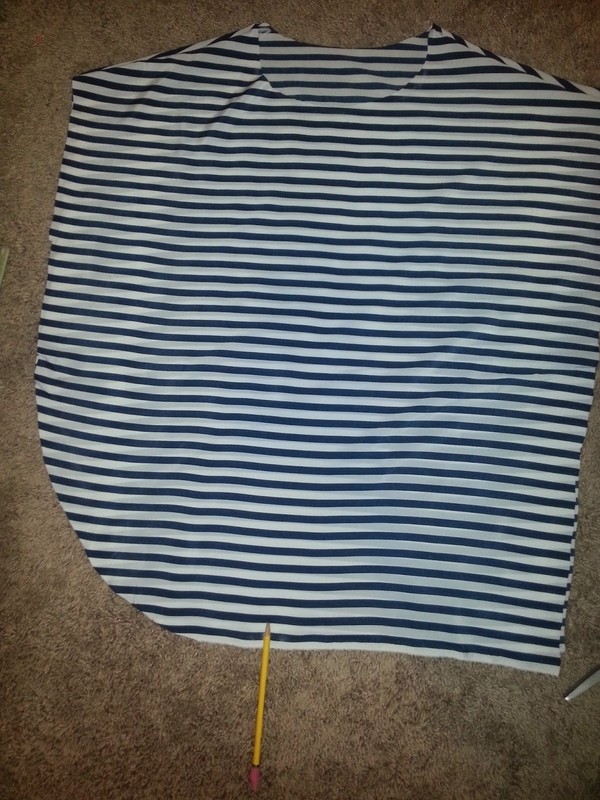
 Step 11
Here is what your shirt looks like completely unfolded at this point.
Press and hem all the way around this piece. Also press and hem around the neckline. I found that double stitching looked nice around the neckline. It helped it to lay nicely. -
 Step 12
Here it is all hemmed up. :) Almost done!
-
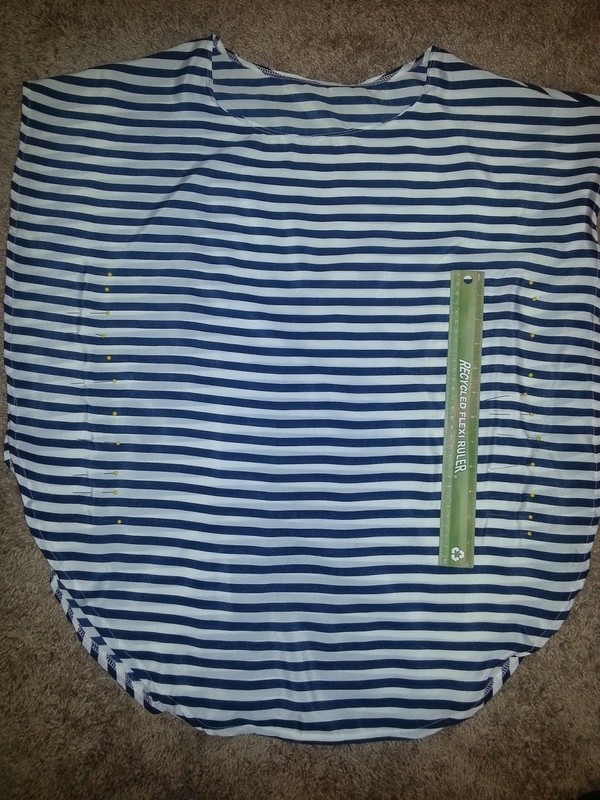
 Step 13
Measure 9" down and 3.5" in from each side of the shirt, and mark it with a pin.
-
 Step 14
Pin through both layers of the shirt going straight down 12 inches from the the first pin you placed. Your pinned shirt should look like this.
-
Step 15
Put elastic thread on the bobbin in your sewing machine. If you aren't familiar with elastic thread, it can be purchased in the thread section of the fabric store. You can put it on the bobbin the same way you do regular thread. The elastic is what gives this shirt the flowing, wavy sides. Use regular thread on top.
-
Step 16
Stitch along the pinned lines through both layers, tying off the stitch at the beginning and end with a back-stitch.
-
 Step 17
Iron (using coolest setting for fabric), along the elastic thread. This helps it draw up more to add a little more waviness.
You are done! Aren't they pretty?