Philippe The Whale Pillow
Extract from Little One-Yard Wonders • By Rebecca Yaker and Patricia Hoskins • Published by Storey

About
Little One Yard Wonders
A simple pillow-y toy that will dress up any kid’s room, Philippe loves being a reading pillow — especially if his favorite friend will read aloud to him sometimes!
Finished dimensions — 15" × 17" × 3"
Seam allowance — H" unless otherwise specified
Phillipe the Whale Pillow - designed by Emily Steffen. Photo by (c) Julie Toy, illustration by Missy Shepler
Tags
Downloads
- 103057_2F2014-07-07-153846-202_MissyShepler_PhillippeWhalePillow_LittleOYW.pdf-1.jpg 815 KB [ Download ]
- 103057_2F2014-07-07-161724-336_MissyShepler_WhalePattern_LittleOYW.jpg 2.11 MB [ Download ]
-
 alp.zoey added Philippe The Whale Pillow to Sewing plushies and more
18 Aug 06:03
alp.zoey added Philippe The Whale Pillow to Sewing plushies and more
18 Aug 06:03
-
 mmotse03 favorited Philippe The Whale Pillow
16 Aug 23:23
mmotse03 favorited Philippe The Whale Pillow
16 Aug 23:23
-
 Shenanigans favorited Philippe The Whale Pillow
13 Nov 08:08
Shenanigans favorited Philippe The Whale Pillow
13 Nov 08:08
-
 danaib1 favorited Philippe The Whale Pillow
12 Nov 05:16
danaib1 favorited Philippe The Whale Pillow
12 Nov 05:16
-
 PixieFey added Philippe The Whale Pillow to Around The Home
30 Sep 14:48
PixieFey added Philippe The Whale Pillow to Around The Home
30 Sep 14:48
-
 Hester A. favorited Philippe The Whale Pillow
27 Sep 08:26
Hester A. favorited Philippe The Whale Pillow
27 Sep 08:26
-
 Katie B. added Philippe The Whale Pillow to Projects to do
25 Sep 14:47
Katie B. added Philippe The Whale Pillow to Projects to do
25 Sep 14:47
-
 Storey Publishing published her project Philippe The Whale Pillow
07 Jul 15:23
Storey Publishing published her project Philippe The Whale Pillow
07 Jul 15:23
-
 Step 1
Measure, Mark, and Cut
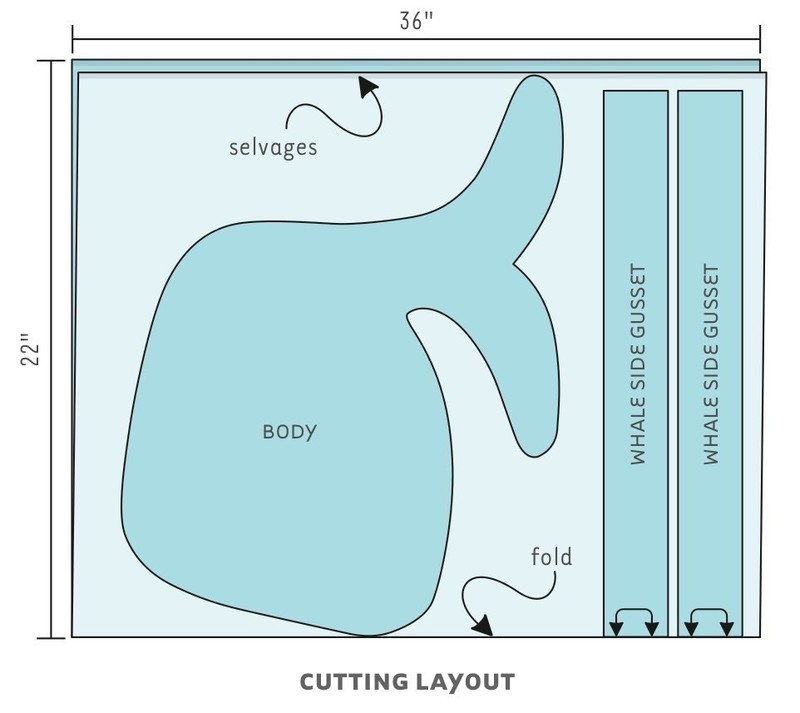
Fold your fabric in half lengthwise with the right sides together, aligning the selvages. Using the template as a guide, draw the body with a fabric marker or pencil, and cut:Body cut 2
Whale side gussets 2H" × 42" (cut 2)Out of contrast edging fabric, cut:
Edging strips 2" × 42" (cut 2) -
Step 2
Make the Appliqué
* Draw a heart motif onto the paper backing of
the fusible webbing. Apply fusible webbing
to the wrong side of the scrap embellishment fabric, following manufacturer’s instructions, and cut out the heart.
* Remove the paper backing and fuse the heart appliqué onto the body, using the photo as a guide. With embroidery floss and needle, use your favorite outline stitch to sew around the heart, about G" from the edge of the appliqué. -
Step 3
Make the Contrast Edging
Pin the two contrast edging strips with right sides together at one short end, and stitch to join. Press seam open. Press one short raw edge H" to wrong side. Fold the pieced edging in half lengthwise, wrong sides together, and press. -
Step 4
Make the Side Gusset
Pin the side gusset pieces with right sides together and stitch along one short edge. Press seam open. -
Step 5
Assemble the Whale Front
Pin the pieced side gusset strip to the front body with right sides together, sandwiching the edging in between the layers and aligning all raw edges. Stitch all around, starting and stopping 2" from the beginning and end of the side gusset pieces and edging. Trim any excess from the gusset and edg- ing pieces, allowing at least 1" overlap. Stitch the short ends of the side gusset piece together to join. Tuck the short raw edge of the edging into the folded end, and complete the stitching. -
Step 6
Finish the Whale
Pin the back body to the side piece with right sides together. Stitch all around, leaving a 4" opening for turning and stuffing. Clip and notch the seam allowances along all curved edges
and corners, taking care not to clip into the stitching. Turn the whale right side out, push- ing all corners out at the tail. Stuff to desired firmness and hand-sew the opening closed.