


About
Recycle an old CD into a nice new pendant necklace :)
I was at a university fair (where unis from all across the country came to give out prospectuses, offer advice on courses etc.) and I saw this CD on the front of a prospectus. I knew I wasn't going to be going to the uni, as they don't offer the course I want, but I still nabbed a copy of their prospectus anyway as it was calling out for me to do something crafty with it :P.
The result was this necklace, which was simple to make and used basic equipment and tools which I already had lying around at home.
-
 Patrick Mclaren commented on Pendant Necklace Using An Old Cd
04 Oct 08:30
Patrick Mclaren commented on Pendant Necklace Using An Old Cd
04 Oct 08:30
-
Patrick Mclaren favorited Pendant Necklace Using An Old Cd
04 Oct 08:29
-
Laura W. favorited Pendant Necklace Using An Old Cd
23 Aug 15:19
-
Marisol H. commented on Pendant Necklace Using An Old Cd
15 Jan 16:47
-
 Ajay I. favorited Pendant Necklace Using An Old Cd
11 Jan 10:29
Ajay I. favorited Pendant Necklace Using An Old Cd
11 Jan 10:29
-
 matthew t. favorited Pendant Necklace Using An Old Cd
12 Dec 04:08
matthew t. favorited Pendant Necklace Using An Old Cd
12 Dec 04:08
-
enzo f. favorited Pendant Necklace Using An Old Cd
06 Dec 16:16
-
 Nimble G. favorited Pendant Necklace Using An Old Cd
16 Nov 10:40
Nimble G. favorited Pendant Necklace Using An Old Cd
16 Nov 10:40
-
 Pammie favorited Pendant Necklace Using An Old Cd
04 Jun 18:41
Pammie favorited Pendant Necklace Using An Old Cd
04 Jun 18:41
-
 Maura B. favorited Pendant Necklace Using An Old Cd
19 Jul 06:58
Maura B. favorited Pendant Necklace Using An Old Cd
19 Jul 06:58
-
 Step 1
Stuff you'll need:
- a CD with a picture/pattern/design on it that you want to use as your pendant
- cord to hang the pendant on, at whatever length you want the pendant to hang at. I used approx. 45cm
- a jump ring
- a clasp. I used a lobster clasp
- 2 coil end fasteners
- a pencil
- a craft knife
- scissors
- paper (this can be scrap paper, as it will only be used to make a template)
- flat nose pliers
- a ruler
- a surface to cut on. Ideally a craft mat, but I don't know where mine's gone :S so I used a piece of board to cover my desk and protect it from scratches
-
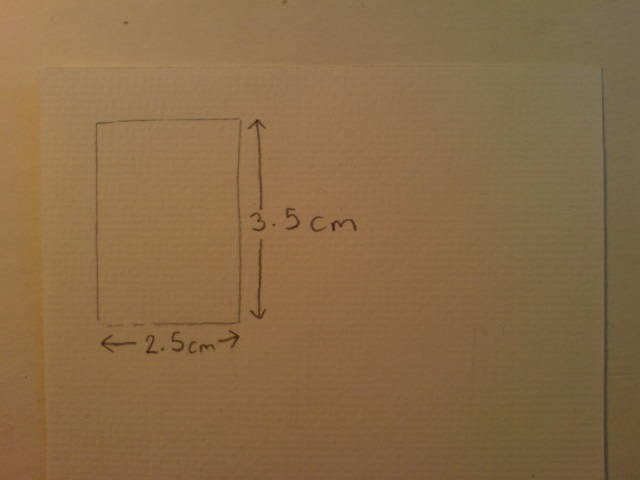
 Step 2
Decide on the size you want your pendant to be.
I chose 3.5cm by 2.5cm.Draw this out on the paper.
-
 Step 3
Cut the shape out, so that you have a frame that will act as your template.
-
 Step 4
Lay the template on the CD, and position it until the part of the CD that you want to use as your pendant is in the frame.
Once you have positioned your template, draw round it onto the CD using a pencil (don't use pen in case you change your mind, pen will dent the CD and you'll be left with marks you can't get rid of!).
-
 Step 5
Cut out your pendant.
You could use a craft knife, but it doesn't give a neat finish and takes ages (as I found out when I was testing this idea)!
Instead, use scissors; CDs are surprisingly easy to cut. I've got a special set of scissors I use to cut thicker and harder craft materials, don't use scissors you're likely to use on fabric or thread as the CD will blunt them.
I neatened the edges of my pendant up with a bit of black nail varnish, as I didn't want the clear plastic edges I was left with.
-
 Step 6
Make a hole to use to hang your pendant.
I usd a craft knife to make the hole in mine, as I found it gave me good control over the size of the hole. To do this, place the point of the knife where you want the hole to be, and keep twisting it round until it goes through the CD and until you have a hole of the right width. Be careful of your fingers though! :P
You could also use a very fine drill.Once you've made the hole, attach a jump ring.
-
 Step 7
Now to prepare the cord.
Place the end of the cord into your coil end fastener, and use pliers to squeeze the bottom few coils closed around the cord.
Do this evenly around all the sides of your coil, otherwise it will be more squished in some places and less in others, and you want to tighten it evenly.
Continue until your cord is held tightly in place by the coil.Only do this on one end at first, otherwise you won't be able to attach your pendant.
-
 Step 8
To attach the clasp, twist open the loop on the top of your second coil end fastener.
I'm not sure how clearly it'll show up in the photo, so I'll have a go at explaining the technique...
Hold the coil between your fingers, and hold your pliers in the other hand. Grasp the loop in your pliers, and twist sideways far enough for you to be able to slip the clasp on. To close the loop, twist the loop back the other way.Thread your pendant onto the cord, and attach the coil to the cord the same way you did in the previous step.
-
 Step 9
Et voila! The finished necklace :)


Comments


