About
Beautiful fun rainbow butterfly!
This fun rainbow butterfly can be used as a pendant, earrings, on greeting cards, in frame designs, and much more!
Tags
-
 Cheryl S. added Paper Quilled Rainbow Butterfly to Paper Crafts
20 Dec 04:40
Cheryl S. added Paper Quilled Rainbow Butterfly to Paper Crafts
20 Dec 04:40
-
 Blueneasydj B. favorited Paper Quilled Rainbow Butterfly
06 Apr 23:46
Blueneasydj B. favorited Paper Quilled Rainbow Butterfly
06 Apr 23:46
-
 charice favorited Paper Quilled Rainbow Butterfly
04 Feb 16:54
charice favorited Paper Quilled Rainbow Butterfly
04 Feb 16:54
-
 HoneysQuilling published her project Paper Quilled Rainbow Butterfly
28 Jan 09:00
HoneysQuilling published her project Paper Quilled Rainbow Butterfly
28 Jan 09:00
You Will Need
-
 Step 1
The paper strips I use for this butterfly are 1/8" wide. You can use any width that you'd like. Here are all the strips you need for the butterfly wings. Glue one orange strip to one red strip. Repeat with the other orange and red. Glue a purple, blue, green, and yellow strip together, and repeat with the others. So you'll up with four longer strips of paper. Two are orange and red, and two are purple/blue/green/yellow.
-
 Step 2
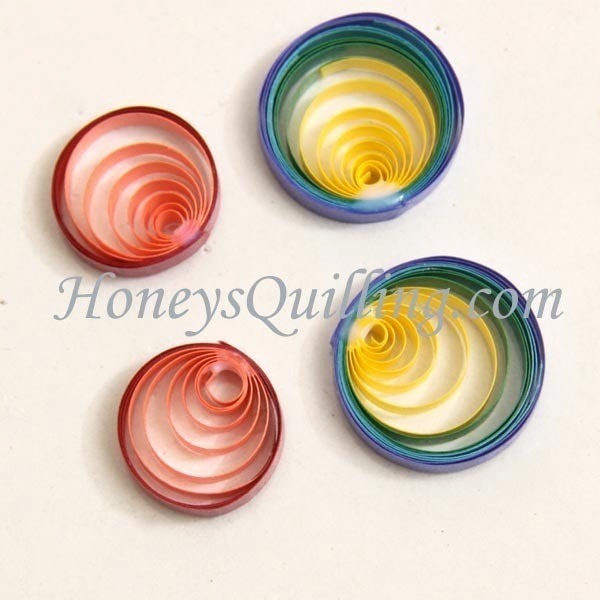
Use your slotted quilling tool (or a toothpick) to roll the strips. Put them in a circle guide to make sure they are the same size. If you don't have a quilling circle guide you can use any ruler from the stationary store that has circle stencil holes in it. Just place it on top of a cork or styrofoam board. I use a 3/4" (2cm) diameter hole for the larger purple/blue/green/yellow wings. I use a 5/8" (1.5cm) diameter hole for the smaller red/orange wings. Use a pin to push the middle of your roll to one edge, creating an eccentric circle shape. Use a toothpick to place a dab of glue as shown. This creates the unique look of the butterfly wings. Let this glue dry completely before going to the next step.
-
 Step 3
Once the glue is dry, remove the circles from the board. Turn the circles over and dab on a little glue right next to where the "center" of the circle is. This makes it more sturdy. Let it dry completely.
-
 Step 4
While the wings are drying, work on the body. Fold the 3" strip of paper in half and glue the bottom part (about 3/4") together. Spread out the top antennae parts.
-
 Step 5
Time to pinch the shapes into wings! Hold the more open part of the circle in one hand while using the other hand to pinch the other side tightly. Do it slowly and carefully so that it doesn't separate. If you do it quickly you can break the glue and the wing will not look as nice. Get as tight of a point as you can.
-
 Step 6
Glue the wings to the body. I put the bottoms wings on first, dabbing glue just on one side of the wing. I put glue on both sides of the top wings so they stick to the bottom wing and the body. After all four wings are on properly, dab some glue over the top of them all as shown, to make sure everything is glued securely.
-
 Step 7
Now choose what you want to make with your butterflies! You can also choose how to design the antennae. You can simply trim them and keep them straight, or you can use your toothpick or quilling tool to curl them up. If you want them to be earrings or a pendant, you need to add on a little tight roll made of a 1 1/2 inch strip of black paper so the jump rings can hang on them.
If you are using them for jewelry you will also need to use a sealant to make them water resistant. There are many products that will work for this, check out my blog for lots of details on them. One that you can use is diamond glaze. Thin it with a tiny bit of water and use a small paintbrush to brush a thin layer on one side of the butterfly. Let it dry completely and repeat on the other side. Do this again on both sides and then a final treatment in all the cracks will finish it up!