


About
Sew an adorable panda.
Is it the perpetual munching of bamboo that gives this miniature panda his spaced-out expression? Or is he simply a bit myopic? Whichever it is, he's still clasping a stalk of greenery firmly in his paw, and the wry twist to his mouth and surprised blush suggest that his snack has been interrupted for only a minute or two.
Tags
-
 Amber R. favorited Panda Plushie
25 May 11:02
Amber R. favorited Panda Plushie
25 May 11:02
-
 samallamaa favorited Panda Plushie
07 Dec 10:25
samallamaa favorited Panda Plushie
07 Dec 10:25
-
 Tierra T. favorited Panda Plushie
26 Oct 19:12
Tierra T. favorited Panda Plushie
26 Oct 19:12
-
 Lucie G. favorited Panda Plushie
04 Oct 18:37
Lucie G. favorited Panda Plushie
04 Oct 18:37
-
chelsea g. favorited Panda Plushie
27 Aug 06:20
-
 artpanda18 favorited Panda Plushie
20 Aug 15:47
artpanda18 favorited Panda Plushie
20 Aug 15:47
-
 Artemi S. favorited Panda Plushie
29 Jul 04:45
Artemi S. favorited Panda Plushie
29 Jul 04:45
-
 mmotse03 favorited Panda Plushie
18 Jul 18:32
mmotse03 favorited Panda Plushie
18 Jul 18:32
-
Emily M. favorited Panda Plushie
09 May 13:19
-
 Abd E. commented on Panda Plushie
14 Mar 19:02
Abd E. commented on Panda Plushie
14 Mar 19:02
-
 Step 1
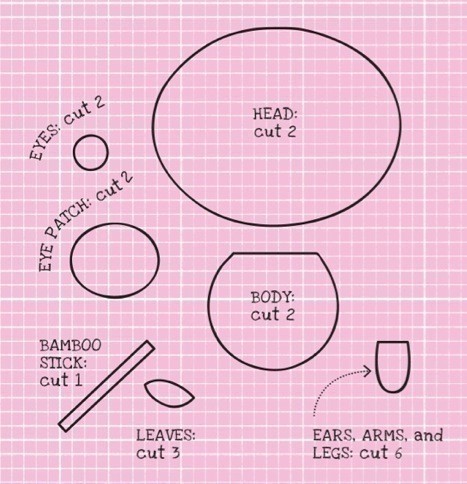
Trace off the pattern pieces onto tracing paper, and cut out to make templates. Cut out 2 pieces each for the body, head, arms and eyes from white felt; 2 pieces for the eye patches and 2 identical pieces for the arms, legs, and ears from the black felt; 1 piece for the bamboo stem for the brown felt, and 4 little leaves from the green. Take 1 of the head pieces and use a little craft glue to stick the black eye patches in position, checking against the photograph to position them correctly. Stick a white eye near the top of the eye patch.
-
 Step 2
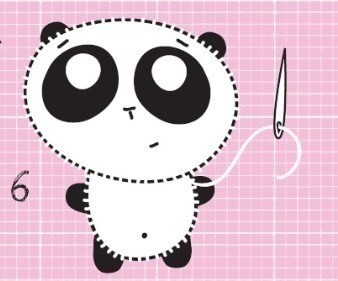
Thread an embroidery needle with 2 strands of black floss, and embroider the nose, mouth, and brows on the face. The nose is made with 2 tiny stitches, 1 horizontal and 1 vertical, making a "T" shape; the brows are 1 small, angled straight stitch each, and the mouth is another single stitch, but places off-center and at a slight angle to give the Panda his quizzical expression.
-
 Step 3
Take 2 of the identical black felt pieces, and a little craft glue to stick Panda's ears on the wrong side of the embroidered face. Thread an embroidery needle with 1 strand of white embroidery floss, align the head pieces with one another, and sew together using a small neat overstitch. Leave a gap at the bottom of the head (don't fasten off the thread), and fill it with a tiny amount of toy stuffing, using a toothpick or a matchstick to get the padding even. Don't overfill; it should be lightly padded, not stuffed. When the padding is evenly distributed, stitch the gap shut.
-
 Step 4
Use a small amount of craft glue to stick the remaining 4 identical black felt pieces onto the back of one of the body pieces for the arms and legs, referring to the photograph to position them correctly.
-
 Step 5
Make a belly button by sewing a French knot low on the second body piece, using 2 strands of black embroidery floss and an embroidery needle.
-
 Step 6
Align the 2 body pieces together with right sides facing out. Thread an embroidery needle with 1 strand of white embroidery floss, and use a small overstitch to sew the body pieces together. Leave the top open, fill with a small quantity of toy stuffing, distributing it evenly, then sew shut. Position the head so it overlaps the body and, using 1 strand of white embroidery floss, sew the body and head together, stitching through all 4 layers of felt. Place the new stitches over the earlier overstitching for a neat finish.
-
 Step 7
Use a little craft glue to stick the leaves onto the stem of bamboo, then glue the bamboo in place on Panda's body, so it looks as though he is holding it in his paw.
-
 Step 8
Finally, use the red pencil to add a touch of color to Panda's cheeks.


Versions

Posted by
rachel.

Posted by
PocketfullOfSunshine

Posted by
Louise C.


i wonder if ironing the felt will work instead of gluing it.??!
Cuteness overdose! <33