


About
planter, pallet, wood, woodworking,
When I've seen these pallets alone in the DIY store, I decided to create something with them. I often see beautiful projects using pallets on pinterest... so I took the pallets and start to create a planter for my garden.
Tags
-
 Sandi G. favorited Pallet Planter
10 Jan 07:14
Sandi G. favorited Pallet Planter
10 Jan 07:14
-
 Bek S. favorited Pallet Planter
02 Aug 11:05
Bek S. favorited Pallet Planter
02 Aug 11:05
-
 imfletchersmom@gmail.com favorited Pallet Planter
01 Jun 08:48
imfletchersmom@gmail.com favorited Pallet Planter
01 Jun 08:48
-
 Harmonee.seal added Pallet Planter to Gardening Fun
18 Feb 17:26
Harmonee.seal added Pallet Planter to Gardening Fun
18 Feb 17:26
-
Harmonee.seal favorited Pallet Planter
18 Feb 17:26
-
 Michelle R. favorited Pallet Planter
31 Jan 22:55
Michelle R. favorited Pallet Planter
31 Jan 22:55
-
Harmonee.seal added Pallet Planter to Want to Make
28 Jan 17:20
-
Jeanne B. commented on Pallet Planter
03 Sep 05:08
-
Mark M. favorited Pallet Planter
03 Jun 11:54
-
 avasko favorited Pallet Planter
20 Mar 04:18
avasko favorited Pallet Planter
20 Mar 04:18
-
Step 1
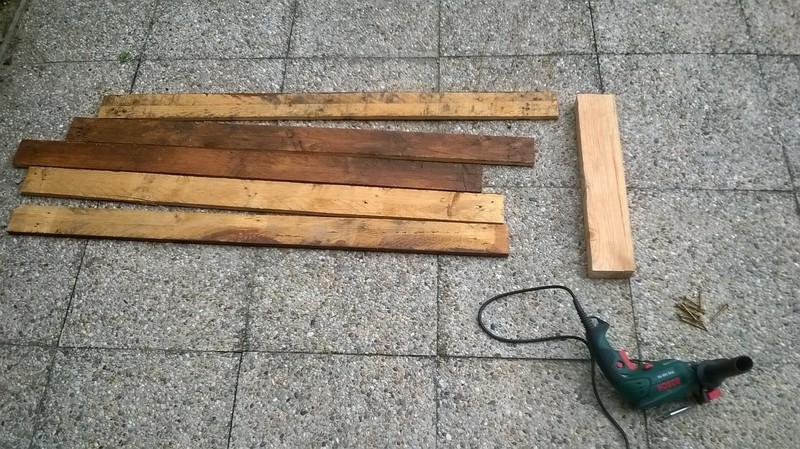
You will need two or three pallets ( it depend on if you want a bottom at your planter) . I found mine in a DIY store, the seller allowed me to take them for free.
First step : you have to dismantle the pallets, it's a bit tricky to separate the planks.
You have to saw the nails of the pallets... To do it, you can help yourself of a flat screw which you put between the planks with a hammer, this way you can separate the planks enought to insert your saw. You must have 15 planks, and 4 other planks (a bit wider)that you will use to build the leg of the planterI'm sorry, I have no photo for this step...
-
 Step 2
Step two :
Your planks are ready. Almost. To avoid the wood to decay, you can paint the planks with woodstain.
For this planter I used 5 planks for the long side, and 5 half-planks for the wide side.Prepare your drill, we use it at the next step ;)
-
 Step 3
Take
one of the planks to build the panel of the planter, one of the planks to build the leg, your drill and a drill bit , smaller than the diameter of your screws.Mine is 3mm and the screws are 5mm diameter.
-
 Step 4
Put the plank on the leg, and make two holes in the wood.
-
 Step 5
Take off the drill bit and take the screw driver.
-
 Step 6
Put your screws in the holes, and screw them.
Do the same at the other end of the planks, and do it for all the 5 planks of the side of your planter.
-
 Step 7
... A little picture of the work in progress...
Next step, we build the wide side of the planter.
-
 Step 8
Step 3 the side !
There is many way to do it, but it's exactly the same method as the one you used for the first panel
-
 Step 9
Build the two other panels...
-
 Step 10
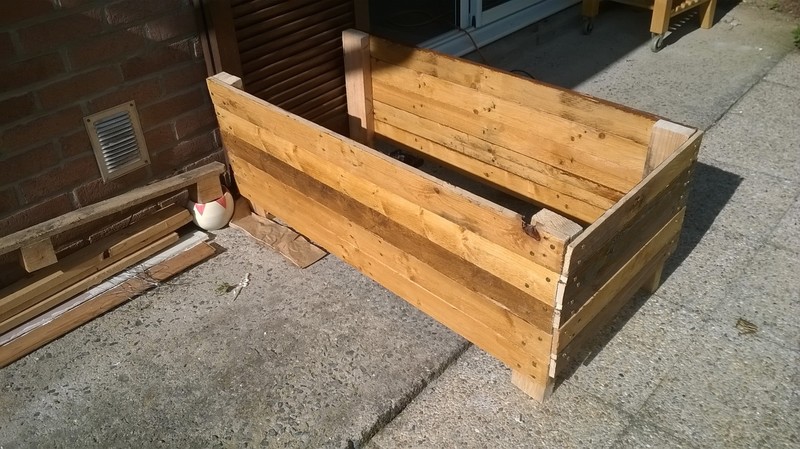
And here is the result.
Now ! we're going to build the bottom of the planter. If we don't, the dirt will fall every where...
-
 Step 11
Take a plank, saw it so it can be insert between the two legs of the planter.
Screw this plank to the lower plank of the side panel. I used 3 screw for this, one in the middle and one at each side.
Do the same at the opposite.
-
 Step 12
To build the bottom, saw 4 plank at the same length, and screw them to the support planks
-
 Step 13
You have to put a covering in the planter, i used a mulching film in which i made some tiny holes, so the water could pass through.
I've fixed the film with tacks ^^
-
 Step 14
Your planter is now finished, you can fill it with dirt and plant everything you want .


Comments

