https://www.cutoutandkeep.net/projects/origami-money-flower-how-to • Posted by Abi L.
This is my version and elaboration of this http://www.youtube.com/watch?v=_tAKFUkRaDw tutorial by Lisa Shea from lisashea.com Subscribe to her Youtube channel for more origami money tutorials. Steps 1-18 Flower Steps beyond 18 are the elaborations.
This is my version and elaboration of this http://www.youtube.com/watch?v=_tAKFUkRaDw tutorial by Lisa Shea from lisashea.com Subscribe to her Youtube channel for more origami money tutorials. Steps 1-18 Flower Steps beyond 18 are the elaborations.

The basics are 3 dollar bills or currency of your choice and some wire. Currency of a different country might be helpful if the receiver is going abroad or is a little homesick. :) The different colored currency is excellent for different outcomes of the flower.

(If you clicked on the link in the description, you already know the entire flower assembly. You can skip to step 19 for the elaborations.) Take one dollar and fold it in half. You may fold it so the backs are together as well.

Lay it back down and fold one side in half again.

Do it to both sides.

Now, fold the top down and crease. This will be the guide for the next step.

Take one edge and bring it to the center, aligning it to the center crease.

Repeat on all edges.

Take the bottom and fold it in half.

Align edge with the center and crease.

Repeat on other side.

Take the entire flower and fold it in half.

Repeat to the other two dollars.

Align the folds.

I've taken a twist tie from a bag of bread and used it here. Half your tie or wire over all the bills.

TWIST!!!

This step is optional but can help loads. Flatten the bills against the wire. The tie I used here was a little square, but the center had a rounded wire.

You can used a pencil, bone folder, or fingernail to help flatten the inner corners of the bill petals.

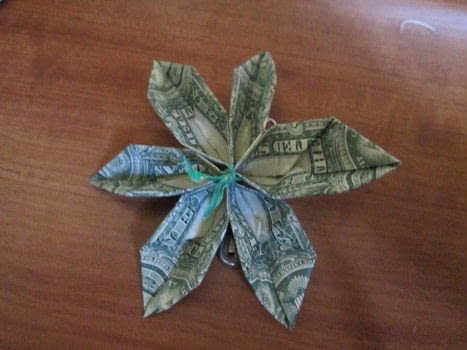
Voila! The flower itself is complete. The steps beyond this point are my elaborations. Add rhinestones, beads, or Swarovski crystals to the ends of the wire to create an elegant effect.

Adding a safety pin: take the sharp end above the wire and through the middle fold of the dollars.

Flip the pin around so the side with the lock is closest to the flower. This will make pinning easier. Uses: adornment for graduation gifts, dollar dances, cards. Attach it to stuffed animals as an additional gift.

Using different mediums other than wire: wire is easier to work with, in my opinion, but anything that will not be bulky or damaging to the bills will work. I used hemp cord here. You can add some crochet or sewing embellishments here as well.

Embellishments to the wire: add buttons, plastic beads, rhinestones, smaller origami. Add colors according: school, wedding, favorite, meaningful, any color. Here I will be showing you how to add a button.

Add one wire at a time. Push both sides through two different holes. Slide the button all the way down.

What a twist!

And there you have it. You can "sew" the button in, meaning, tucking in the wires as you would have sewn an actual button for a + in the center. The "sewn" look can keep the wires back and out of the way.

Here's a variation on the button.

Adding a tail: I pulled a piece of hemp cord through the side of the bills. I double knotted the end and left the long piece for my decorations.

Tail: This can be used with wire to create rays of beads, buttons, rhinestones, etc. Cord, string, yarn, thread: all can be used as adornments to the flower. I would suggest using some crocheting techniques to add a bit of texture. I used hemp cord here to make it look like a flower stem with leaves.

I added a tiny paper version of the money flower to my tail. The same steps apply.

Tail with coins of your choice and paper flower.

The look of varying bills and twisting the wire. I used two 1 dollar bills and one 5 dollar bill. Make a wreath out of these for the holidays or for graduations and ceremonies.

Adding lucky stars to the tail: start off making a "pink ribbon" fold. Star paper can be found at Japanese stores or any Asian store. You can use regular copy paper for this too.

Take that little end piece on the left and tuck it into the ribbon...

Like so.

The back should look like this. Crease the paper. If not, you'll end up with a wonky star. Wonky stars may also be due to the strength of the paper you're using and how many times you've tried making it on the same paper.

Take the tail and slip it through one side of the ribbon fold. Place the star paper where you want it to end up.

Then wrap the long piece of the paper all the way over the hexagon. The edges of the hexagon should be meeting up with the edges of the paper. (Do not take it out of the tail. I forgot to take a picture of it on the tail.)

Once you have wrapped the paper and you've got this little bit, tuck it into the hexagon...

like...

so. Again, make sure you've kept it tight and creased.

Take one edge of the hexagon and pinch.

Repeat on all the edges of the hexagon. You, hexagon, have become a star!

Now add any of the embellishments you've learned from this tutorial to your tail. Add 3 stars for good luck or some money!

A variation of the tail, now tied behind the flower. Now this is where your creativity come into play. Post your versions of these flowers and let us see what can be made from the basic 3 bill flower design. Add live flowers to them! Make a bouquet! Prom corsage! MAKE IT! DO IT! :)