


About
A teeny plush treat withy all the sweet but none of the calories
This little plush creation is based on a New York style cheesecake toped with cherries.
The project takes a little basic sewing knowledge.
You'll use the whip-stitch for the entire piece.
The time taken to complete will obviously vary
Note: This is my first ever Tutorial so please forgive me if I over or under explain anything ^__^
-
 banu added New York Cheesecake to Inspiring Felt Ideas to Try
30 Mar 08:11
banu added New York Cheesecake to Inspiring Felt Ideas to Try
30 Mar 08:11
-
banu favorited New York Cheesecake
30 Mar 08:11
-
 Sandy D. favorited New York Cheesecake
25 Jan 21:14
Sandy D. favorited New York Cheesecake
25 Jan 21:14
-
 Timber H. added New York Cheesecake to Felt
28 Jul 12:14
Timber H. added New York Cheesecake to Felt
28 Jul 12:14
-
Kaiulani W. favorited New York Cheesecake
10 Jul 01:50
-
 Jolanda favorited New York Cheesecake
05 Apr 23:03
Jolanda favorited New York Cheesecake
05 Apr 23:03
-
 Ana.Loli favorited New York Cheesecake
30 Mar 07:32
Ana.Loli favorited New York Cheesecake
30 Mar 07:32
-
 HylianWriter534 favorited New York Cheesecake
21 Feb 18:39
HylianWriter534 favorited New York Cheesecake
21 Feb 18:39
-
 Jalan C. favorited New York Cheesecake
14 Aug 05:12
Jalan C. favorited New York Cheesecake
14 Aug 05:12
-
 Youghurt Jaja favorited New York Cheesecake
08 Aug 00:29
Youghurt Jaja favorited New York Cheesecake
08 Aug 00:29
-
 Step 1
You'll need the following materials:
- Felt: Beige, Brown, Light Brown, a small amount of red
(Note: if you can not find a light brown just use beige for the cake top instead)
- Embroidery Floss in Beige, Brown, and Red (You'll be using 3 strands of floss to sew unless otherwise noted)
- 5 1/4" red PomPoms (For cherries)
- An Embroidery Needle or any sharp needle with an eye big enough for floss
- Straight pins
- Small scissors
- Fabric glue (you may use hot glue if you prefer)
- Polyfill
- A Fabric marking pen (Optional but recommended) -
 Step 2
You will also need to print out a copy of this pattern.
Transfer the pattern to your felt (use either a fabric pen or straight pins to attach paper to fabric)
Cut out each piece accordingly
-
 Step 3
You will end up with these pieces:
- 1 Brown triangle(bottom/crust)
- 1 Lt brown triangle (top)
- 2 Long beige rectangles(sides)
- 1 Shorter beige rectangle(back)
- 2 Long brown strips(side crusts)
- 1 Shorter brown strip(back crust)
- 2 Red pieces(cherry juice) -
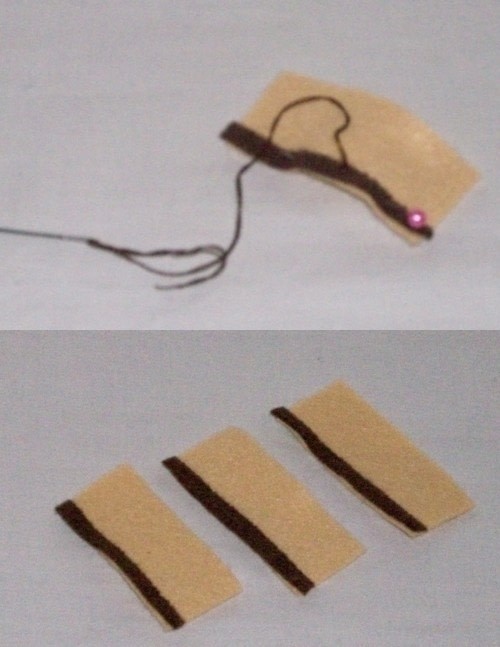
 Step 4
Use 2 strands of brown floss for this step
- Pin 1 long brown strip to the bottom edge of 1 side
- Whip-stitch top edge of crust to side as shown
- Repeat for other side and back (short strip to back)
- Leave bottom edge of crust as is -
 Step 5
Use 3 strands of beige floss for this step
- With 'wrong' side together, pin one side to the top of pie as shown and whip-stitch together
- Repeat for other side and back
Tip: Start from back edge of cake and work your way to the tip
-
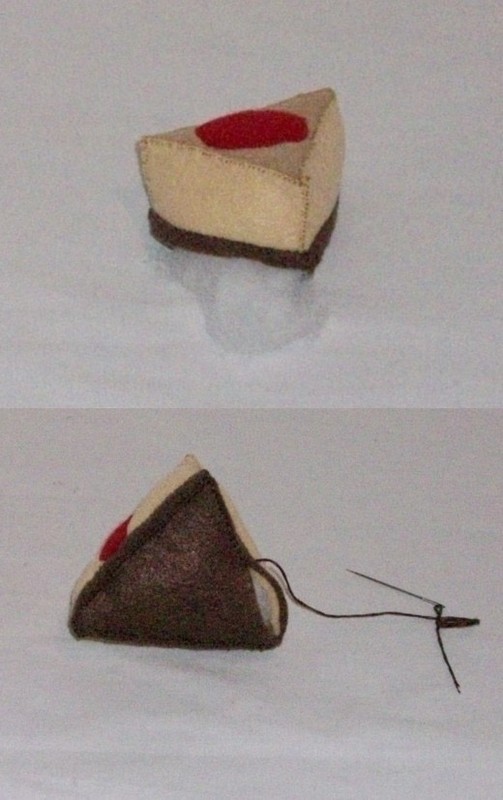
 Step 6
Your cake should look like this now
- Leave side seams open for now. You're ready to ass the cherry juice
-
 Step 7
Use 2 strands of red floss for this step
- Pin smaller piece of red on one side so it slightly overlaps the top as shown
- Whip-stitch in place- Pin larger red piece on to of cake so it slightly overlaps the piece you just stitched on
(Arrange it however you think it looks good, there is no wrong way as long as it covers the first piece's edge so the look like one big drip of cherry juice)
- Whip-stitch in place -
 Step 8
Use 3 strands of beige floss for this step
- Pin front sides together and whip-stitch
- When you reach the crust, use brown floss to finish stitching to the bottom
-
 Step 9
Use 3 strands of brown floss for this step
- With wrong sides together pin bottom piece to sides
- Whip-stitch together. Up one side and down the other
- Leave back open -
 Step 10
Use 3 strands of beige floss for this step
- Pin back side seams together and whip-stitch
- As in 'Step 8' use brown to stitch the crust
- Repeat for other side
- Leave very back bottom edge open for stuffing -
 Step 11
Use 3 strands of brown floss for this step
-Stuff to your liking
- Close back bottom edge with a whip-stitch
-
 Step 12
To finish and hide your final bit of thread:
- Tie a knot at the end of your stitches
- Push your needle into the felt and then out about a 1/2 inch along the back edge as shown
- Pull the needle through and out, leaving a tail of floss
- Snip the tail and close to the felt as you can. This will give you a nice clean final stitch
-
 Step 13
Now that the main cake is done, add you topping
- Glue on the pompoms as shown:
3 on top in a triangle shape
2 on the bottom of the red drip (as though they spilled down the side of the cake leaving a trail of cherry juice)Tip: Use pins to hold the pompoms in place while the glue dries, especially the ones on the side. Remove them when the glue is dry and holds steadily in place
-
 Step 14
All done!
Your cheesecake is adorable on it's own but try this additions for even more creativity:
- Sew a small lobster clap to one of the back corners the attach to a keychain or cell strap
- Glue to a tiny hat or headress for a sweet Lolita head piece
Also try your own variations of toppings: Blueberries, Starwberries, Raspberries, Chocolate whatever you love!


it looks good enuf to eat