


About
Neck Gaiter Tutorialc
I have been wanting to create these cute neck gaiters for a long time. My inspiration were these Buffs from Sahalie called Winterized Bandanas. I thought I could make them much cheaper than the $28.50 they are charging. I wanted to use up my leftover fleece from the monster hats that I make. I found the stretchy polyester, at Joann for $3.00 a yard. The fabric is not the easiest to sew, but I’m proud of how well they turned out.
Use a 1/2" seam allowance.
Size Chart:
Double Fleece Version
Single Fleece Version
Fleece Size
Polyester Patterned Fabric Size
Fleece Size
Polyester Patterned Fabric Size
Newborn (6 months and younger)
8” X 13 to 15"
4” X 13 to 15”
8” X 13 to 15"
Infant (6 to 12 months)
9” X 14 to 17"
4.5” X 14 to 17”
9 X 14 to 17”
Child (12 months to 3 years)
10” X 16 to 19”
5” X 16 to 19”
10” X 16 to 19”
Child (3 years and older)
12” X 18 to 20”
6” X 18 to 20”
12” X 18 to 20”
Adult Woman
13” X 20 to 22”
6.5” X 20” to 22”
13” X 20 to 22”
Adult Man
14” X 21 to 24”
7” X 21 to 24”
14” X 21 to 24”
You Will Need
-
 Step 1
Double Layer Version:
1) Cut fleece as shown using the size chart. Make sure that you have the stretch in the right direction. You’ll have a hard time getting it over your head otherwise. -
 Step 2
2) Line up wrong sides of fabric together with patterned fabric on top.
Sew a ½ inch seam using a slight zigzag stitch. (about 2.5 mm long and 2mm wide) Start sewing a little into the fleece and reverse so you don’t get the fleece stuck in the carriage of the machine. -
 Step 3
3) Fold up the fleece from the bottom, hiding the patterned polyester inside.
-
 Step 4
Turn to where you can see that first seam.
-
 Step 5
4) Sew slightly to the left of the first stitching line.
-
 Step 6
5) Hide the patterned fabric inside...
-
 Step 7
by moving it over...
-
 Step 8
and stitch along one end of your folded fleece.
-
 Step 9
6) Trim corners of fleece.
-
 Step 10
7) Turn inside out.
-
 Step 11
8) Fold right sides together to get ready to make a tube. Put the seam side of the fleece on top of the open end and leave about a ½ of the under side sticking out to the right. You will need that extra fabric to create a nicer final seam to create the tube.
-
 Step 12
Sew a 1” seam from the end of the fleece up to the top of the patterned fabric. Reverse a little at both ends, preventing the stitch from loosening up later.
-
 Step 13
9) Line up your foot at the edge of the top patterned fabric. Sew to the right of your original seam using a reg. zigzag stitch to make a seam a little softer.
-
 Step 14
Trim off the extra fabric underneath.
-
Step 15
10) Turn right side out.
-
 Step 16
11) Now you have the open end of the fleece and the seam end of the fleece with enough of the open ended fleece to overlap with the stitched side.
-
 Step 17
Stitch with a straight stitch on top to attach.
-
 Step 18
12) Turn inside out and make another line of stitching to the left to anchor the seam.
-
 Step 19
(2nd picture is the look of this seam from the outside.)
-
Step 20
13) You will not need to finish the edge of the top fabric because it will not fray.
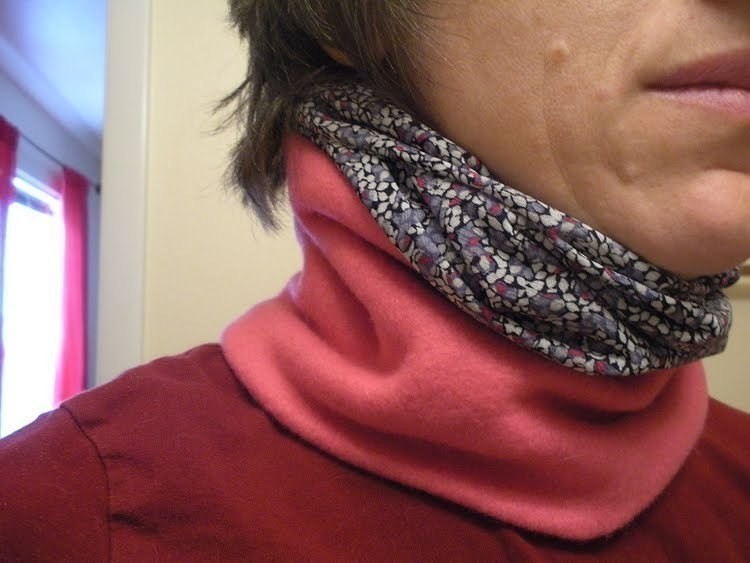
Go outside and your neck will be warm and you will look stylish!
-
 Step 21
Single Layer Version: (much easier)
1) Cut both fabrics into correct dimensions according to the chart.. Make sure that you have the stretch in the right direction. You’ll have a hard time getting it over your head otherwise.
2) Hem the bottom of the fleece rectangle with about a ½” - ¾” fold. Start sewing a little into the fleece and reverse so you don’t get the fleece stuck in the carriage of the machine.
3) Line up wrong sides of fabric together with patterned fabric on top. Sew a ½ inch seam using a slight zig zag stitch. (about 2.5 mm long and 2mm wide)
4) Go back and fold the fleece over itself on the wrong side and stitch along with a straight stitch.
5) Fold the whole thing in half lengthwise, right sides together and sew to make a tube. Start at the fleece end using a straight stitch. Switch to the slight zigzag when you hit the patterned material.
6) Go back and stitch to the right of the original seam of the fleece and add a regular zigzag on the outside edge of the patterned fabric seam to make it a bit softer on the inside. You can leave the upper edge of the gaiter un-stitched because it won’t unravel.


