


About
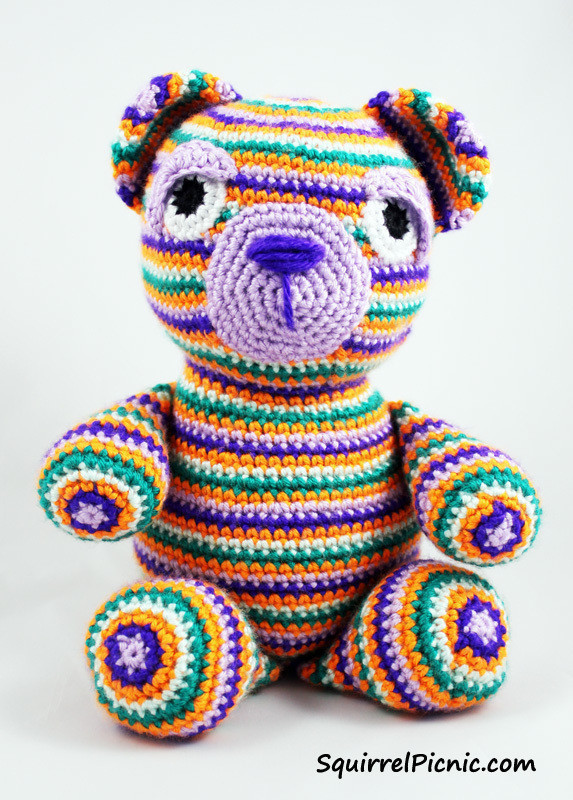
A super-stripey bear brings good cheer wherever he goes.
Introducing Motley Bear! I made this bear for one of my dear friends who was donating her kidney to a relative. I wanted to provide her with a bear that exuded confidence while at the same time bringing a lot of colorful cheer while she was recovering. I think Mr. Motley pulls it off nicely.
A striped bear provides a great opportunity to use up some leftover yarn too. I’ve made Motley Bears out of odds and ends of yarn that I collected over the years. I even have another bear that I am crocheting as I go, adding a round at a time as I gather leftover yarn from other projects. If you start a stash-busting bear like I have, my biggest word of advice is to pin a card listing your place in the pattern to your bear each time you put him aside so you’ll know where you left off when you pick him up again.
When I work in stripes like this, I prefer to end each round by joining with a slst and then chaining 1 with the new color to start the next round. By pulling on the strand for the previous color, it creates almost perfect, non-jogging rounds. They aren’t entirely perfect though. You still end up with a noticeable seam that spirals down the back, but I always just make sure that this part is at the back when I sew on the arms and legs and face. I prefer this method because I am too lazy to fasten off one color and attach the new one in each round. If you have a different method for changing colors in a striping pattern, by all means use it… and please share it with me! I am always up for learning new techniques. Visit the website for other stripe techniques you might try.
And be sure to check out my photo tutorial for crocheting and embroidering the eyes, nose, and mouth.
Downloads
- 109389_2F2015-06-18-191906-How+to+Embroider+a+Nose+and+Mouth+by+Jennifer+Olivarez.pdf 6.3 MB [ Download ]
-
 Key West Witch favorited Motley The Bear
07 May 09:48
Key West Witch favorited Motley The Bear
07 May 09:48
-
 Chudames favorited Motley The Bear
27 Jul 09:08
Chudames favorited Motley The Bear
27 Jul 09:08
-
 Jenn favorited Motley The Bear
26 Jun 16:59
Jenn favorited Motley The Bear
26 Jun 16:59
-
 Caz favorited Motley The Bear
24 Jun 16:51
Caz favorited Motley The Bear
24 Jun 16:51
-
 Cat Morley commented on Motley The Bear
23 Jun 19:19
Cat Morley commented on Motley The Bear
23 Jun 19:19
-
 Jennifer Olivarez published her project Motley The Bear
23 Jun 13:09
Jennifer Olivarez published her project Motley The Bear
23 Jun 13:09
-
Step 1
Note about yarn: Feel free to use the yarn of your choice, but be sure that all of the yarn you use for this project is about the same weight. For reference, I used an aran-weight yarn — Caron Simply Soft (250 yds [228 m], 5 oz [141.7 g] in neon orange, soft green, cool green, orchid, and purple.
This yarn and the gauge below made a 10″ tall bear and required about 5.5 ounces of yarn.
Gauge for bear made with Caron Simply Soft and size G-6 (4.00 mm) crochet hook:
9.5 sc sts = 2″
10 rnds = 2″Abbreviation Notes
inc = 2 sc in next sc
dec = sc2tog -
Step 2
Note: To change colors as I have, at the end of each round, join with a slst to the first stitch in that round and chain 1 with the new color. I haven’t included this instruction in the pattern, in case you choose a different technique.
-
 Step 3
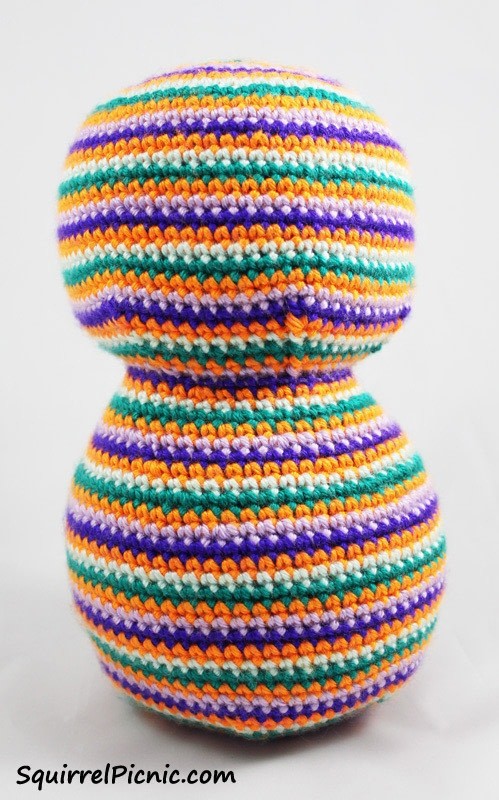
Head and Body
Ch 2 or begin with a magic loop.
Rnd 1: 6 sc in 2nd ch from hook (or in magic loop and close).
Rnd 2: 2 sc in ea sc around. (12)
Rnd 3: * Sc, inc, rep from * 5 more times. (18)
Rnd 4: * 2 sc, inc, rep from * 5 more times. (24)
Rnd 5: * 3 sc, inc, rep from * 5 more times. (30)
Rnd 6: * 4 sc, inc, rep from * 5 more times. (36)
Rnd 7: * 5 sc, inc, rep from * 5 more times. (42)
Rnd 8: * 6 sc, inc, rep from * 5 more times. (48)
Rnd 9: * 7 sc, inc, rep from * 5 more times. (54)
Rnd 10: * 8 sc, inc, rep from * 5 more times. (60)
Rnd 11: * 9 sc, inc, rep from * 5 more times. (66)
Rnds 12-24: Sc in ea sc around.
Rnd 25: * 9 sc, dec, rep from * 5 more times. (60)
Rnd 26: * 8 sc, dec, rep from * 5 more times. (54)
Rnd 27: * 7 sc, dec, rep from * 5 more times. (48)
Rnd 28: * 6 sc, dec, rep from * 5 more times. (42)
Stuff the head at this point.
Rnd 29: Sc in the FL only of ea sc around.
Rnd 30: * 6 sc, inc, rep from * 5 more times. (48)
Rnd 31: Sc in ea sc around.
Rnd 32: * 7 sc, inc, rep from * 5 more times. (54)
Rnd 33: Sc in ea sc around.
Rnd 34: * 8 sc, inc, rep from * 5 more times. (60)
Rnd 35: Sc in ea sc around.
Rnd 36: * 9 sc, inc, rep from * 5 more times. (66)
Rnd 37: Sc in ea sc around.
Rnd 38: * 10 sc, inc, rep from * 5 more times. (72)
Rnds 39-51: Sc in ea sc around.
Rnd 52: * 10 sc, dec, rep from * 5 more times. (66)
Rnd 53: * 9 sc, dec, rep from * 5 more times. (60)
Rnd 54: * 8 sc, dec, rep from * 5 more times. (54)
Rnd 55: * 7 sc, dec, rep from * 5 more times. (48)
Rnd 56: * 6 sc, dec, rep from * 5 more times. (42)
Rnd 57: * 5 sc, dec, rep from * 5 more times. (36)
Rnd 58: * 4 sc, dec, rep from * 5 more times. (30)
Rnd 59: * 3 sc, dec, rep from * 5 more times. (24)
Stuff the body.
Rnd 60: * 2 sc, dec, rep from * 5 more times. (18)
Rnd 61: * Sc, dec, rep from * 5 more times. (12)
Rnd 62: * Sc, sk, rep from * 5 more times. (6)
FO, leaving a long tail. Thread through remaining sts and weave in. -
 Step 4
Arms (Make 2)
Ch 2 or begin with magic loop.
Rnd 1: 5 sc in 2nd ch from hook (or into magic loop and close).
Rnd 2: 2 sc in ea sc around. (10)
Rnd 3: * Sc, inc, rep from * 4 more times. (15)
Rnd 4: * 2 sc, inc, rep from *4 more times. (20)
Rnd 5: * 3 sc, inc, rep from * 4 more times. (25)
Rnds 6-8: Sc in ea sc around.
Rnd 9: * 3 sc, dec, rep from * 4 more times. (20)
Rnds 10-18: Sc in ea sc around.
Stuff arm and flatten the opening so that the sts line up in pairs. Sc these pairs together to close.
FO, leaving long tail. -
 Step 5
Pin arms to body in the position shown and sew on using long tail.
-
 Step 6
Legs (Make 2)
Ch 2 or begin with magic loop.
Rnd 1: 6 sc in 2nd ch from hook (or into magic loop and close).
Rnd 2: 2 sc in each sc of round (12)
Rnd 3: * Sc, inc, rep from * 5 more times. (18)
Rnd 4: * 2 sc, inc, rep from * 5 more times. (24)
Rnd 5: * 3 sc, inc, rep from * 5 more times. (30)
Rnd 6: * 4 sc, inc, rep from * 5 more times. (36)
Rnds 7-9: Sc in ea sc around.
Rnd 10: * 4 sc, dec, rep from * 5 more times. (30)
Rnd 11: * 3 sc, dec, rep from * 5 more times. (24)
Rnds 12-19: Sc in ea sc around.
Stuff leg and flatten the opening so that the sts line up in pairs. Sc these pairs together to close.
FO, leaving long tail. Pin to body and sew on using long tail. -
 Step 7
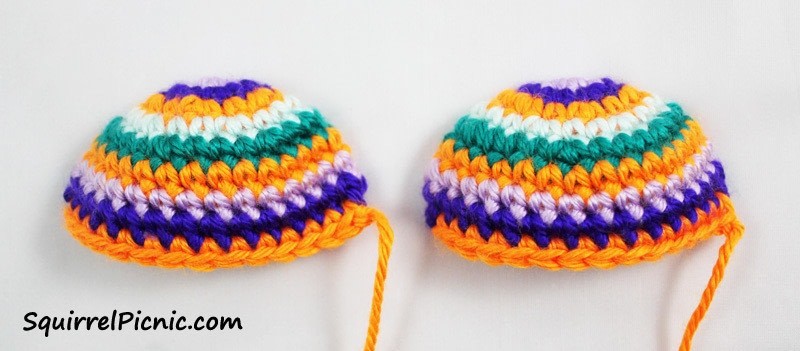
Ears (Make 2)
Ch 2 or begin with magic loop.
Rnd 1 : 6 sc in 2nd ch from hook (or into magic loop and close).
Rnd 2: 2 sc in ea sc around. (12)
Rnd 3: * Sc, inc, rep from * 5 more times. (18)
Rnd 4: * 2 sc, inc, rep from * 5 more times. (24)
Rnd 5: * 3 sc, inc, rep from * 5 more times. (30)
Rnds 6-8: Sc in ea sc around.
Flatten the ear opening so that the stitches line up in pairs. Sc these pairs of stitches together to close. -
 Step 8
FO, leaving a long tail. Pin to body in the position shown and sew on using long tail.
-
 Step 9
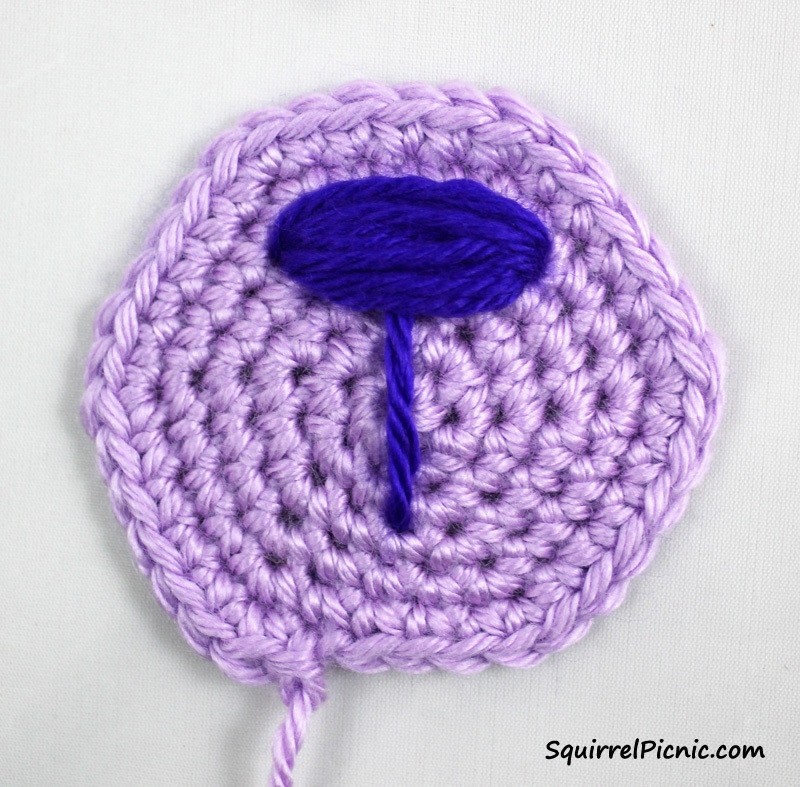
Muzzle
With one color of your choice, ch 2 or begin with magic loop.
Rnd 1: 6 sc in 2nd ch from hook (or into magic loop and close).
Rnd 2: 2 sc in ea sc around. Join with slst, ch 1. (12)
Rnd 3: * Sc, inc, rep from * 5 more times. Join with slst, ch 1. (18)
Rnd 4: * 2 sc, inc, rep from * 5 more times. Join with slst, ch 1. (24)
Rnd 5: * 3 sc, inc, rep from * 5 more times. Join with slst, ch 1. (30)
Rnd 6: * 4 sc, inc, rep from * 5 more times. Join with slst, ch 1. (36)
FO, leaving a long tail. Using embroidery floss and yarn needle, embroider a nose and mouth. (Check out my downloadable PDF in the pattern description box above for how to embroider the nose and mouth.) -
 Step 10
Pin muzzle to head.
-
 Step 11
Using long tail, sew to head.
-
 Step 12
Using my tutorial found here at Cut Out + Keep, crochet eyes and eyelids and sew them to the head.
-
 Step 13
Give your bear a cuddle.


Comments


