


About
EcoGlue Mosaic Vase from JunkMailGems
This is a great way to use EcoGlue to turn something old into something new and one-of-a-kind. Roll up your sleeves and put on your safety glasses because we are going to bust up some old plates and, using Eco Glue and some grout, create a beautiful mosaic flower vase.
If you don’t have old vases or plates lying around your house, take a trip to any thrift store, where you will most likely find at entire aisles dedicated to plates and vases. For this project I am using an old plate that I already had with a vase I bought at a thrift store. I also bought an extra white plate just in case I didn’t have enough pieces with my plate, to use as filler. Tell the checkout clerk that he/she need not waste paper to wrap them up; you are going to break them anyway!
TIP: When choosing a vase, choosing square instead of round makes it easier and faster for the mosaic tiles to lie flat while drying on each side. When choosing plates, find ones that are as flat as possible. Look for patterns & colors you like…textured decorations and gold edges make nice details.
-
 Kd L. favorited Mosaic Vase
22 Dec 19:24
Kd L. favorited Mosaic Vase
22 Dec 19:24
-
rene c. favorited Mosaic Vase
11 Aug 00:54
-
Patricia J. favorited Mosaic Vase
29 Mar 01:09
-
 Kay T. favorited Mosaic Vase
20 Nov 21:28
Kay T. favorited Mosaic Vase
20 Nov 21:28
-
 mmotse03 favorited Mosaic Vase
21 May 07:53
mmotse03 favorited Mosaic Vase
21 May 07:53
-
Michelle C. favorited Mosaic Vase
20 Apr 05:29
-
 buttercup303 added Mosaic Vase to handy ones
18 Sep 08:47
buttercup303 added Mosaic Vase to handy ones
18 Sep 08:47
-
 Cuồng P. favorited Mosaic Vase
14 Jul 16:56
Cuồng P. favorited Mosaic Vase
14 Jul 16:56
-
 Mai added Mosaic Vase to House Stuffs
25 Jan 04:59
Mai added Mosaic Vase to House Stuffs
25 Jan 04:59
-
 Kerikins added Mosaic Vase to Mosaics- bits and pieces
28 Sep 04:14
Kerikins added Mosaic Vase to Mosaics- bits and pieces
28 Sep 04:14
-
 Step 1
Time to get out those safety glasses and head out to a driveway or sidewalk! To break the plate, I like to put then in a clear plastic storage bag so that I can see how the pieces are breaking as I go. If you do this, use a heavy duty freezer bag. Better yet, use one that has already been used for something else. This is all about recycling, people!
Just make sure the bag and the plate are clean. It’s a lot easier to clean a plate than a hundred little pieces of plate. I also set the bagged plate on a brown paper grocery bag to help absorb some of the impact underneath. Then it’s time to go to town with your hammer! There is really no special technique for this; just hammer away until you have a variety of different sized pieces.
-
 Step 2
Open the bag and pour them into a tray or box. I am using the lid from a shoe box. Flip any over if necessary to see the patterned sides, like you would if you were starting a jigsaw puzzle. Gloves are not a bad idea either when handling the glass…be careful as they are SHARP!
-
 Step 3
Next I traced the 4 faces of my vase onto some pieces of scrap paper. More recycling…I used the backs of bad computer printouts and papers I no longer needed. This will give you a frame to work in when laying out your pieces.
-
 Step 4
Now it’s time to lay out your composition! This just takes some time to find pieces you like and that fit together, and arrange them so they look good to you. They don’t need any particular rhyme or reason, but I picked out some of the scalloped edges of the plate to use around the top. You can arrange them randomly, or into patterns. It works best to lay out larger pieces and then fill in with smaller ones where needed. Be sure to leave some space between each piece to fill with grout later.
TIP: Lay the paper outlines on a hard board or hardcover book. This will make it easy to move your project if you need to set it aside for a while, without disturbing your loose tiles.
-
 Step 5
Once you have all your sides laid out how you’d like them, it’s time to crack open that fresh bottle of Eco Glue and start transferring them to the vase.
Working from one corner/side to the other, Apply Eco Glue to the back of each tile and to the vase and set each into place. This is where choosing a very flat plate comes in handy. The flatter the pieces are, the more surface area you have for the glue to bond, and the smoother it will come out in the end.
TIP: If your vase is not square (tapered like mine) and the tiles are sliding down, prop up one end to make it more level while the tiles dry. (Now you can see why we did not choose a round vase!)
-
 Step 6
After you’ve finished gluing down all of the tiles on one face, leave your project to dry for an hour. Repeat the transfer & glue process for all sides of your vase and allow the whole thing to dry for at least 24 hours for the glue to reach full strength.
-
 Step 7
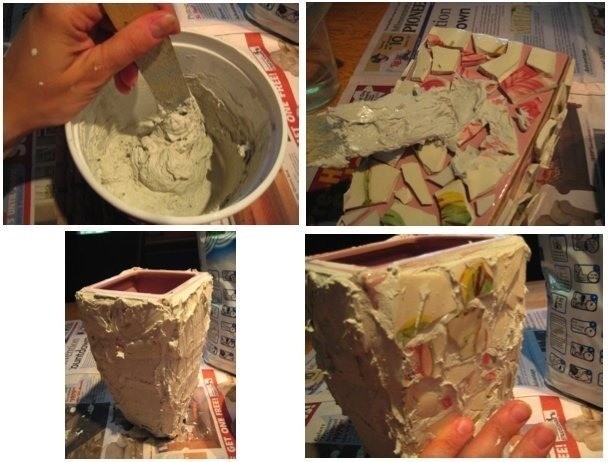
Next it’s time to fill in the gaps and cover the sharp edges with grout! Pick up some grout at your local home improvement store if you don’t have any already lying around from a previous tiling project. Start with a very small amount, because it will go farther than you think! Pour a little into an old food container and then start adding water in small amounts. I like to stir mine with old paint stir sticks. Get it to a good consistency…you want it to be thick enough not to run down your vase, but not too thick or dry to work with. Peanut butter or frosting-like usually works pretty well.
Start spreading on the grout! This part is messy and will look ugly. But, the main goal is to get all the spaces between your tiles filled full with grout. Once you have laid on the thick layer of grout and have filled all the cracks, you can scrape off the excess. It’s a good idea to use a trowel for tiling. I use my fingers because I like to feel the tiles and what I’m doing. But, if you do this, be extremely careful not to cut yourself! Try to scrape off enough so you can see the tiles, but are leaving the grout in the spaces. It’s a good idea to do small amounts and one side of the vase at a time as the grout dries quickly.
-
 Step 8
After you’ve scraped off most of the excess and exposed the tiles, let it dry for a while (15-30 minutes or so: check your grout package). Then, use a damp sponge to continue wiping off the tiles. This is where you’ll want to scrub off any chunks that are left ON the tiles and expose or cover as much as you want to get the look you like.
TIP: If you like a smooth grout look, dip your finger in some water and smooth the edges. Pay special attention that you’ve grouted and smoothed the corners and top/bottom edges to your liking before it dries.
-
 Step 9
Let the grout dry further, according to your grout package directions. Once it is more hardened, take a dry rag or towel and buff off the tiles. (Optional: If you like you can then also apply some grout sealer to your vase.)
Voila! You have just given an old, mismatched plate a new life as a beautiful, one-of-a-kind mosaic vase!


Thank you for sharing!