https://www.cutoutandkeep.net/projects/mop-bucket-bed-crown • Posted by BarryBelcher
Using an old tin mop bucket, create a bed crown to go over a baby crib or for a bed canopy with drapes. Can you believe that used to be an old mop bucket?
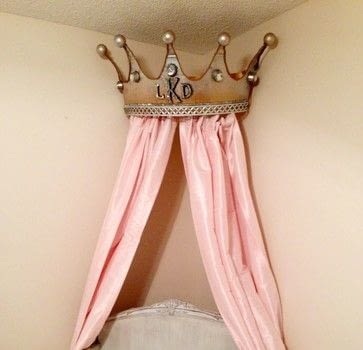


Using an old tin mop bucket, create a bed crown to go over a baby crib or for a bed canopy with drapes. Can you believe that used to be an old mop bucket?

Find a new or used tin bucket and measure out crown points evenly with the circumference of the bucket. Draw out points with a sharpie.

Using tin snips, carefully cut along your crown point sharpie lines.

Stick styrofoam balls on the tips of the crown, then spray paint completely silver. Take your two other colors and lightly spray gold and copper giving a gradient look.

Hot glue round wax crayon to the center of each points of the crown. Spray them with paint.

Hot glue rhinestones to the crayon rounds.

Optional, use rhinestone strips and write out monogrammed style lettering to the center of the crown.

Cut 1.5 wood board to an appropriate width for the crown and bend back sides of crown and bolt to wood board. (You will have to drill a hole in the tin with a metal drill bit.)

Mount to wall studs using long wood screws through the wood board. Add curtain rod and drapes and walla! Royal!