


About
easy and fun
• You can use foil instead of wax paper.
• A conventional oven will do set to about 275 or 300
• A jump ring is a connecter you can easily make yourself with wire and pliers.
• Prism color pencils are what I prefer but you can use markers.
• If the finished piece isn’t as flat as you like reheat it and press between books.
• Have no varnish then just use clear nail polish.
Tags
-
 Kyara S. favorited Monarch Necklace
03 Oct 22:46
Kyara S. favorited Monarch Necklace
03 Oct 22:46
-
 olivia n. favorited Monarch Necklace
05 Aug 10:12
olivia n. favorited Monarch Necklace
05 Aug 10:12
-
 meges2381 favorited Monarch Necklace
31 Jan 20:12
meges2381 favorited Monarch Necklace
31 Jan 20:12
-
 Kayla M. favorited Monarch Necklace
22 Jul 15:14
Kayla M. favorited Monarch Necklace
22 Jul 15:14
-
 WaterAngel added Monarch Necklace to Jewelry
04 May 00:34
WaterAngel added Monarch Necklace to Jewelry
04 May 00:34
-
 Selene favorited Monarch Necklace
15 Mar 15:26
Selene favorited Monarch Necklace
15 Mar 15:26
- reneereplayxxx favorited Monarch Necklace 09 Mar 18:46
-
 cristinakilljoyway favorited Monarch Necklace
03 Jan 16:59
cristinakilljoyway favorited Monarch Necklace
03 Jan 16:59
-
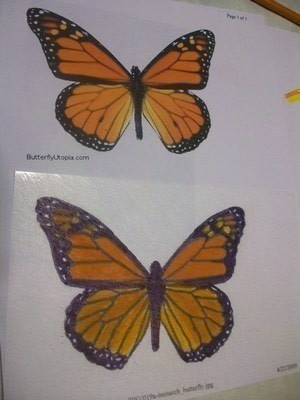
 Step 1
First get online and print an image. The monarch I like to use is from www.butterflyutopia.com. Or just google it and find the biggest image and print. Try to get the image about half the size of your computer paper. (It is ok if the image isn’t in color.)After you are through with that gather the rest of the materials.
-
 Step 2
Outline the image. Take a sheet of Shrinkydink (Rough and Ready) and begin to outline the image using your permanent black marker. Be sure that you are tracing the butterfly’s outline onto the rough surface.
-
 Step 3
Pick a hue and color. I used the hues fitted to the printed image but you can be as creative as you want with any hue. It is important to at least pick three shades. After deciding on the colors you want it is time to fill your outline in. I usually start with the darkest color but you can color as you wish. (Be sure that you are coloring on the rough side!)
The darker you color in the more vibrant your pendent will be as a finished product so beware of open spaces.
-
 Step 4
Retrace outline. Flip the shrinkydink over so the smooth side is facing up and simply retrace your outline using the permanent black marker.
-
 Step 5
Punch holes. Get the hole puncher and at the tip of each wing punch a hole.
-
 Step 6
Next get scissors and cut away. It is a bit tricky and you have to be careful not to cut into the image but you will get it.
-
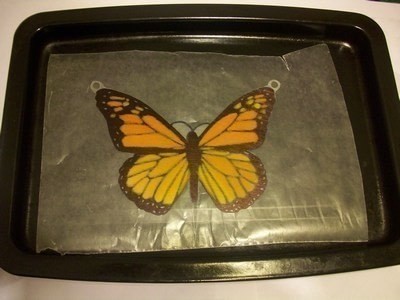
 Step 7
Cut a piece of wax paper that fits into your toaster pan and place your pendent on there. VERY IMPORTANT (not like image) => SMOOTH side facing up!!
-
 Step 8
Place in toaster oven. Now do not freak out your piece will not only shrink down to a third of its size but it will curl up and curl down and move in odd shapes. In the end it will lay flat all on its own. The amount of time you leave it in varies on type of toaster oven and temperature. I have found that it doesn’t matter all that much if you keep and eye on it. Once it is flattened and a third of its size, take it out and try not to let it melt.
Because the smooth side was facing down the permanent marker melted straight on the wax paper making the pendent dull and overall not as appealing as it could be. That is why it is important to remember smooth side up.
-
 Step 9
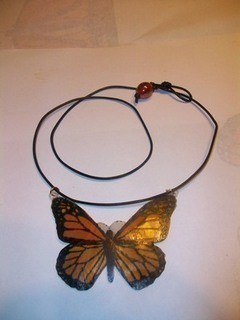
The Necklace part
Step one:
Open two jump rings and attached each one to one of the holes in the wings.
Step two:
Cut desired length or cord or string. At one end tie a knot and add the medium sized bead and then tie a knot on top of it. Cut excess string.
Step three:
Add the monarch to the cord.
Step four:
Take the end of the cord and fold it in estimated amount and knot. Be sure to tighten knot so that it fits snug around the bead.
Once you have done that just varnish to seal in the deal and you are finished.
-
 Step 10
This step isnt really a step but if you like to recycle take an empty soda bottle and cut the flat surface with scissors. Taking sand paper (any kind as long as you can create decent scratches) sand a rough surface to one side and draw or trace whatever you want on it, whole punch it and bake and there you go trash into treasure.


Comments

