Miss Marlo Dress
Extract from Sew La Tea Do: 25 Favourite Things to Sew • By Pip Lincolne • Published by Hardie Grant Books

About
Make like Marlo Thomas and channel your best ‘That Girl’!
This is such an ace dress. You can make it look vintage or modern (or indeed mod!) depending on the fabric you choose and your personal style. It has a nice deep pocket for stowing cute stuff in, too. So what are you waiting for? Make like Marlo Thomas and channel your best ‘That Girl’!
Fabric details
» Finished size: small to medium or medium to large (see pattern)
» Seam allowance: 1 cm [3⁄8 inch] unless otherwise stated
» Fabric should be washed, dried and pressed before beginning to allow for shrinkage and to prevent dyes from running.
Cutting out
There are five pattern pieces: dress front, dress back, front facing, back facing and pocket (optional). Cut out your pieces as marked on the pattern.
Downloads
- MISSMARLO_1.jpg 2.76 MB [ Download ]
- Missing file
-
 Melissa S. favorited Miss Marlo Dress
10 Jun 04:01
Melissa S. favorited Miss Marlo Dress
10 Jun 04:01
-
 AlterEgo Designs favorited Miss Marlo Dress
23 Sep 13:51
AlterEgo Designs favorited Miss Marlo Dress
23 Sep 13:51
-
 Charlie. favorited Miss Marlo Dress
18 Aug 19:28
Charlie. favorited Miss Marlo Dress
18 Aug 19:28
-
Alecia B. favorited Miss Marlo Dress
22 Apr 04:55
-
cameron l. added Miss Marlo Dress to tolo
16 Nov 03:14
-
cameron l. favorited Miss Marlo Dress
16 Nov 03:14
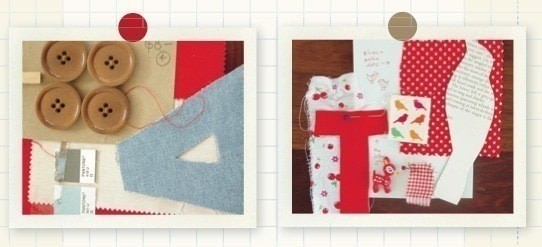
You Will Need
-
 Step 1
Sewing up
First, let’s get pressing. Take the three facing pieces and, with wrong sides facing up, fold the bottom edges up 1 cm [3⁄8 inch]. Press firmly, easing any curved edges in and pinning as you go. Now stitch into place to finish the raw edges neatly. Press again and trim loose threads.
-
 Step 2
Now we’re going to use those facing pieces to make a nice neat neckline and armhole. Take the dress front and lay it right side up. Lay the front facing piece right side down on top of the dress front. Match the raw edges of these pieces and pin them together. Now stitch along the neckline 1 cm [3⁄8 inch] in from the raw edge. Then stitch along the armhole. Clip the curved edges by making small cuts from the raw edge of your fabric to very near the stitching line. Do this along the neckline and the armhole seam too. Don’t cut through your stitches, though! Clipping the seams in this way will make the curved edges sit nicely once you turn your dress out the right way. Trim loose threads then turn the frock out so the right side of the dress is on the outside and your facing piece is neatly sewn to the inside with its right side out too. Bravo!
-
Step 3
Take one dress back piece and lay it right side up. Lay the matching back facing piece right side down on top of the dress back piece. Stitch as you did before, along the neckline and armhole only. Clip the curves and trim loose threads. Turn right side out and press well. Repeat this process for the other dress back piece and back facing piece.
-
 Step 4
Let’s keep working on the back. Lay one of your back pieces out, wrong side facing up, and fold tab A in and press. Stitch into place with a 1 cm [3⁄8 inch] seam. Repeat this process for the other dress back piece.
-
 Step 5
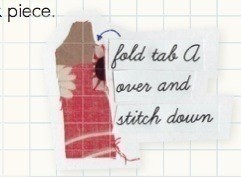
Next we need to sew the dress back pieces together. Pin your dress back pieces together starting just under tab A, with the right sides facing in and the long centre seams matching. Sew together from the bottom of tab A to the hemline with a 1 cm [3⁄8 inch] seam allowance. Press your seam open and trim loose ends. Fold the edge of tab A in 1 cm [3⁄8 inch] and pin it into place, tucking your back facing underneath it. Stitch tab A down with a line of stitches close to the edge. You need to stitch a line from the neckline down to the bottom of one side of tab A, then along the bottom (please reverse stitch a couple of times to fortify this seam!) and then back up the other side of tab A. Nice work! The back centre seam and opening should be looking nice and neat now. Yay!
-
 Step 6
If you are putting a pocket on your dress, take the pocket piece and, with the wrong side facing up, fold each edge in 1 cm [3⁄8 inch]. Press the folded edges and pin into place, then stitch along the top edge only, 5 mm [1/4 inch] from the top folded edge. Place your pocket on the front dress piece and pin into place around the sides and bottom. Make sure the pocket is centred nicely, and all the edges are tucked under. Stitch into place along the sides and bottom, leaving the top edge open. Be sure to reverse stitch a little at each top edge of the pocket to reinforce it. Trim and press.
-
Step 7
Let’s sew the front to the back! Lay out the dress front, right side up. Now lay your dress back on top of it, with its right side down. Match the raw edges of the shoulder seams and pin into place. Stitch a 5 mm [1/4 inch] seam at each shoulder. Stitch over this seam once more an itsy bit away from the first line of stitches. Trim the edges of the shoulder seam with pinking shears or scissors to finish and press the seam towards the back of your dress. (You can hand stitch the raw edge of your shoulder seam neatly onto your back facing piece for a super neat finish, if you like. Just be careful to keep your stitches tiny and not to stitch through the outer layer.)
-
Step 8
Next we need to stitch the side seams. Still with right sides together and starting at the armholes, pin each side seam together so that the raw edges match up neatly. Stitch each side from armhole to hemline with a 1 cm [3⁄8 inch] seam allowance. Zigzag stitch over these two seams again, to finish and neaten them, then trim any messy bits or loose threads. Press the side seams open and fl at. Try the dress on. Work out where you want your hemline to sit and pop a pin in to mark the length.
-
Step 9
Press the hem evenly at this pinned point all the way around. Make sure it’s nice and straight. Pin it into place and try it on again to be sure. Once you’re happy with the length, iron hemming tape over the raw edge of the pressed-up hem. Stitch a line 1 cm [3⁄8 inch] from the folded edge to finish. Trim and press, as is the rule!
-
 Step 10
Sew a hook and eye to the top of the neckline opening. Make sure it’s facing the right way so that it will hook together nicely. Use matching thread and tiny firm stitches for the best results. 11. You’re all done! It could be time to go-go dance, I think …
Variations
* Try a press-stud or small loop of hat elastic and matching button as your dress closure.
* Try a slightly heavier, more wintry fabric for the dress, or cut the facing from contrasting fabric to make a highlight of it.
* Make the pocket from a piece of contrasting fabric or patchwork, like we did.
* Make the frock from neutral fabric and appliqué something cute on it.
* Add some binding, perhaps on the pocket or the hemline.