About
Mini potholders that are perfect for gripping the edges of muffin tins and cookie sheets.
Have you ever ruined freshly baked cookies because your bulky potholder smooshed them? The worst is when it's chocolate chip and the chocolate smears on the pot holder. That's why I wanted to make these cute little potholders. The fit your fingers perfectly and allow you to grip the little edges of cookie sheets and muffin tins. No more ruined baked goods!
-
 Key West Witch favorited Mini Pot Holders
08 Aug 03:12
Key West Witch favorited Mini Pot Holders
08 Aug 03:12
-
 Ellen R. favorited Mini Pot Holders
01 Sep 16:16
Ellen R. favorited Mini Pot Holders
01 Sep 16:16
-
 alp.zoey added Mini Pot Holders to Crafty/diy
17 Aug 03:08
alp.zoey added Mini Pot Holders to Crafty/diy
17 Aug 03:08
-
 Biblionic favorited Mini Pot Holders
03 Aug 02:18
Biblionic favorited Mini Pot Holders
03 Aug 02:18
-
 Jenee Nicole added Mini Pot Holders to Home Decor
28 Apr 06:19
Jenee Nicole added Mini Pot Holders to Home Decor
28 Apr 06:19
-
 Lisa B. favorited Mini Pot Holders
20 Jun 16:28
Lisa B. favorited Mini Pot Holders
20 Jun 16:28
-
 bkind2me08501 favorited Mini Pot Holders
29 Mar 03:24
bkind2me08501 favorited Mini Pot Holders
29 Mar 03:24
-
 Nicole D. published their project Mini Pot Holders
25 Mar 06:00
Nicole D. published their project Mini Pot Holders
25 Mar 06:00
-
Step 1
MAKE THE POTHOLDER TEMPLATE
I have a printable template on my website, but you can easily make your own. Cut a rectangle 4" x 7" and round the ends. This will be your potholder body template. Trace the curved end of your potholder body template, then draw a straight line making a half-circle shape. Add a 1/4" seam allowance to the straight edge. This will be your potholder pocket template.
-
 Step 2
CUT THE PIECES
For ONE PAIR of potholders, cut:
From fabric:
4 potholder body pieces
8 potholder pocket piecesFrom cotton batting:
4 potholder body pieces
4 potholder pocket piecesFrom Insul-bright:
2 potholder body pieces -
 Step 3
SEW THE POCKET PIECES
Lay 2 potholder pocket pieces right sides together, and lay a cotton batting potholder pocket piece on top. Sew with a 1/4" seam allowance along the flat edge. I pin and sew with the fabric up to help prevent the batting from shifting. Open the pocket piece right sides out and press. Topstitch 1/4" away from the edge.
Repeat for the other pocket pieces.
-
 Step 4
ASSEMBLE THE BODY
Layer the following potholder body pieces: fabric wrong side up, cotton batting, Insul-bright, cotton batting, fabric right side up.
-
 Step 5
QUILT THE BODY
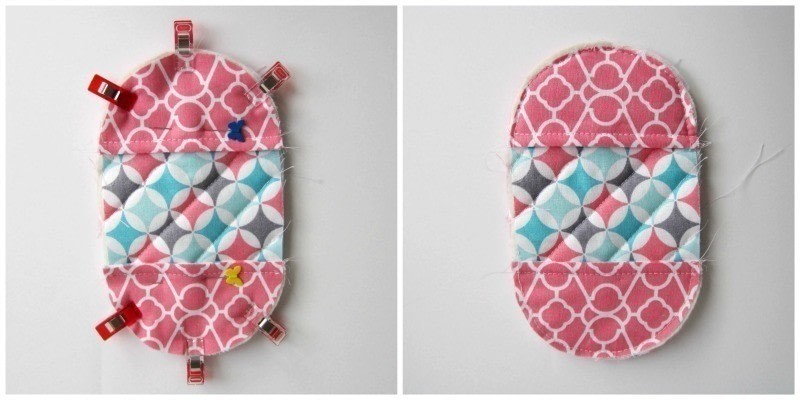
Now it's time to quilt your potholder sandwich. Clip, pin, or baste the pieces together to minimize shifting. I clipped the edges and used pins in the middle. Mark lines at a 45 degree angle about 1" apart. If you have a quilting guide you can use that instead. Sew along the lines.
Repeat for the other body pieces.
-
 Step 6
ASSEMBLE THE POTHOLDER
Lay a pocket piece on each end of the potholder. Use a clear ruler to help line them up straight. Pin or clip into place and baste close to the edge.
Repeat for the other pocket and body pieces.
-
 Step 7
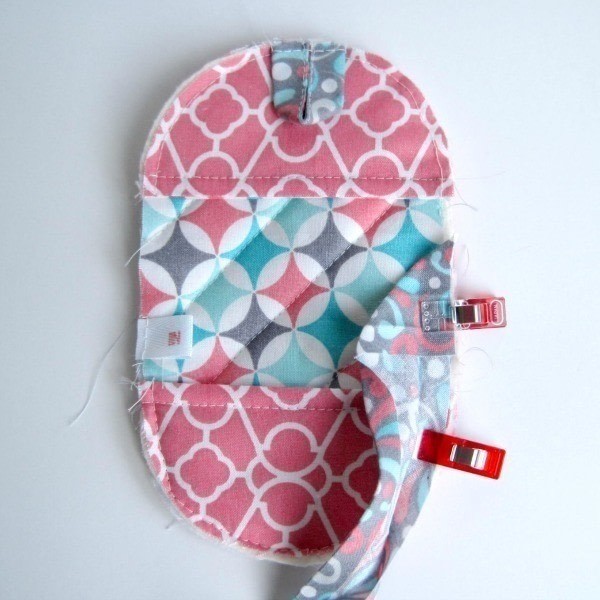
ADDING THE LOOP (optional)
These steps are completely optional, but they add a nice touch. This is when you can add a loop to hang your potholders and a tag to personalize it.
Cut a 3 inch piece of bias tape. Fold in half lengthwise and edgestitch closed. Create a loop and align the raw edges to the top of the potholder. Sew into place close to the edge.
-
 Step 8
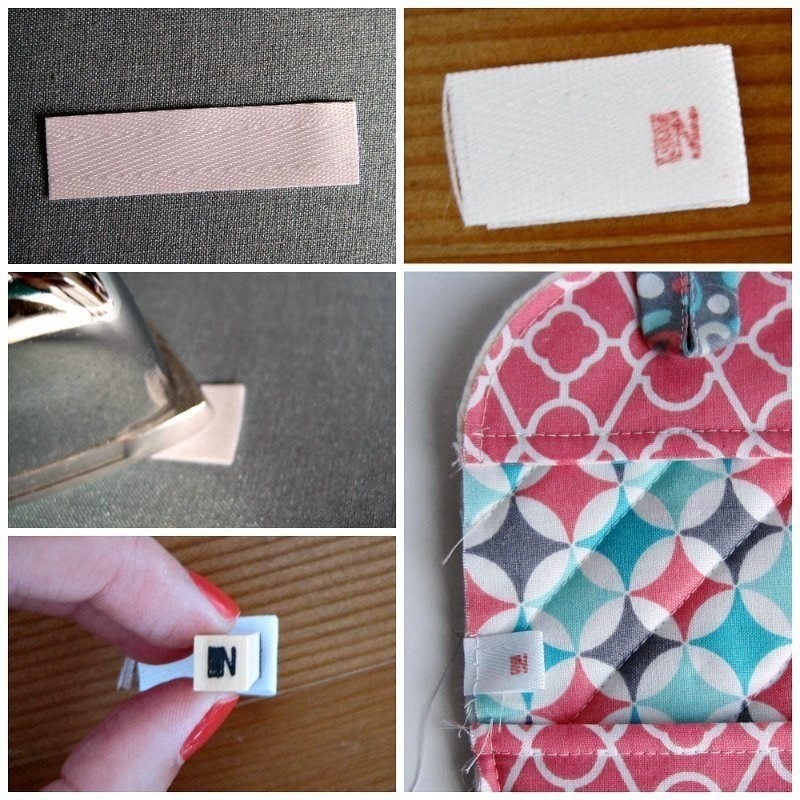
ADDING A TAG (optional)
To make a tag, I cut about a 2" inch piece of 1/2" twill tape. Fold and iron the twill tape in half. I have an alphabet set of letter stamps (you can find these in the scrapbook sections of craft stores). I use the letter 'N' for Nicole and Notion. I use regular stamp ink since the potholders won't be washed much. If you have fabric ink, then you can use that too. Stamp the letter of your choice close to the folded edge and let dry completely. Lay a piece of scrap fabric on top of the tag, and iron the tags. This will set the ink. Sew the tag into place close to the edge.
-
 Step 9
SEW ON THE BIAS TAPE
Open your bias tape and align the edge of bias tape wrong side up along the edge of the potholder. Fold the end down at a 45 degree angle as shown. This helps create clean finish. Sew into place along fold line. Shorten your stitch length to help sew around the curves. Overlap the bias tape by about 1/2" to finish and cut off excess.
Repeat for the other potholders.
-
 Step 10
FINISH THE BINDING
Fold your bias tape over to the other side and clip or pin into place. Hand sew your binding to the back side using a blind stitch.
Give your mini potholders a final press and go bake a batch of chocolate chip cookies!