https://www.cutoutandkeep.net/projects/messenger-bag-from-old-clothes • Posted by Maladignia
The summer coat was fraying so much that there was no helping it anymore and no thrift store would ever want it. I did like the color very much and the "I believe in faeries" patch that I had added, so I saved it for this project. The pants were good enough for a thrift store except for the zipper. It was broken. I hate replacing zippers in pants, so I decided to just use the pants fabric for lining of this bag.
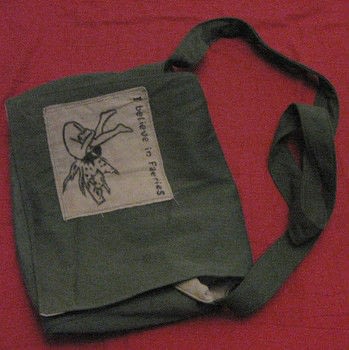


The summer coat was fraying so much that there was no helping it anymore and no thrift store would ever want it. I did like the color very much and the "I believe in faeries" patch that I had added, so I saved it for this project. The pants were good enough for a thrift store except for the zipper. It was broken. I hate replacing zippers in pants, so I decided to just use the pants fabric for lining of this bag.

Get your fabric or the items you're willing to sacrifice for this. I used some pants and my old summer coat.

Draw a design and a plan for your pattern pieces.

Take your items apart so you can lay all the fabric flat. Measure out your pattern pieces and cut them. Don't forget seam allowances! (I use about 1 cm on all sides that will be sewn)

These are all my pattern pieces: - 2 long and wide rectangles of both the outer fabric (green) and the lining (beige) - 2 small rectangles for the sides of the bag, and lining - 1 long strip of fabric for the shoulder strap - 2 back pockets from the pants - the faery patch - 3 buttons that were still on the summer coat

Pin the sides onto the long strip that is the front-bottom-back-top-flap of your bag. You can see where I pinned it in the little inset: the blue lines. This takes a bit of tweaking because you have to make 90 degree corners. When you're happy with your pinning, sew it.

Decide where to add your pocket and decoration (like a patch). Pin and sew. As you can see the bag is now right side out. Be sure to think this step through before you end up adding stuff to what will later be the inside of your bag.

* SHOULDERSTRAP * For the shoulder strap I cut a length of fabric of 120 cm by 10 cm. (I did have to cut smaller pieces and sew them together to get this long a strip since my coat was not 120 long) 120 is right for me, measure what is right for you! The finished width of this strip is about 4 cm. Fold in the long edges and pin. About 1 cm on each side.

Now fold the strip in half so that the folded sides are on top of each other. When you do this you remove the pins from step 7 and add them again to go through all layers. So there are no more pins inside your shoulder strap.

Sew the pinned side. And then sew the side that has only the fold. Doing this will prevent weird wrinkling and turning of the fabric. I have another bag like this (self made) where I skipped this step and that shoulder strap just never sits right.

Sew the lining like you did your outer piece, see step 5. Leave the lining wrong side out. Add pockets or other stuff that you want to have inside your bag.

I like my bag to have a bottom, so I cut a piece of leather from an old fashioned school bag and sewed it onto the bottom of the lining. This takes some fidgeting because the lining is now of course bag-shaped. I only sewed the long edges.

Put your bag (right side out) into your lining (which is right side in) so that the right sides are matching. Make sure that your shoulder strap is in there too but is only sandwiched between the layers on the sides of the bag. It should not cross the stitching line anywhere else! Also make sure that there is no twist in the strap or you'll have to take your work apart again later.

Pin everything together except for the long edge of the closing flap. I did sew a few cm around the corner because this makes the corners prettier in my opinion. Sew this.

Pull your bag right side out through the opening you left in the flap. This will look weird.

You might end up with something looking like this. Don't panic: this is supposed to happen. You can now just push your lining into the bag and everything will line up great.

This is the bag with everything on its rightful place. Carefully fold in the edges of the flap opening and pin it. You might also want to pin all other sides where lining and fabric were sewn together, or you might want to freewheel a bit (I pinned). Sew close to the edge for a nice finished look.

You're done! I was so excited for this picture that I forgot to add the buttons. Meh... In the main images you can see more views of the final result.