

Matchbox Pinhole Camera
Extract from Pinhole Cameras • By Chris Keeney • Published by Princeton Architectural Press

About
Turn a matchbox in to a pinhole camera!
Negative type:
35 mm color or black-and-white film (50 or 100 ISO)
Focal length:
17 mm
F-Stop:
103
Pinhole diameter:
.006 in. (or .16 mm)
Exposure time:
1?2–1 second (bright sunlight)
-
 ShortHairedGirl favorited Matchbox Pinhole Camera
01 Jan 02:45
ShortHairedGirl favorited Matchbox Pinhole Camera
01 Jan 02:45
-
 Tierra T. favorited Matchbox Pinhole Camera
07 Nov 20:42
Tierra T. favorited Matchbox Pinhole Camera
07 Nov 20:42
-
 sarah.jones.756412 favorited Matchbox Pinhole Camera
04 Jul 16:48
sarah.jones.756412 favorited Matchbox Pinhole Camera
04 Jul 16:48
-
 suzusul favorited Matchbox Pinhole Camera
14 May 12:19
suzusul favorited Matchbox Pinhole Camera
14 May 12:19
-
 TARA R. added Matchbox Pinhole Camera to must try this
06 Jan 00:58
TARA R. added Matchbox Pinhole Camera to must try this
06 Jan 00:58
-
 MandyCip_93 favorited Matchbox Pinhole Camera
09 Dec 11:50
MandyCip_93 favorited Matchbox Pinhole Camera
09 Dec 11:50
-
 Merel B. favorited Matchbox Pinhole Camera
17 Oct 17:29
Merel B. favorited Matchbox Pinhole Camera
17 Oct 17:29
-
 Elise F. favorited Matchbox Pinhole Camera
19 Sep 22:24
Elise F. favorited Matchbox Pinhole Camera
19 Sep 22:24
-
 kimberley.kelly.904 favorited Matchbox Pinhole Camera
26 Aug 11:14
kimberley.kelly.904 favorited Matchbox Pinhole Camera
26 Aug 11:14
-
 Sammie S. favorited Matchbox Pinhole Camera
27 Jun 02:43
Sammie S. favorited Matchbox Pinhole Camera
27 Jun 02:43
You Will Need
-
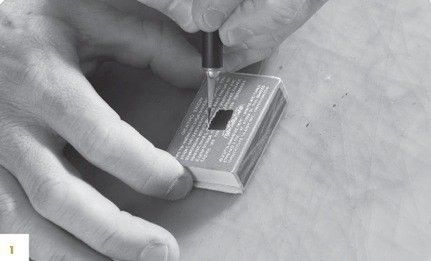
 Step 1
Cutting the Matchbox
?
Pretty much any matchbox will work for this exercise, but there are a couple of things you should consider before you begin. A piece of 35 mm film should be able to fit inside the matchbox. To check this, insert the leader of a roll of film through the bottom of the matchbox. If the film can slide through the inside of the box without bending, you’re good to go; if not, you’ll need to find a larger box. Don’t worry about what the matchbox looks like, since you’ll be covering it with tape to make it lighttight.Once you’ve determined that your matchbox can accommodate 35 mm film, find the location of the box’s center by drawing an X on one side of the box with a ruler and pencil. Make sure the blade in your X-AcTO knife is sharp, and cut out a .25 x .25 in. square in the center of the box.
-
 Step 2
Pull the inner tray out of the box, and on the bottom of the tray, draw and cut out a 36 x 24 mm rectangle. A dull blade will likely bend or tear the box as you cut. Any frayed edges will be seen by the film and captured, but that can be cool, too, so don’t stress out about cutting it perfectly.
-
 Step 3
Use a black permanent marker to color the interior of the box black. This will prevent light from bouncing around inside the box during exposures.
-
Step 4
Making the Shutter
?Just like all the pinhole cameras in this book, you have the option of using a piece of black opaque tape as your shutter. But with a little more work, your can make a more sophisticated shutter.
-
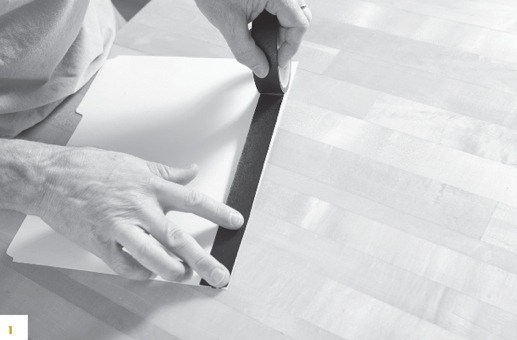
 Step 5
Making the Shutter Sleeve
Cut a standard manila file folder in half, along the fold, and run a long piece of 1 in. black photographic tape along the top edge. You need to apply tape to only one side of the folder.
-
 Step 6
Measure and cut a 2.25 x 1 in. section from that taped strip.
-
 Step 7
(Set aside the extra section of this long strip; it will come
in handy as a measuring tool later on.) With the dull side of the blade, and on the side of the manila folder section that isn’t covered with black tape, score a .25 in. line from both ends. Once you’ve scored both ends, fold the scores to make flaps on each side of the shutter sleeve. -
 Step 8
Making the Shutter envelope
The next step is to create a small paper envelope to hold the shutter sleeve in position. Place the longer edge of your matchbox in the center of the manila file folder, along the 11.5 in. edge, and trace as close as you can around the box with a pencil.
-
 Step 9
Then move the box up and align the bottom of the matchbox with the top line you just made and trace again. When you’re done, there should be two rectangles: one on top of the other.
-
 Step 10
Now measure and draw three lines, .25 in. from the existing rectangular boxes (one line parallel to the left side, one line parallel to the right side, and one horizontal line across the top).
-
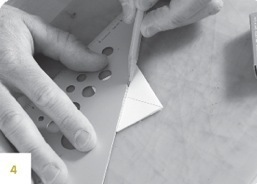
 Step 11
Draw 45-degree angles on the sides of the bottom box and two 45-degree angles on the top box.
-
 Step 12
These are glue flaps: don’t worry if the lines aren’t perfect, because nobody will see them. cut out what you’ve just drawn with an X-AcTO knife or scissors.
-
Step 13
After the paper is cut out, score the line between the two boxes and the three glue flaps with the dull end of your X-AcTO knife. fold all scores and make an X on the bottom rectangular section by drawing two lines from each opposing corner. This will help you determine the exact center of the shutter sleeve.
-
 Step 14
Unfold the shutter envelope and take the 1 in. long strip of manila folder leftover from cutting the shutter insert, and align it in the center of the envelope.
-
 Step 15
On both folds of the top box, make a mark on each side of the 1 in. shutter sleeve with a pencil.
-
 Step 16
Using a metal triangle or ruler, cut along the fold from one mark to the other. Make sure you don’t cut past your pencil marks. Doing that will make the shutter insert loose and uneven when you insert it into the shutter envelope.
-
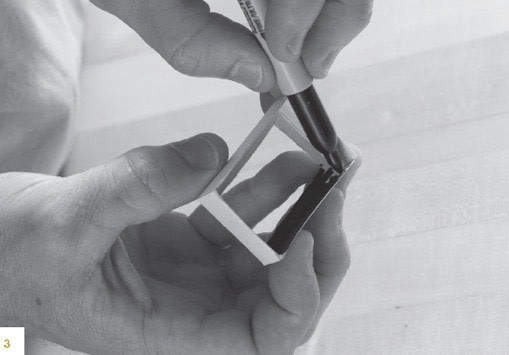
 Step 17
Fold up the shutter envelope, turn it over, and draw an X on the back to find the center.
-
 Step 18
Slide the shutter insert into the shutter envelope and push one side of the sleeve all the way to the end until it reaches the fold. (I’ve found
it helpful to mark an X on the end of the shutter insert when it’s in the closed position and a circle on the insert when it’s in the open position.) Hold the shutter in your hand and use your hole punch to make a hole through the shutter envelope and insert. -
 Step 19
Apply glue to the flaps on the shutter envelope. Try to avoid getting glue on the shutter insert when doing this. Once the flaps of the shutter envelope are glued and pressed down, you’ll need to apply a couple
of pieces of black tape to the front of the envelope to ensure that no light bleeds through onto your film. -
 Step 20
Trim the extra tape from the edges with scissors, but leave about a .25 in. of tape to fold over onto the back of the shutter envelope.
-
 Step 21
Since you’ve taped over the hole in the shutter envelope, you’ll need to punch through the tape you’ve just applied.
Your shutter is done!
-
Step 22
Making the Pinhole
?Since there isn’t a standard pinhole size for matchboxes, you’ll first need to measure the height of your box. The box I used for this exercise measured .6875 in. For a height of .6875 in., my focal length is .006 in. (.16 mm), giving my camera an f-stop of 103. Refer to chapter 4, “How to Make a Pinhole,” for more detailed instructions.
-
Step 23
making a perfectly round .006 in. pinhole is difficult and will take some patience and practice. I would start by using an extra-fine beading needle and drilling just the tip of the needle through whatever metal you decide to use for your pinhole. Remember to sand both sides of the metal with 600 or 1000 grit sandpaper to thin it as much as possible.
-
 Step 24
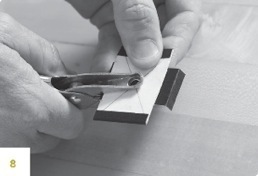
When you’re satisfied with your pinhole, cut the metal to about a .25 x .25 in. square and apply black tape on all four sides, as close to the pinhole as possible without covering it. Too much exposed metal could reflect light back onto your negatives. cut off excess tape, align the pinhole to the hole in the back of your shutter envelope (the side without black tape on it), and tape in place.
-
 Step 25
Drawing a circle around the pinhole in black permanent marker will help you align the pinhole with the hole in the shutter.
-
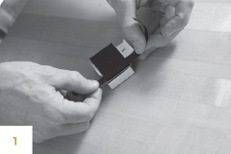
 Step 26
Applying the shutter and Pinhole and light Proofing the Camera
The next step is to attach the shutter and pinhole to your match- box. Make sure the hole in the shutter envelope is centered over the square you cut out of the top of the matchbox.
-
 Step 27
Instead of gluing these items to the matchbox, I suggest using tape, in the event that you want to pull the shutter off to make repairs or to change out your pinhole at a later date. I find that cutting the tape in half (lengthwise) makes this process a lot easier. When doing this, make sure you don’t get any tape in the way of the shutter sleeve or the interior box of the matchbox.
-
 Step 28
Finish by using black opaque photo tape to cover any areas where light may be able to shine through.
-
 Step 29
Loading the Camera
Place the leader of the film underneath the tray and insert both into the matchbox.
-
 Step 30
Open the empty film cartridge and remove the interior spool from the cartridge. Take a piece of black tape and attach the film leader to the spool.
-
Step 31
Make sure it’s securely attached to the spool, otherwise it can come undone when advancing the film later. use two pieces of tape if necessary. If you’re unable to find empty reusable 35 mm cassettes at your local camera store, you can always use old, empty 35 mm film cartridges. film technicians normally throw these away, so I’m sure they’d give you a few, if you ask.
-
 Step 32
Once you have the film leader attached to the film take-up cartridge, wind the film once around the spool, insert it back into the cartridge, and screw on the cap.
-
 Step 33
The next step is to find something that will work as a handle, to help wind the film into the take-up canister. I use modified OOK picture hangers, but if you can’t find those at your local hardware store, there are other solutions. I normally crimp the bottom portion of the hanger by putting it in a vise and slowly cranking down on it, but if you squeeze hard enough with pliers, you can achieve similar results. The goal is to open up the end of the hanger so it can easily fit into the film cartridge.
-
 Step 34
By crimping the hanger with a vise or pliers, it reduces the width of the hanger (from side to side) but also opens the space between the two pieces of metal, allowing it to slide into the top of the spool.
-
 Step 35
After you’ve attached the handle into the empty film take-up cartridge, firmly secure the two cartridges to the matchbox with black tape.
-
 Step 36
When doing this, make sure you butt the cartridge snug to the box (if the fit is loose, the tape may stick to your film, making it difficult to advance it through the camera). I cut the tape in half (lengthwise), making it easier to mold around the edges of the spool.
-
Step 37
Use generous amounts of tape, but be careful not to get tape on any moving parts of the film cartridges.
-
 Step 38
Tape a cotton ball or crumpled-up piece of tissue paper to the bottom half of the take-up cartridge. This will help keep tension on the film once it’s wound into the cartridge.
-
Step 39
Once your cotton ball or tissue paper is in place, make sure that the shutter is in the closed position and advance the film that was exposed during the loading process into the take-up cartridge. Two or three cranks should do the trick. If you find that the film crank winds back in the opposite direction after you let go of the handle, add more tension by securing the cotton ball tighter to the cartridge.
You’re ready to shoot! -
 Step 40
Using the Camera
?Since this camera is small and a bit hard to handle during exposures, you’ll need to keep a few things in mind when using it.
It’s important to keep the camera still when opening and closing the shutter. Since there isn’t any tripod mount, this can be a challenge. The best solution I’ve come up with is using a 6 in. spring clamp modified to attach to a tripod (see chapter 9, “6 Inch Clamp Tripod Mount,” for detailed instructions). In bright sunlight I normally keep my exposure to about 1?2–1 second, and at least double that for cloudy days.
After each exposure, turn the film advance crank about 11?2–2 turns before making another exposure. When you can’t turn the crank anymore, you’re at the end of the roll. Remove the crank from the take-up cartridge spool and put it in the now empty film cartridge. Wind the film back into this cartridge until you can’t wind anymore. Remove the tape that secures the cartridges to the camera. Open the cap on the empty film cartridge and remove the tape connecting the film leader to the spool. make sure all the tape is off the exposed film leader and then wind the remaining film back into the cartridge.
-
Step 41
Processing and Printing your film
If you use color negative or transparency film, take your film to your local film processor. depending on the lab you use, machines may have trouble automatically making prints from your negatives. If that’s the case, simply ask the film technician to process the negatives only. These machines read the black spaces between each frame, and if, for some reason, you overlapped one exposure onto the next, the machine can malfunction. Not to worry. Sometimes it’s interesting to see where the machine decides to crop an image. But if you want to bypass the whole automatic machine printing process, you can have your negatives processed only and then you can scan, adjust, crop, and print them on your own. If the lab scans your negatives, I recommend requesting the highest resolution you can afford. Then use a photo-editing program to process and downsize the images to their final sizes.


Comments


