

Mason Night Light
Extract from Mason Jar Crafts • By Lauren Elise Donaldson • Published by Ulysses Press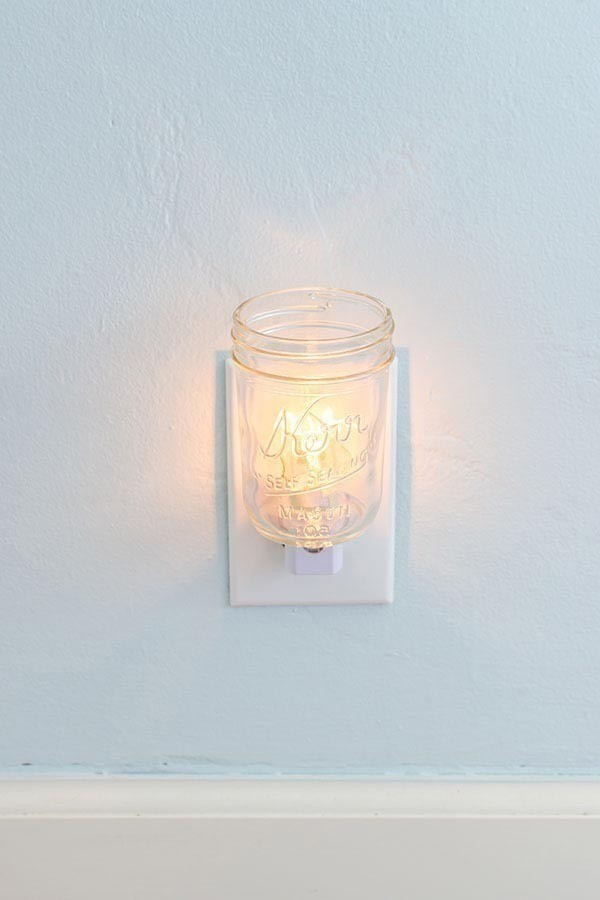


About
Mason Jar Crafts
Difficulty Rating
Moderate
Light up the dark, ominous corners of your home with a night-light disguised as a Mason jar. Instead of living with the ordinary plastic cover that comes with the light, replace it with something more your style, something you made yourself. This project involves drilling a hole in the glass. Take the time to follow the safety instructions laid out in this tutorial. This endeavor can be dangerous, but if you take the right precautions and equip yourself with the correct tools, this project is feasible and fairly simple.
-
 Gunhild N. added Mason Night Light to Nordic style
22 Jun 06:52
Gunhild N. added Mason Night Light to Nordic style
22 Jun 06:52
-
 Muhaiminah Faiz added Mason Night Light to Demi Lovato's Living Room
10 Mar 03:12
Muhaiminah Faiz added Mason Night Light to Demi Lovato's Living Room
10 Mar 03:12
-
 hurley00173 h. added Mason Night Light to To-make list
30 Dec 09:59
hurley00173 h. added Mason Night Light to To-make list
30 Dec 09:59
-
 Angie B. favorited Mason Night Light
15 Nov 07:39
Angie B. favorited Mason Night Light
15 Nov 07:39
-
 Cake Eater Sarah favorited Mason Night Light
15 Nov 05:22
Cake Eater Sarah favorited Mason Night Light
15 Nov 05:22
-
 Ulysses Press published her project Mason Night Light
22 Aug 09:59
Ulysses Press published her project Mason Night Light
22 Aug 09:59
-
Step 1
The metal lid needs to be removed for this project. The metal band is optional.
-
Step 2
You will want to complete this project outside or in a garage since you will be handling glass. Set up your workspace ahead of time and make sure you are prepared before proceeding. You will need your Mason jar, a drill, a 7/8-inch diamond drill bit, gloves to protect your hands, safety goggles for eye protection, and a particulate respirator to fully cover your nose and mouth. Also set up a water source. In this example, a watering can was used so that water could be repeatedly applied to the point of contact between the drill and the glass. A light stream of water from a hose would be effective as well. The water is necessary to keep the drill bit cool while you are working. Without it, the difference in temperature could cause the glass to crack. The water also prevents the glass dust from escaping into the air. You do not want these particles to get into your lungs, hence the use of the water and respirator as a safety precaution.
-
Step 3
Place the mouth of the Mason jar down. You will be drilling into the bottom of the jar. Mark the spot where you wish to begin drilling with a marker. You want to position the hole as close to the back edge of the jar as possible.
-
Step 4
Put on your gloves, goggles and respirator before proceeding.
-
Step 5
Pour water onto the bottom of the jar. The surface is concave so it will pool up. At the marked spot, begin to drill. The drill bit may slip around on the slick surface. This is normal at first. Eventually the bit will start to cut into the glass. Power up the drill as you initiate contact with the jar and keep a firm, steady hand.
-
Step 6
Drilling through glass is a slow and steady process. Apply light pressure with the drill and keep the bit rotating at a slower speed. The quicker you go, the hotter the bit can get, which could potentially crack the glass. Drill for about 30 seconds and then stop, remove the drill, and pour water over the hole. Then continue drilling some more, another 30 or 45 seconds. Stop again and spill water over the hole. Continue with this pattern. You will notice that the dust catches in the water and turns murky white. This is a good thing because it is not escaping into the air. By frequently washing down the surface of the jar, you will be removing the dust and increasing the visibility of your work area.
-
Step 7
Continue drilling until you have punctured a hole all the way through the glass.
-
Step 8
Wet down the surface of the jar to clean it. Safely dispose of the glass displaced by the drill. Run sandpaper along the inner face of the hole to smooth any sharp fragments.
-
Step 9
Remove the plastic cover from your automatic night-light. Unscrew the bulb from the socket.
-
Step 10
The plastic socket is a bit small for the hole. To prevent it from jostling, wrap foam mounting tape around the outside of the socket. The tape will form a wedge between the night-light and jar and keep it steady
-
Step 11
Insert the socket into the hole from the bottom of the jar. Screw the bulb back into the socket from inside the jar.
-
Step 12
Plug in your Mason jar night-light to an electrical socket.
Extra Tips
Depending on your specific brand of automatic night-light, vary the size of the hole that you drill into the bottom of the jar. In this project, the size needed to be ⅞ -inch. To determine sizing, take the automatic night-light, remove the plastic cover, unscrew the bulb, and measure the diameter of the plastic socket. Buy the drill bit that corresponds to that diameter.Spray-paint your jar for a more colorful night-light, but avoid covering the jar in fabric or loose trims. Night-lights are not extremely hot, but you want to avoid a possible fire hazard.

