About
Wall Art
Light up a section of wall and give your room an urban-cool vibe with this industrial-look, illuminated arrow. The string of LED lights is battery operated, so there are no unsightly wires to deal with.
Please note: the template is at 25% and it will need to be enlarged by 400%. To do this, you will need to enlarge by 200% on a photocopier and then enlarge that photocopy by another 200%.
Downloads
- 111752_2F2015-10-29-203255-light+up+arrow.eps 731 KB [ Download ]
- 111752_2F2015-10-29-203305-light+up+arrow.pdf 1.05 MB [ Download ]
-
 Presley W. favorited Marquee Arrow
24 Sep 06:34
Presley W. favorited Marquee Arrow
24 Sep 06:34
-
Mark M. favorited Marquee Arrow
03 Jun 02:52
-
 RareJewel favorited Marquee Arrow
20 Jan 01:10
RareJewel favorited Marquee Arrow
20 Jan 01:10
-
 Pippa added Marquee Arrow to DIY Room
06 Jan 11:54
Pippa added Marquee Arrow to DIY Room
06 Jan 11:54
-
 amyistheparty favorited Marquee Arrow
19 Nov 18:30
amyistheparty favorited Marquee Arrow
19 Nov 18:30
-
 Tierra T. favorited Marquee Arrow
16 Nov 17:45
Tierra T. favorited Marquee Arrow
16 Nov 17:45
-
 Ryland Peters & Small published his project Marquee Arrow
16 Nov 06:00
Ryland Peters & Small published his project Marquee Arrow
16 Nov 06:00
You Will Need
-
Step 1
Enlarge the template to the right size using a photocopier and cut it out. You will need to work in two sections on ledger-size (A3) sheets of paper and join them together. Alternatively, scale up using graph paper to make a template for each size arrow.
-
 Step 2
If you are using the photocopy method, cut out the template and lay it down on coloured card stock (card) for the border section. Secure with masking tape and draw around the edge using pencil. Cut this out, using the craft knife and protecting your work surface with a cutting mat.
-
 Step 3
Trim the border section from the template so that you are left with the smaller arrow. (You will not need to do this if you scaled up two separate templates using graph paper.) Follow Step 2 to cut an arrow from a contrasting colour of card stock (card).
-
Step 4
Use craft glue (PVA) to stick the smaller arrow on top of the larger arrow, leaving an even border all around.
-
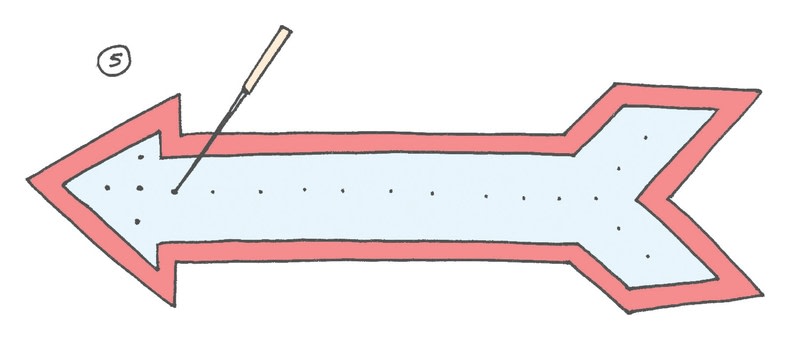
 Step 5
Mark positions for the lights. If using the photocopy method, center the small arrow template over the back of your arrow shape, and press the awl (bradawl) through at each dot. Remove the template and pierce each hole a second time, using a knitting needle to make the holes bigger. The lightbulbs should fit snugly into the holes.
-
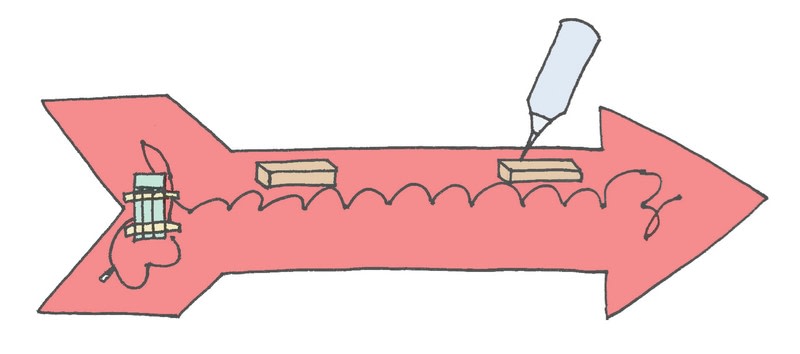
Step 6
Push each bulb into a hole from the back. I used 19 of the 20 bulbs, as that worked best with my measurements. Tape the battery pack to the back of the arrow.
-
 Step 7
Stick the two blocks of wood to the back of the arrow—one at either end. You can use these to rest on nails, for hanging.