


About
Warning: grotesque teddy bear mutilation ahead!
"Something came through the woods, above our heads. I glanced up, saw something brown and furry, but flat, like a huge rug, flapping and curling at the edges, and, at the front of the rug, a mouth, filled with dozens of tiny sharp teeth, facing down.
It flapped and floated above us, and then it was gone.
'What was that?' I asked, my heart pounding so hard in my chest that I did not know if I would be able to stand again.
'Manta wolf,' said Lettie. "We've already gone a bit further out than I thought...'"
-"The Ocean at the End of the Lane" by Neil Gaiman
My favourite mad-haired fantasy author was coming to town for a book signing event, and I wanted to make him a little gift. I would like to give him something really cool, really amazing... but I'm broke. So I made him a little toy manta wolf out of an old teddy bear.
A warning to the experienced crafters who are reading this tutorial:
I am not a sewing person. My crooked hand-stitches would make your grandmother vomit with rage. If sloppy sewing mistakes make your obsessive-compulsive seamstress heart pound with impotent frustration, turn back now. I have almost no sewing experience except for the occasional loose button, and if there is a "right way" to make a plushie, I'm pretty sure I did it the other way -- but I had an awful lot of fun.
Disclaimer: I don't own the idea of a manta wolf or any of Mr. Gaiman's other creations, and I made no profit from this -- unless you count happiness as profit, in which case it made me appallingly rich.
Tags
-
 Kristy B. favorited Manta Wolf Plushie From Neil Gaiman's "The Ocean At The End Of The Lane"
24 Mar 10:28
Kristy B. favorited Manta Wolf Plushie From Neil Gaiman's "The Ocean At The End Of The Lane"
24 Mar 10:28
-
 Xfluffy_unitatoX favorited Manta Wolf Plushie From Neil Gaiman's "The Ocean At The End Of The Lane"
03 Dec 22:19
Xfluffy_unitatoX favorited Manta Wolf Plushie From Neil Gaiman's "The Ocean At The End Of The Lane"
03 Dec 22:19
-
 Patricia F. favorited Manta Wolf Plushie From Neil Gaiman's "The Ocean At The End Of The Lane"
06 Jun 00:14
Patricia F. favorited Manta Wolf Plushie From Neil Gaiman's "The Ocean At The End Of The Lane"
06 Jun 00:14
-
 Chantal C. favorited Manta Wolf Plushie From Neil Gaiman's "The Ocean At The End Of The Lane"
06 Apr 03:33
Chantal C. favorited Manta Wolf Plushie From Neil Gaiman's "The Ocean At The End Of The Lane"
06 Apr 03:33
-
Chantal C. commented on Manta Wolf Plushie From Neil Gaiman's "The Ocean At The End Of The Lane"
06 Apr 03:30
-
 raven w. favorited Manta Wolf Plushie From Neil Gaiman's "The Ocean At The End Of The Lane"
29 Jul 09:38
raven w. favorited Manta Wolf Plushie From Neil Gaiman's "The Ocean At The End Of The Lane"
29 Jul 09:38
-
 Spookachtige favorited Manta Wolf Plushie From Neil Gaiman's "The Ocean At The End Of The Lane"
23 Apr 07:32
Spookachtige favorited Manta Wolf Plushie From Neil Gaiman's "The Ocean At The End Of The Lane"
23 Apr 07:32
-
 ZenPinkBunny favorited Manta Wolf Plushie From Neil Gaiman's "The Ocean At The End Of The Lane"
19 Nov 19:04
ZenPinkBunny favorited Manta Wolf Plushie From Neil Gaiman's "The Ocean At The End Of The Lane"
19 Nov 19:04
-
 AlterEgo Designs favorited Manta Wolf Plushie From Neil Gaiman's "The Ocean At The End Of The Lane"
18 Nov 01:54
AlterEgo Designs favorited Manta Wolf Plushie From Neil Gaiman's "The Ocean At The End Of The Lane"
18 Nov 01:54
-
 Moose:) added Manta Wolf Plushie From Neil Gaiman's "The Ocean At The End Of The Lane" to Toys to make
29 Oct 07:21
Moose:) added Manta Wolf Plushie From Neil Gaiman's "The Ocean At The End Of The Lane" to Toys to make
29 Oct 07:21
-
 Step 1
Find a source of inspiration.
-
 Step 2
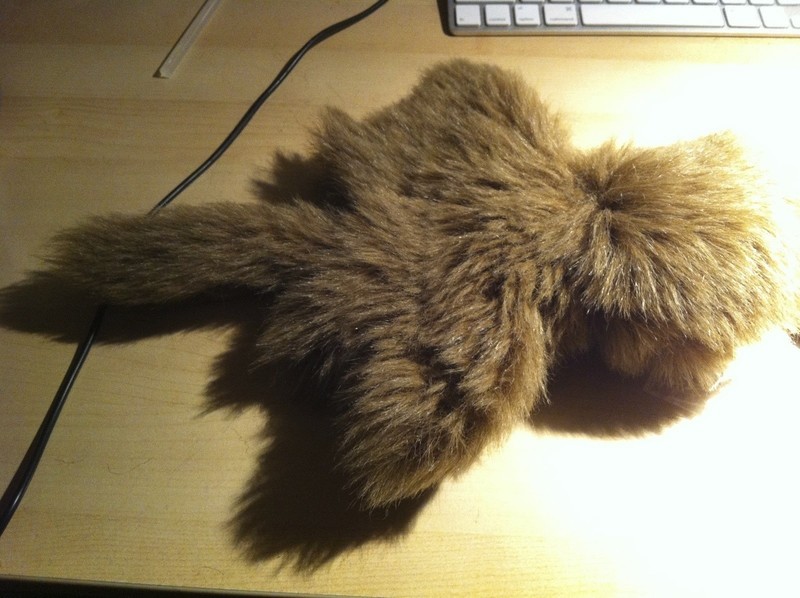
Get some fake fur. Look for something greyish brown and wolfy-looking.
Like most university students, I am not rich. I eat like a raccoon and dream of the day when I can fill my car up with more than $5 of gas at a time. So instead of buying a meter of fake fur for $10, I found a secondhand teddy with fur in decent shape (no stains, no smells, no worn patches) for fifty cents at the Salvation Army.
A tumble through the washing machine on the cold cycle, and he’s ready.
-
 Step 3
AAAAARGH!!
I snipped a hole across Teddy’s bum seam from one leg to the other, took out his guts, and turned him inside out. This lets us see his seams more easily, instead of having to hunt for them in his thick fur. Here he is resting on a pile of his own soft, fluffy entrails.
-
 Step 4
I found the seams around Teddy’s arms and legs and snipped them off. Then I snipped one seam up his side to his neck, so that his back and his belly were still attached by the other side seam.
Trying to cut around fur is MUCH harder than it looks.
And on that note...
-
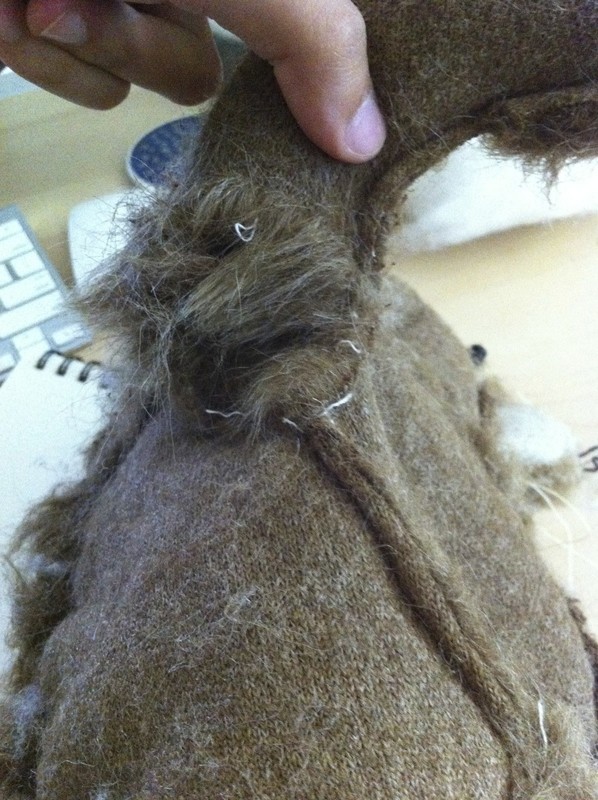
 Step 5
A note about fur:
Fur is unforgiving. Fur does not grow back. If you snip it the wrong way, it will almost always be noticeable. Look closely as you cut and be careful that the blades of your scissors aren’t catching fur when you’re snipping seams, like mine are in this picture. -
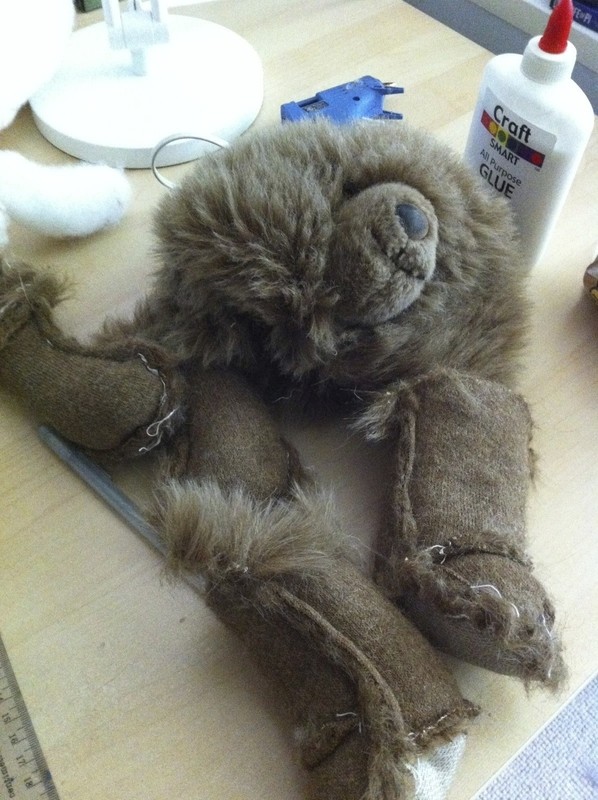
 Step 6
Put all of Teddy's gruesome, amputated body parts aside in a pile. We’ll need them later.
-
 Step 7
I drew a paper template of the manta wolf’s body, making it slightly larger than I wanted in order to leave a little stitching room around the edges.
I folded the paper in half before I cut it in order to make the sides symmetrical and then unfolded it when I was done, like making a paper snowflake.
-
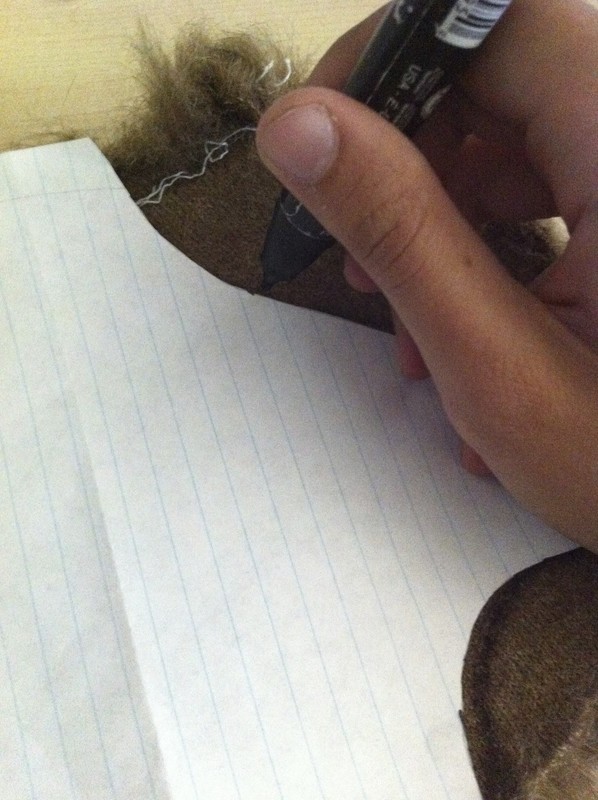
 Step 8
I pressed the manta template against the fabric and drew its outline in felt pen.
As you draw your body outline, be sure that the fur is facing in the correct direction, or you’ll have a toy with fur that has to be petted upwards, from its bum to its neck.
-
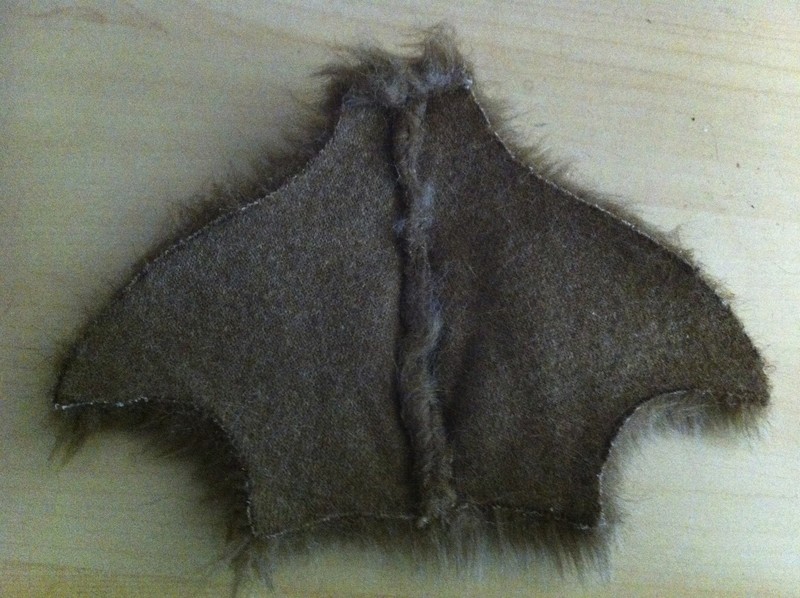
 Step 9
Then I cut out the design I had drawn on the fur.
A second note about fur:
You can’t really use a pair of scissors to cut fur. It’s best done with an X-Acto knife, fabric side up, fur side down. If you absolutely have to use scissors, go slowly, pulling the fur out of the way with your fingers as you go, or you’ll end up with a ragged, patchy edge with bald bits.
-
 Step 10
Go back to the grisly pile of body parts and pick out a nice looking piece of fur from one of Teddy's arms or legs. Then snip it into a sort of rectangle with one end tapered. This will be his tail. Again, look for which way the fur naturally lies.
-
 Step 11
Fold this rectangular piece of fur in half lengthwise and stitch or hot-glue it together. Or both, if you’re me. Because I do not know what I am doing.
Ta-dah! You’ve made a tail! You can stuff a little bit of Teddy’s stuffing down it if you like a nice full tail, but the fur I used was thick enough that it didn’t need it.
-
 Step 12
Place the two body pieces, the ones you cut out from the paper template, over each other so they line up, with the fabric sides facing out and the fur sides facing in.
If you are smart and experienced, you will pin it before you begin to sew. If you think (A) you’re too good for pins, or (B) you don’t have the money for pins, your project will probably suffer for your hubris/poverty. I learned this.
Thread a needle. Hand-stitch the two pieces of fur together along the sides -- but leave the top and the bottom open, so the body is sort of an empty ring of fur that you can slip your arm through. Later, you’ll need to attach the head and tail using these unsewn gaps at his bum and neck.
-
 Step 13
Take one of Teddy’s paws. Dig out any remaining stuffing. Then, like I do in the picture here, slip your hand in and use it like a sock puppet. This will be his mouth.
Time to plug in your hot glue gun.
Find the crease in the fur where you want the mouth to be. Then, with your fingers still inside the head, run a line of hot glue along the fur on the outside where you want the mouth to be. Pinch it tightly shut to make the “sock puppet” stick that way once your hand is removed. Hold it until it sets.
Stuff a fist-sized gob of of Teddy’s stuffing into the head to give it some form, but don't sew it closed yet.
-
 Step 14
Ah, that moment of satisfaction where you can begin to see how it’s going to look when it’s done!
The three parts -- head, body, and tail -- are laid out. Now we only need to link them up and add a few details.
-
 Step 15
Get that needle and thread out again. We're going to sew the head and tail onto the body.
Open up the gap you left in the bum, and slide the first half inch of tail inside the body cavity. Sew it in, being careful to hold it straight and seam side down.
Then sew up the gap. If you are smart, you will turn him inside out first so the seams won't show when you are finished. If you are like me, you will forget until afterwards and just hope for the best.
I didn't add any stuffing to the body. I wanted him to have a very thin, wide, floppy body to play up the "manta" part of "manta wolf". I did experiment with adding wire along the inside of the "fins" to create cool bendy fins you can pose, but the wire I had wasn't strong enough. Oh well -- he's more cuddly this way anyway.
On the other side of the body, take the head and carefully sew the neck to the body. You will have to do this from the outside, but the fur should hide your stitches.
A third and final note about fur: when you're sewing it, it often gets caught under the thread. Just gently use the pointy end of the needle to tug the trapped fur free after each stitch.
-
 Step 16
And we have a manta wolf!
Except we need, of course, some teeth. And eyes. And perhaps claws.
-
 Step 17
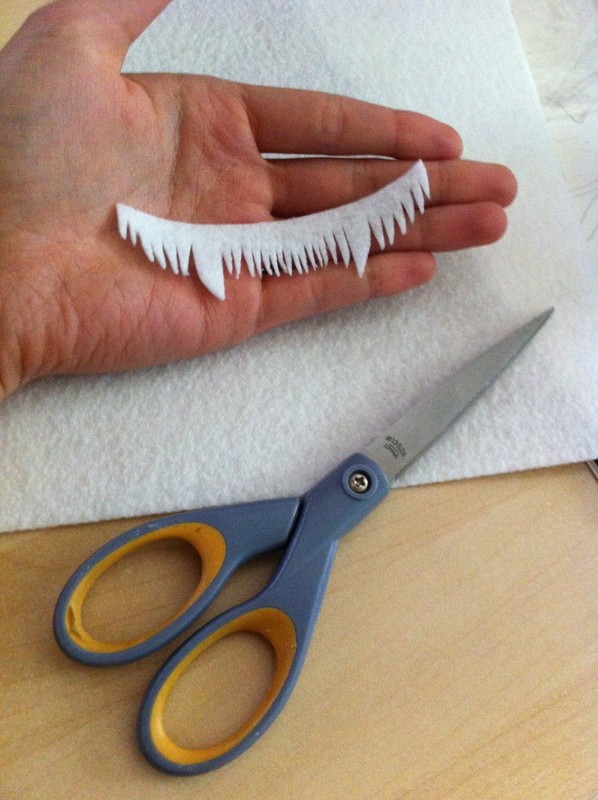
Time for teeth! Take a piece of nice stiff white felt. Cut out a gently curved rectangle, and snip some fangs out. Be playful with this part -- you don’t need to make it perfectly symmetrical or even. In fact, it’ll look better if it’s not.
Leave at least half a centimeter of felt above the fangs so the teeth don’t fall apart.
-
 Step 18
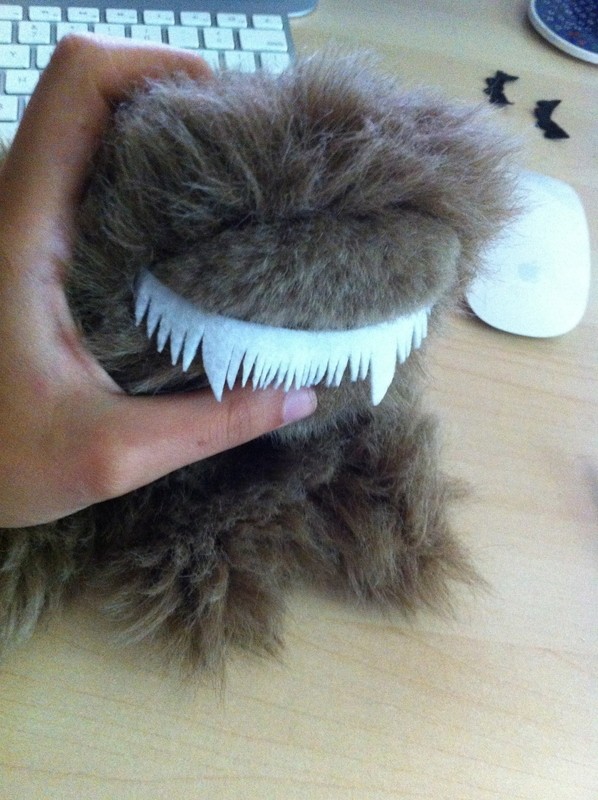
Cut a second, slightly smaller strip of white felt in roughly the same shape. Use your hot glue gun to stick it on the fur where you want the mouth to be. Then, once the glue is set, glue the teeth to it in a nice curving smile. Or a hideous terrifying one, if that's what you're going for.
This step helps to anchor the teeth to the fur and makes the whole business look tidier. It shouldn’t be visible once you’re done, unless you pull the teeth aside and look for it.
-
 Step 19
Om nom nom!
-
 Step 20
I took these claws from another teddy bear, but you can easily cut something like this from a bit of scrap black plastic or leather. Attach the claws at the tips of the manta’s “wings” with a dab of hot glue, and smooth the fur over the base of the claws so the glue is hidden.
-
 Step 21
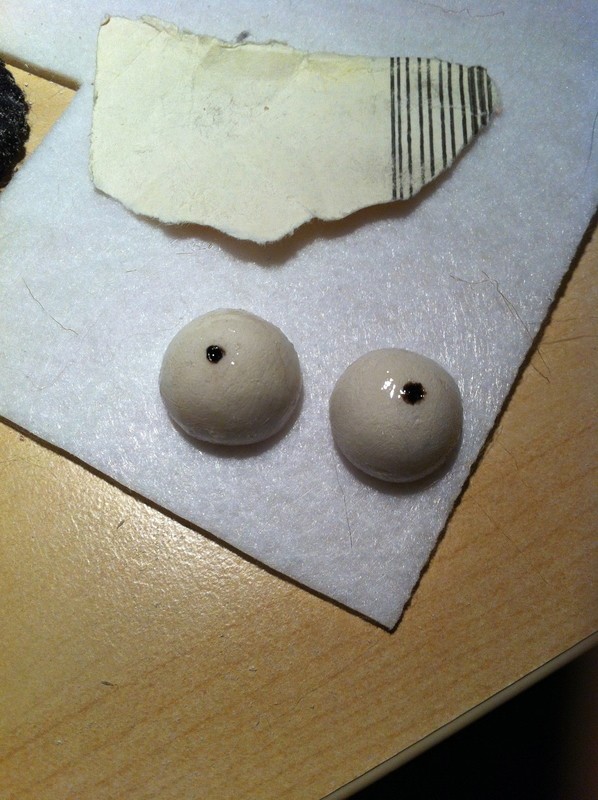
And now my favourite part... the eyeballs.
I used a product called Paper Clay, a mix of clay and paper fiber that becomes surprisingly strong and light after a few hours of air-drying. I rolled a ball of it in my hands and cut it in half so I had two equal half-spheres, and let them dry overnight.
When they were dry, I took a bit of fine grain sandpaper and gently smoothed away any lumpy bits of Paper Clay.
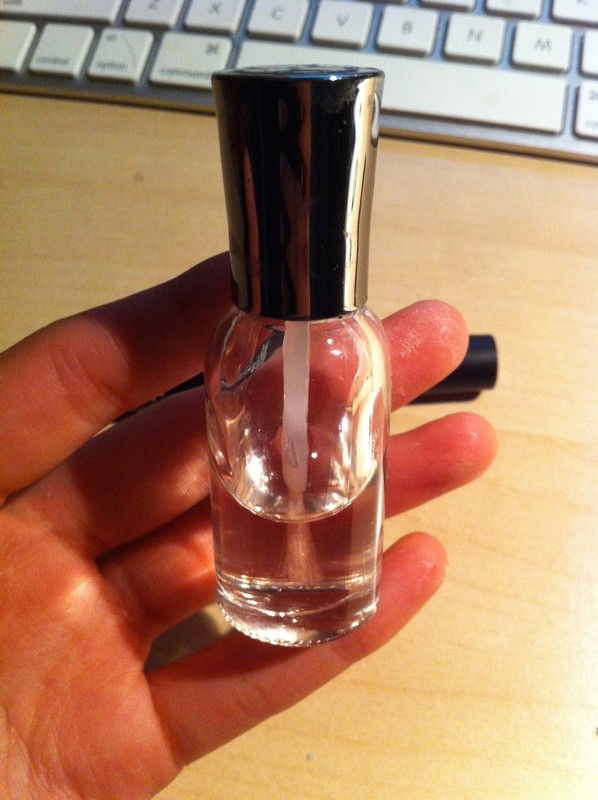
Then I painted the eyeballs with a clear gloss resin which, its bottle told me, “dries clear and tack free.” This, it turned out, is an ugly, sad little lie. After an hour of drying, the resin was still sticky and peeled wherever my fingers got stuck on it.
-
 Step 22
So I used a coat of this instead. MUCH better. Thank you, Sally Hansen!
-
 Step 23
I used a black felt marker to make two pupils on the eyes.
Unfortunately the pupils in this photo are very uneven, but I fixed them.
When I liked the way the eyes looked, I gave the pupils another coat of nail polish to protect the ink from fading or smearing.
-
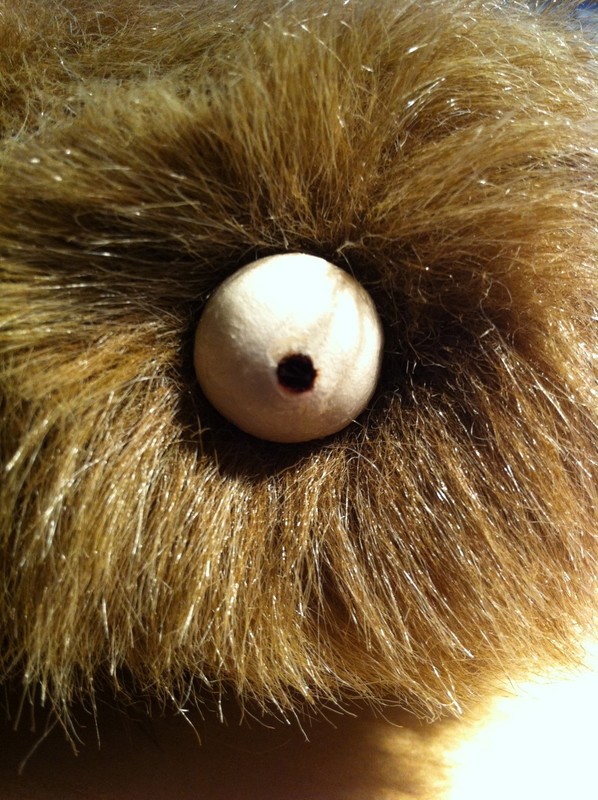
 Step 24
I found the two places on the head where I wanted the eyes to go. I pushed the fur away, took my scissors, and trimmed the fur short in those two spots, making it easier to glue the eyes on.
-
 Step 25
Admire your handiwork.
-
 Step 26
Give the manta wolf to your favourite author and watch him make this wonderful face!
-
 Step 27
:)


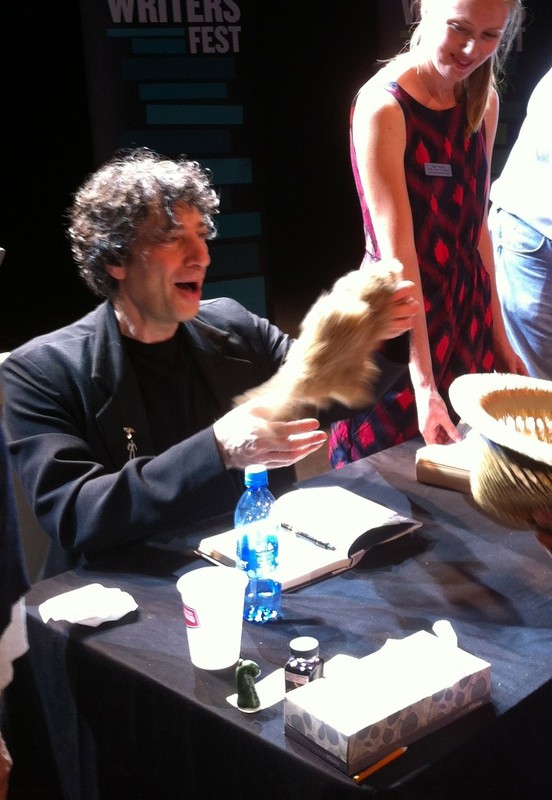


It's impresive! Good Work