


About
make your own moveable parts tools of scraps for a doll;-D
I was making the mouse pluchie wich had moveable limbs, and of course the washers and pins were all wrapped in boxes for my upcoming moving-S
I found that out on sunday morning when i needed them, so i didn't want to buy new ones or to wait till t he hardware shop was open on monday morning.
I was upset of the long waiting time of the moving and allready live too long between boxes.
So suddenly it thought why can't i make them by my self? So i was searching all around my house for useable things to make them.
I found out to make themof plastic tubes of meds wrapping and curtain hooks.
I thought mayby it's nice to make for you all a tute to make your own tools for such a doll.
Of course you can use the ironpins you can buy in the hardware store with washers , and of course if you don't find such one you can use tiny moertjes en boutjes as well
But that's up to you.
i hope it's helpful for you all.
much succes and thank you for stopping by;-D
Tags
-
 Bek S. favorited Make Your Own Moveable Part Tools Of Scraps
02 Aug 10:41
Bek S. favorited Make Your Own Moveable Part Tools Of Scraps
02 Aug 10:41
-
distel d. favorited Make Your Own Moveable Part Tools Of Scraps
28 Apr 17:43
-
 Mistress Nora of Madness favorited Make Your Own Moveable Part Tools Of Scraps
21 Feb 02:44
Mistress Nora of Madness favorited Make Your Own Moveable Part Tools Of Scraps
21 Feb 02:44
-
Alissa B. favorited Make Your Own Moveable Part Tools Of Scraps
27 Aug 04:19
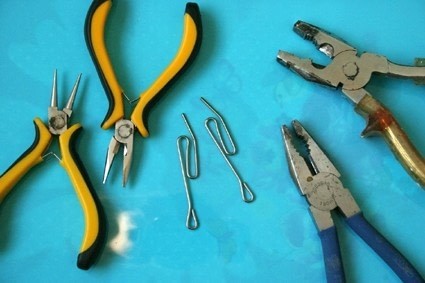
You Will Need
-
 Step 1
You need for making the moveable tools between the limbs of your doll two of these tubes or something like that.
they are of hard plastic but easy to saw with an hacksaw. -
 Step 2
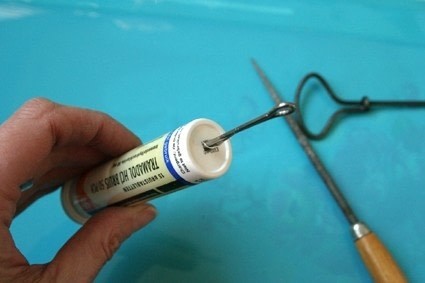
Make holes with the tiny iron hand drill in the bottom of the tubes.
With the metal file you can make the holes roomier. -
 Step 3
with the metal file you can make the holes roomierr so that the iron pins can put throw them.
Try this the whole time by fitting the iron curtain pins in it., The holes mustn't be too large.!!!! -
 Step 4
Cut of the botoms with a hacksaw.
Watch the picture to know how large i have made them.
For every moveable limb you need two of these part of the tubes.
so go on;-D -
 Step 5
Making the pins of the curtains hooks:
Those tools you need for folding the curtains hooks.
watch the picture;-D -
 Step 6
When you start with refolding the curtain hook it will look like number one.
Unfold the leg that is folding down like i show you in the picture by number 2. -
 Step 7
By this step you must make the head eye in the top in the middel of the iron curtain hook.
First you spread the boths legs and with using the flat nose plier it will look like this . -
 Step 8
Bend the middle together with your bigger pliers.
-
 Step 9
And .....cut off t he leg parts , watch the picture.
-
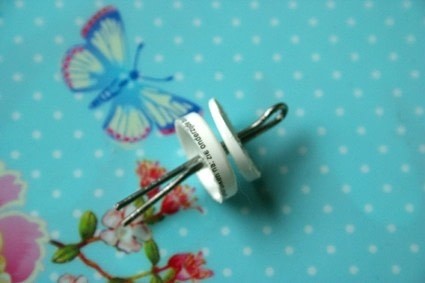
 Step 10
Slide the two plastic "whashers on the pin , and you're done !!!!!
Yeaaaah ready to for making your moveable plushie ;-D
Thank you for stopping by, and i hope this tute is helpfull for you all;-D


I was just going to cut circles out of cardboard and duct tape them, but this is better!