
About
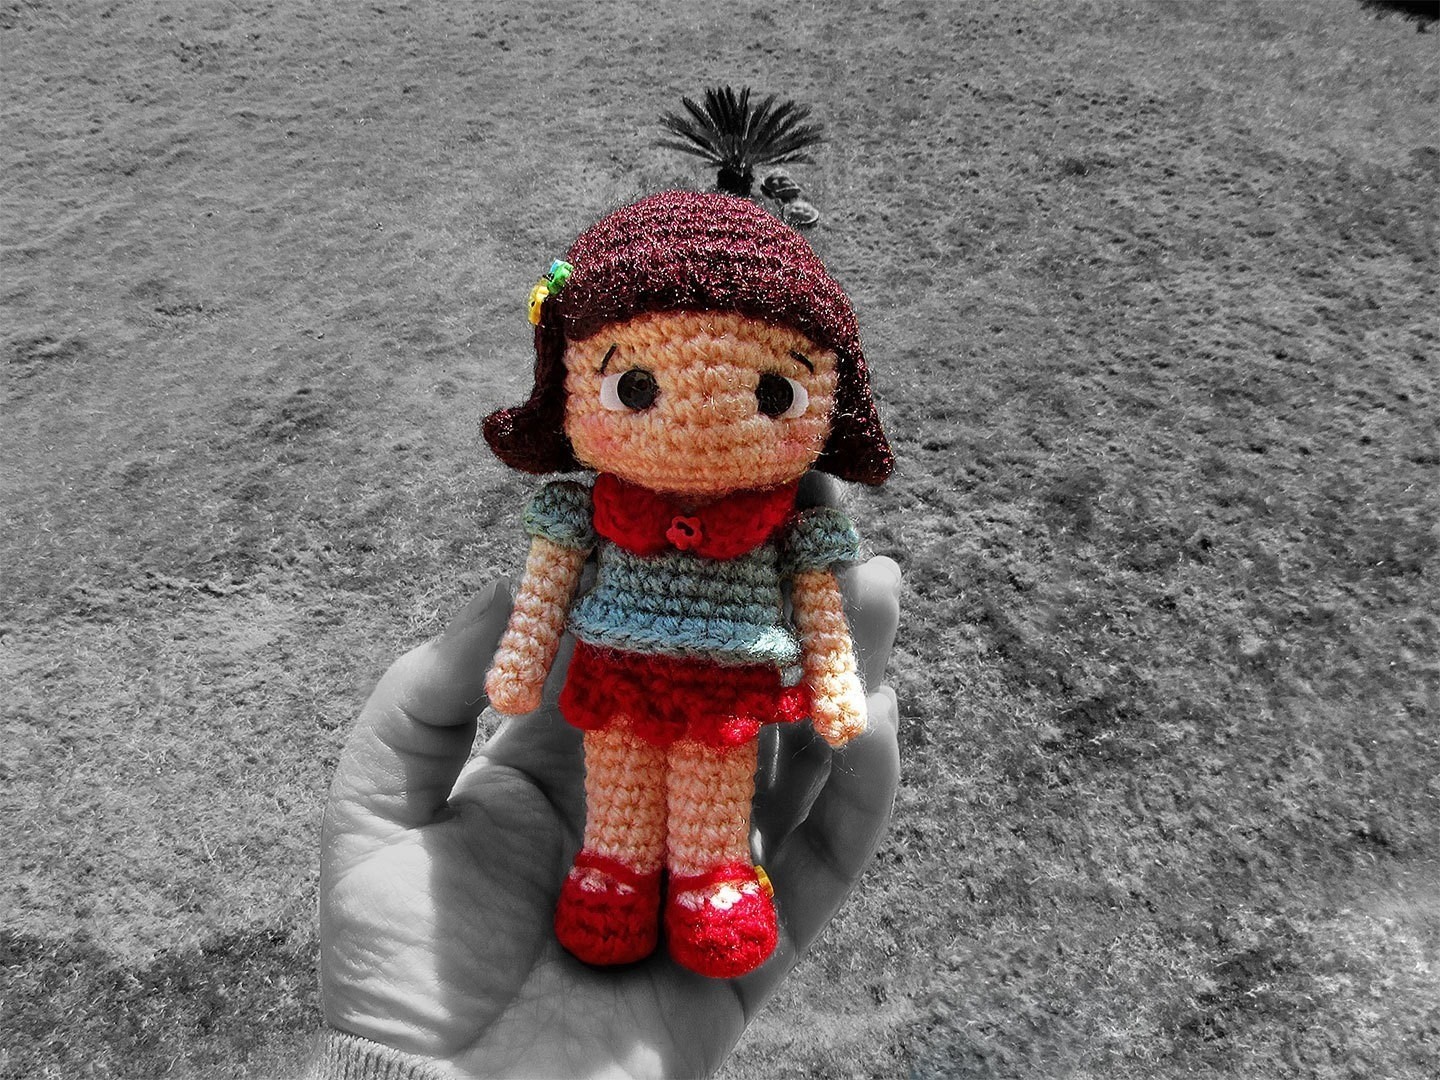
Make Maiya, the sweet naughty little girl
Namaste! Greetings from Kathmandu. My name is Maiya [my-YA], which means “little girl” in Nepali, and that’s my picture up there. As you can see, I’m only 5.5 inch tall. Looking at me you’d never guess but I love doing silly stuff. Like jumping into a puddle (I have to make sure it’s a really tiny one though or I’ll drown) or whirling around and around till I get dizzy and go bumping around stuff (and at 5.5”, it’s easy to be knocked out by something as harmless as a table lamp!). But it’s fun and totally worth a bump or two.
Okay enough about me. The person who made me asked me to tell you I’m very easy to make. Would you like to make me? We could be good friends, you know. :)
-
 gloomy-smiles favorited Maiya
18 Jan 03:37
gloomy-smiles favorited Maiya
18 Jan 03:37
-
 Alex Z. added Maiya to Интересное
12 May 15:27
Alex Z. added Maiya to Интересное
12 May 15:27
-
 jeanetteedwardswasthomas added Maiya to Crochet
04 Mar 07:52
jeanetteedwardswasthomas added Maiya to Crochet
04 Mar 07:52
-
 ZombieUnicorn favorited Maiya
14 Jan 21:40
ZombieUnicorn favorited Maiya
14 Jan 21:40
-
jack m. favorited Maiya
14 Oct 05:32
-
 Michael P. favorited Maiya
28 Sep 09:56
Michael P. favorited Maiya
28 Sep 09:56
-
 Josh P. favorited Maiya
19 Sep 10:46
Josh P. favorited Maiya
19 Sep 10:46
-
 Bonnie P. favorited Maiya
14 Sep 07:08
Bonnie P. favorited Maiya
14 Sep 07:08
-
 Martha R. favorited Maiya
20 Aug 07:33
Martha R. favorited Maiya
20 Aug 07:33
-
 Niamh R. favorited Maiya
19 Aug 09:31
Niamh R. favorited Maiya
19 Aug 09:31
-
Step 1
LEG (make 2)
Round 1: With red yarn, 6 sc in a magic ring. (6)
Round 2: inc X 6. (12)
Round 3: (sc 1, inc) X 6. (18)
Round 4: dec X 6, sc 6. (12) Fasten off this color.
Round 5: Join light peach. Working in BLO, dec X 3, sc 6. (9)
Round 6-14: sc around. (9)
Mark the second stitch in the next round and fasten off. Stuff.Make the second leg following pattern from Round 1-14. In the next round, sl st in the next 4 st. Stuff.
Strap: Sew shoe straps on both feet with red yarn. Attach 4mm yellow flowers at the end of the straps.
-
 Step 2
BODY
Round 1: In this round, we will join the legs.
Hold the first leg on the left of the working piece. sc in the marked stitch (See Fig 1), sc in the remaining 8 st of this leg. Now sc in all 9 st of the second leg. (18)
Round 2-8: sc around. (18) Stuff.
Round 9: (sc 1, dec) X 6). (12)
Round 10: sc around. (12)
Fasten off and weave in yarn end. Stuff. -
Step 3
DRESS
We will work top down, from the neck of the shirt to the skirt.
Round 1: With grey, ch 18. Make a circle by joining to the first chain with a sl st. (18)
Round 2: sc around. (18)
Round 3: (sc 5, inc) X 3. (21)
Round 4-5: sc around. (21)
Round 6: (sc 6, inc) X 3. (24)
Round 7: Working in FLO, hdc around. (24) Fasten off this color.
Round 8: Join red and working in BLO sc around. (24)
Round 9-10: sc around. (24)
Round 11: In this round, we will make the frills on the hem of the dress. (sc in the first st, ch 4, hdc in the third st from the hook, hdc in the next st, skip the next st on the hem of the dress, sl st in the next st) X 8.
Fasten off, weave in yarn ends.Collar: Hold the body upside down, legs facing away from you. Join red yarn on the center of the shirt neck, ch 3, 3 dc in the same st, dc around, 3 dc in the last st, ch 3, sl st in the same stitch. Fasten off, and sew collar around the neck. Keep the collar in place by sewing it to the shirt at the back. Sew a red 4mm flower button between the collars.
-
Step 4
SLEEVE (make 2)
Round 1: With grey, 6 sc in a magic ring. (6)
Round 2: inc X 6. (12)
Round 3: sc around, sl st in the next st. (12)
Fasten off, leaving a long tail to sew. -
Step 5
ARM (make 2)
Round 1: With light peach, 6 sc in a magic ring. (6)
Round 2-10: sc around. (6)
Fasten off, weave in yarn end. Do not stuff.
Insert arm into the sleeve and sew these together. Next, sew the arms on the body. -
Step 6
HEAD
Round 1: With light peach, 6 sc in a magic ring. (6)
Round 2: inc X 6. (12)
Round 3: (sc 1, inc) X 6. (18)
Round 4: (sc 2, inc) X 6. (24)
Round 5: (sc 3, inc) X 6. (30)
Round 6: (sc 4, inc) X 6. (36)
Round 7-13: sc around. (36)
Round 14: (sc 4, dec) X 6. (30)
Round 15: (sc 3, dec) X 6. (24)
Round 16: (sc 2, dec) X 6. (18)
Round 17: (sc 1, dec) X 6. (12)
Stuff and fasten off, leaving a long tail to sew. -
 Step 7
EYES
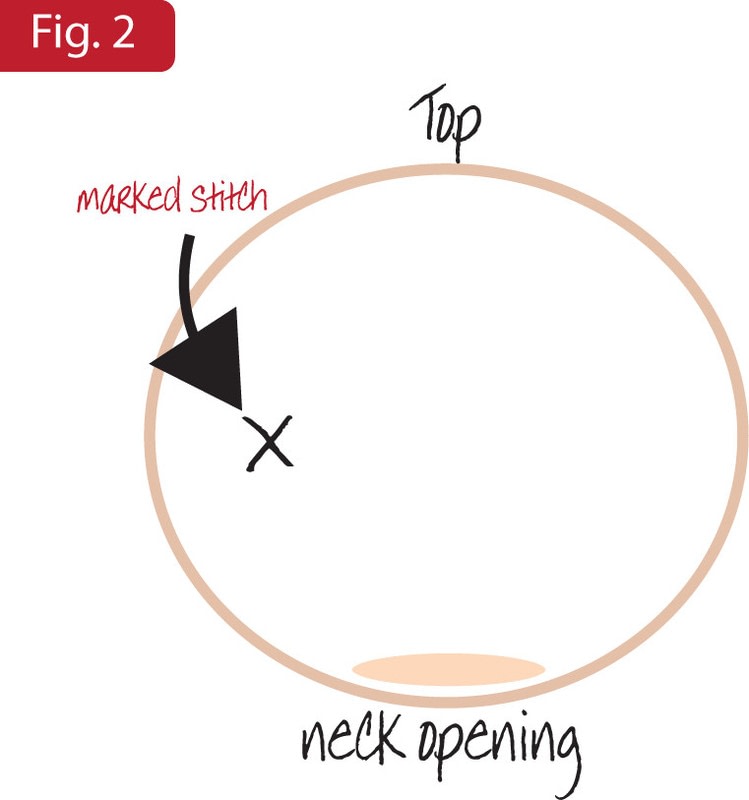
Indent eye area: Count down from the top of the head and mark a stitch between Round 10 and 11 (Fig 2). -
 Step 8
From this point, count 7 stitches horizontally and mark the 8th stitch (Fig 3).
-
 Step 9
Thread a yarn needle with light peach yarn. Insert needle from the neck opening and bring it out from one of the marked stitches (Fig 4).
-
 Step 10
Push the needle back in from the adjacent stitch and bring it out from the stitch that is on the right of the next marked stitch (Fig 5).
Push the needle back in again from the marked stitch, bringing it out from the neck opening (Fig 6). Pull both the yarn ends tightly to indent the eye area and secure the shape with a few knots.
-
Step 11
Attach eyes: Cut out an oval from white felt and further cut it in half so that you have two semi circles. Glue them over the ident you created earlier. Sew 6mm black buttons over the ovals, making sure a bit of felt is left uncovered by the buttons.
-
Step 12
Eyebrows: With four strands of black sewing thread, embroider eyebrows.
-
Step 13
WIG
Top
Round 1: With light peach, 6 sc in a magic ring. (6)
Round 2: inc X 6. (12)
Round 3: (sc 1, inc) X 6. (18)
Round 4: (sc 2, inc) X 6. (24)
Round 5: (sc 3, inc) X 6. (30)
Round 6: (sc 4, inc) X 6. (36)
Round 7-8: sc around. (36)
Mark the next st from where we will work on the back hair panel later. For now, we will continue working with the “live” stitch.Fringe
ch 3, turn, dc in the next 11 st. (12) Fasten off.Back panel
Row 1: Join yarn on the marked stitch and sc in the next 24 st, ch 1, turn. (24)
Row 2-3: sc 24, ch 1, turn. (24)
Row 4: inc, sc 22, inc, ch 1, turn. (26)
Row 5-6: sc 26, ch 1, turn. (26)
Row 7: inc, sc 24, inc, ch 1, turn. (28)
Row 8: sc 28, ch 1, turn. (28)
Row 9: sc 28. (28)
Sc along both row ends to even out the edges.Sew the wig on head. You can leave the last three rows of the back hair panel unattached if you want the hair to flip out. Attach the remaining three 4mm buttons to the hair.
If you want a bit of color on her cheeks, you can lightly apply rouge using your finger tip.
-
Step 14
Finally, sew the head to the body.