About
Gorgeous Golden eyes!
I have to admit that I did this eye more for myself….you see, I have sooo many eyeshadows…but recently I have been doing the same eye looks on myself over and over. Not because I don’t feel like getting creative… but because there are just a set group of eye looks that I love on myself and lately I haven’t wanted to veer away from them. But this morning I woke up and told myself that I absolutely had to branch out as I have some colors I never, ever wear. So… this tutorial is a result of all of that which unfolded this morning. It is actually a great eye for fall/winter and I will definitely be wearing it again. The majority of the color is “Antiqued”-which just screams fall to me with it’s bronzey tones. “Antiqued” is also a lovely color on you blue eyed ladies as the orangey tones make the blue in your eyes pop! Products used: MAC Eyeshadows in Crystal Avalanche, Amber Lights and Antiqued, MAC Paint Pot in Soft Ochre, MAC Lipstick in “Velvet Teddy”, Maybelline Eye Studio Gel Liner in “Blackest Black”
Tags
-
 Siana favorited Mac "Antiqued" Tutorial
24 Dec 22:21
Siana favorited Mac "Antiqued" Tutorial
24 Dec 22:21
-
 Suzi T. favorited Mac "Antiqued" Tutorial
08 Nov 01:52
Suzi T. favorited Mac "Antiqued" Tutorial
08 Nov 01:52
-
 bemeself added Mac "Antiqued" Tutorial to make-up
15 Jun 14:22
bemeself added Mac "Antiqued" Tutorial to make-up
15 Jun 14:22
-
Kaiulani W. favorited Mac "Antiqued" Tutorial
12 Jun 05:19
-
 Sharon H. favorited Mac "Antiqued" Tutorial
11 Jun 16:58
Sharon H. favorited Mac "Antiqued" Tutorial
11 Jun 16:58
-
 Sarah W. favorited Mac "Antiqued" Tutorial
15 Feb 23:02
Sarah W. favorited Mac "Antiqued" Tutorial
15 Feb 23:02
-
 Sarah Kim added Mac "Antiqued" Tutorial to Beauty
18 Dec 19:04
Sarah Kim added Mac "Antiqued" Tutorial to Beauty
18 Dec 19:04
-
Sarah Kim favorited Mac "Antiqued" Tutorial
18 Dec 19:04
-
 Jacqulene C. favorited Mac "Antiqued" Tutorial
12 Dec 20:44
Jacqulene C. favorited Mac "Antiqued" Tutorial
12 Dec 20:44
-
 Judy added Mac "Antiqued" Tutorial to Clary
06 Nov 23:34
Judy added Mac "Antiqued" Tutorial to Clary
06 Nov 23:34
You Will Need
-
 Step 1
Apply concealer on the lid up to the brow, all around the eye and underneath the eye. Set with powder. Apply your primer, I use MAC’s Paint Pot in “Soft Ochre”. Using a stiff fluffy, apply “Antiqued” all over the lid and up..stopping just past the crease. Pick up some color on your bullet brush and apply the shadow underneath the eye. Starting at the corner of the lower lashline, drag that color out diagonally….what we are doing is just dragging that color out past the natural end of the eye to make the eye appear bigger. It should look something like this:
-
 Step 2
Using your bullet brush, apply “Amber Lights” right above wherever you ended with “Antiqued”. It should look something like this:
-
 Step 3
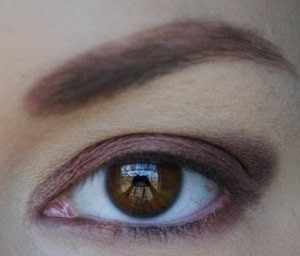
Using your big fluffy, blend blend blend! Using a stiff brush, apply your highlight from the brow bone down into the inner corner. Blend it out a bit. Apply your gel liner to the waterline. I also took an wide angled brush and lined the top of my eye. I then smudged out the liner on the lower lashline out to create a wing. This was not a stiff wing at all because of the wide, angled brush that I used and also because I used residual liner not full on liner. I also applied more “Antiqued” to my lower lashline. Apply your fake eyelashes and go over any excess glue with gel liner. Your final product should look something like this: