


About
My Felt Doll
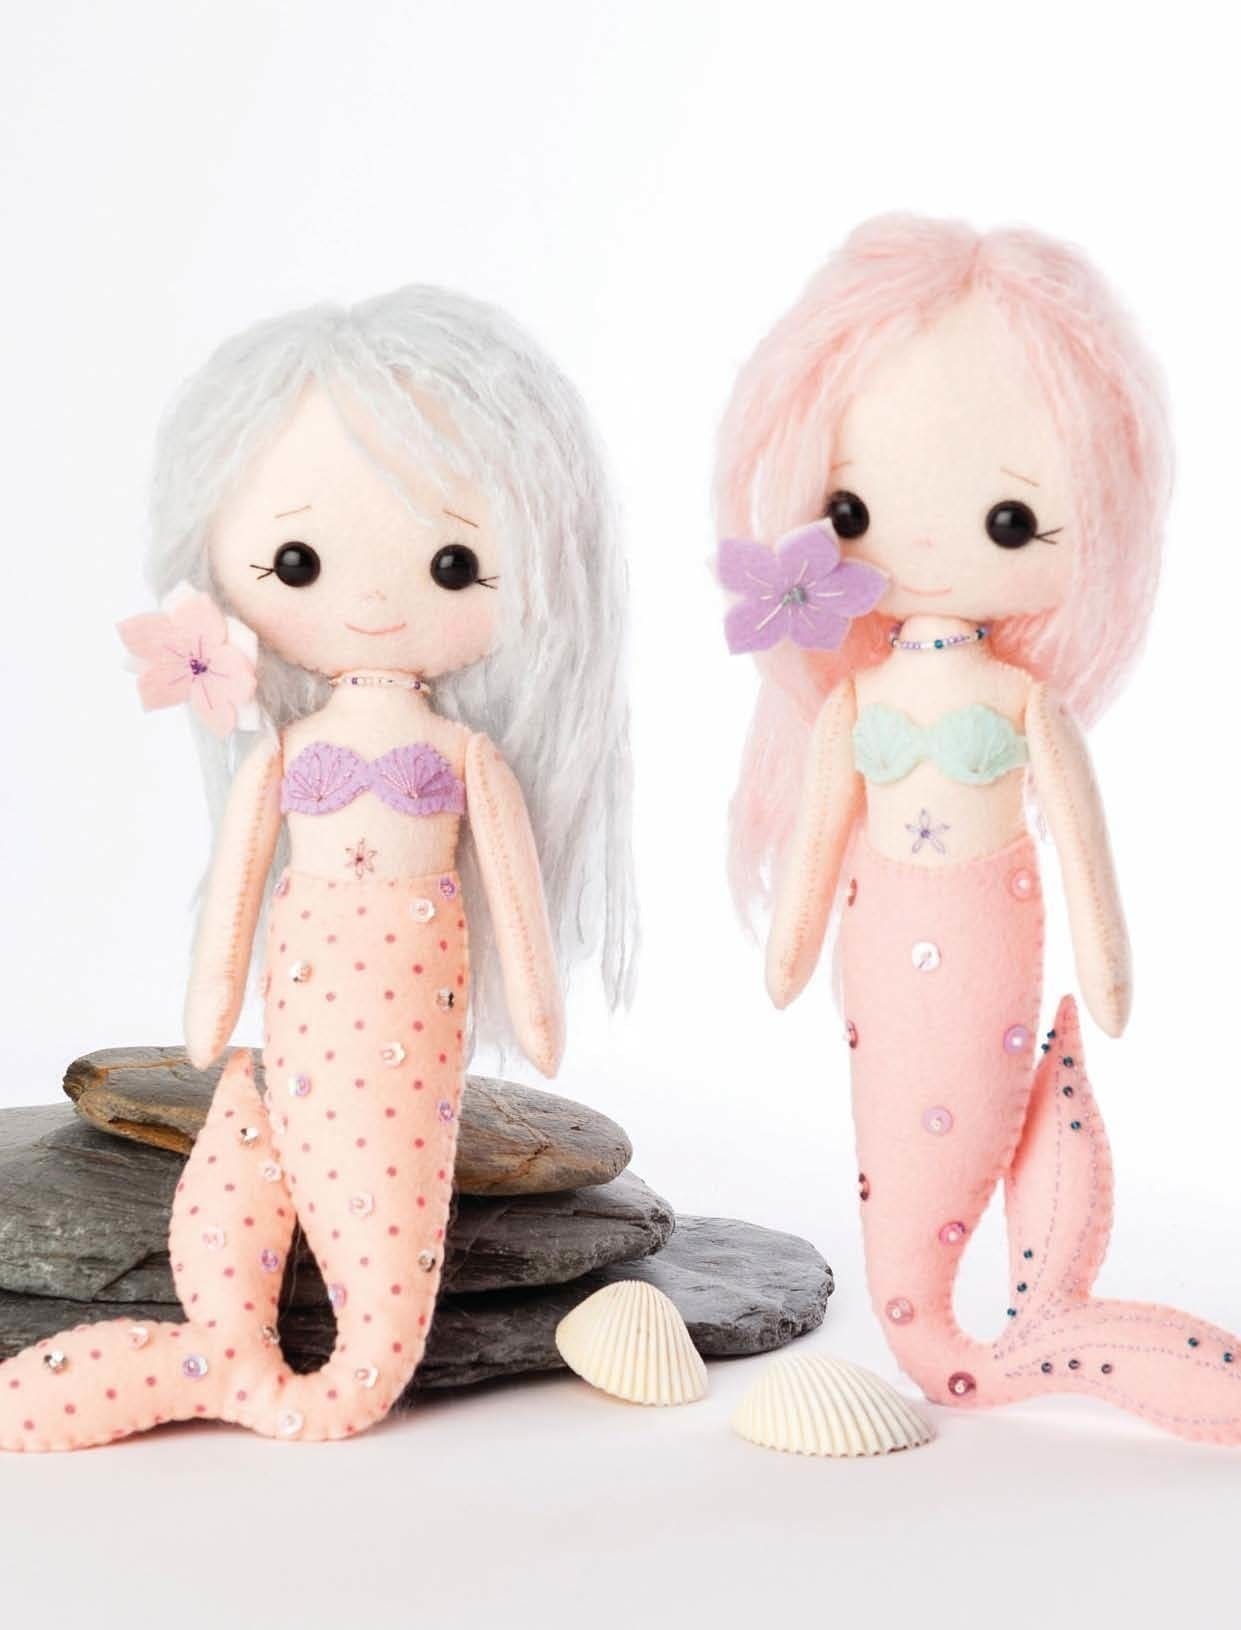
The enchanting mermaid in this project was inspired by tales of the beautiful mythical creatures of the sea. She wears an embroidered seashell bikini top that closes at the back with a tiny snap, and there are a few variations for embellishing her tail – you can keep it plain, sew on sequins with seed beads at the centre and/or embellish the fin with fancy embroidery stitches and seed beads. I’ve chosen a beautiful brushed suri alpaca wool (yarn) for the hair to achieve a soft, floaty look.
Tags
Downloads
- 112650_2F2016-03-04-232213-My+Felt+Doll+-+Little+Mermaids+Pattern.jpg 1.07 MB [ Download ]
-
 Ms Dorito added Little Mermaids to Plushie
12 Jun 17:46
Ms Dorito added Little Mermaids to Plushie
12 Jun 17:46
-
Ms Dorito favorited Little Mermaids
30 Jan 04:03
-
 sharon w. favorited Little Mermaids
13 Oct 05:20
sharon w. favorited Little Mermaids
13 Oct 05:20
-
Michelle M. favorited Little Mermaids
11 Mar 18:42
-
 SecretCheri favorited Little Mermaids
01 Mar 05:12
SecretCheri favorited Little Mermaids
01 Mar 05:12
-
 mountainlove added Little Mermaids to cutie pie
05 Sep 14:51
mountainlove added Little Mermaids to cutie pie
05 Sep 14:51
-
 Kacie O. added Little Mermaids to Mermaid Dolls
25 Jul 00:07
Kacie O. added Little Mermaids to Mermaid Dolls
25 Jul 00:07
-
Kacie O. favorited Little Mermaids
25 Jul 00:03
-
 Katie M. favorited Little Mermaids
06 Jul 04:59
Katie M. favorited Little Mermaids
06 Jul 04:59
-
Lanie H. favorited Little Mermaids
28 Feb 07:11
-
Step 1
LAYOUT AND CUTTING
1 Follow Steps 1 to 4 of the Layout and Cutting section from the Basic Doll project (see How to Sew the
Basic Doll).
HEAD
1 Follow Steps 1 to 6 of the Head section from the Basic Doll project (see How to Sew the Basic Doll).
ASSEMBLING THE HEAD
1 Follow Steps 1 to 3 of the Assembling the Head section from the Basic Doll project (see How to Sew the Basic Doll). -
Step 2
BODY AND TAIL
Using your disappearing ink marker, transfer the dotted line indicated on the pattern of the body onto both your body felt pieces. These will be your guides for positioning the waistband of the mermaid's tail.
-
 Step 3
If you’d like to add sequins and/or embroidered details to the tail and fin, transfer the sequin placement markings shown on the tail pattern onto the front tail felt piece, as you did with the face grid (see How to Sew the Basic Doll).
-
Step 4
Lay the front tail piece onto the front body piece, aligning the top of the tail's waist with the dotted line that you drew on the body in Step 1. Then appliqué stitch (see Stitch Guide) the waistband of the tail onto the body.
-
Step 5
Repeat Step 3 with the back tail and body piece, making sure you reverse the pieces first.
-
 Step 6
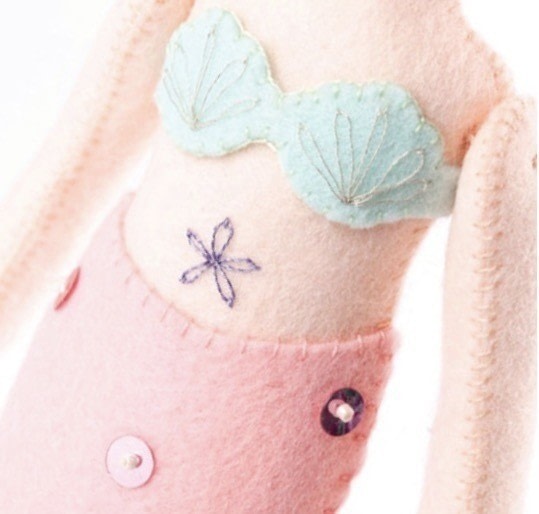
For the doll's belly button, embroider a tiny lazy daisy flower (see Stitch Guide) on the front of the body, just above the waistband of the tail.
-
 Step 7
Attach a sequin with a seed bead at each point where the diagonal lines you drew in Step 2 meet on the tail. Embroider the fin with small running stitches (see Stitch Guide) directly onto the drawn lines and sew seed beads onto the marked dots (see Fig A).
-
Step 8
ASSEMBLING THE BODY AND TAIL
Pin the front body to the back body, wrong sides facing. Using a matching embroidery thread (floss), whip stitch (see Stitch Guide) down one side of the body. Start at one side of the neck and work down until you reach the waistband. End off your thread. -
 Step 9
Starting at A on the waistband of the tail and using matching embroidery thread, whip stitch around to B but do not end off your thread (see Fig B). Add tiny pinches of stuffing to fill up the first fin.
Continue whip stitching around to C then fill the second fin with stuffing. Now continue stitching and filling up the tail in this manner until you reach the opposite side of the waistband and end off your thread (see Fig B).
-
Step 10
Change your thread to one that matches the body colour and continue stitching up to the area where the shoulder meets the neck on the opposite side.
-
 Step 11
Add stuffing through the gap in the neck, using the wooden spoon to push filling down inside the body and tail. Continue adding more until the stuffing reaches the shoulder area then use your cocktail (orange) stick or chopstick to push stuffing into this (see Fig C).
-
Step 12
To complete this stage, follow Steps 3 to 5 from the Body section of the Basic Doll project (see How to Sew the Basic Doll).
-
Step 13
ARMS
Follow Steps 1 to 3 of the Arms section from the Basic Doll project (see How to Sew the Basic Doll).
-
Step 14
ATTACHING THE HEAD TO THE BODY
Follow Steps 1 to 5 of the Attaching the Head to the Body section from the Basic Doll project (see How to Sew the Basic Doll).
-
Step 15
ATTACHING THE ARMS TO THE BODY
Follow Steps 1 to 2 of the Attaching the Arms and Legs to the Body section from the Basic Doll project (see How to Sew the Basic Doll).
-
Step 16
HAIR
Follow Steps 1 to 10 of the Hair section from the Basic Doll project (see How to Sew the Basic Doll).
-
Step 17
SEASHELL TOP
Using the disappearing ink marker, transfer the line markings from each shell pattern onto your felt pieces.
-
Step 18
Embroider each shell pattern onto the seashell top using lazy daisy stitch then blanket stitch (see Stitch Guide) around the outline of each shell.
-
 Step 19
Fit the top onto the doll to determine where to attach the snap closure, then sew this in place at the back of the top (see Fig D).
-
Step 20
FLOWER PETAL HAIR ACCESSORY
Using the disappearing ink marker, transfer the line markings from the petal pattern onto the piece of felt that will be your top flower. Then use a contrasting embroidery thread colour to stitch these lines onto the flower, but do not end off your thread.
-
 Step 21
Place the second flower petal felt piece behind the first, arranging it so that the petals of the second flower are slightly off-centre from the first. Insert a threaded needle in through the back of both petals and out through the centre of the front petal (see Fig E).
-
 Step 22
Stitch seed beads onto the centre of the top flower petal. Then take the thread through to the back of the flower and position the flower on the hair clip, so that it is centred on top. Now sew the clip in place (see Fig F).
-
Step 23
NECKLACE
For the necklace, double thread a beading needle with embroidery thread. Make a couple of tiny stitches at the base of the doll's neck at the back to secure the thread in position, then thread seed beads onto this.
-
 Step 24
Stitch the other end of the necklace in the same spot at the back of the neck to ensure the necklace stays in place.


Chieronymus, here on this page, down, close the the end, there are 4 blue line that say: 1.Step 2 doll, 2. Basic doll, ... They suppose to take you to these pages but it a trap. Admin or somebody can help us?