About
Liberty & Chambray Throw by Alewives Fabrics
Finished Throw measures approximately 54” square.
You’ll reach for your Liberty throw over and over! In just a couple of hours, even beginners can make this luxurious throw. The wool batting is light and airy, pairing perfectly with the soft, smooth Liberty lawn and the classic Union chambray. This throw is perfect for year-round snuggling: nice and warm in winter, soft and light for summer nights. Best of all, your throw is machine washable. Wash in cold water to preserve color, dry on the low settin
-
 Virginia H. favorited Liberty & Chambray Throw
24 Apr 19:37
Virginia H. favorited Liberty & Chambray Throw
24 Apr 19:37
-
Alissa B. favorited Liberty & Chambray Throw
21 May 02:26
-
 Peggy M. favorited Liberty & Chambray Throw
03 Jul 22:19
Peggy M. favorited Liberty & Chambray Throw
03 Jul 22:19
-
 Shop Showcase published her project Liberty & Chambray Throw
03 Jul 06:00
Shop Showcase published her project Liberty & Chambray Throw
03 Jul 06:00
You Will Need
-
 Step 1
Putting your throw together
Layer your fabrics on a large, blank surface in the following order: Batting on the bottom
Liberty Tana Lawn (right side up) in the middle
Union chambray (wrong side up) on the top -
Step 2
Trim all three layers so they measure the same size.
-
Step 3
Pin the three layers together. Don’t be too stingy with the pins! This will keep the Liberty and the chambray from “creeping” as you stitch. A walking foot will also help the layers to feed evenly through your machine.
-
Step 4
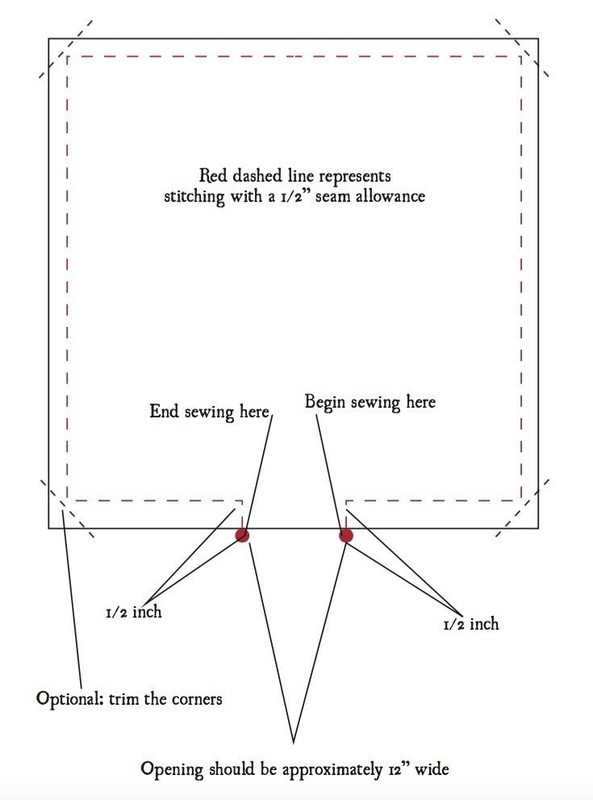
Choose a spot near the middle of one edge of the throw. As in the illustration, stitch a 1/2” line perpendicular to the edge of the throw. Backstitch as you start. Leaving the needle in the throw, lift your presser foot and turn the throw 90 degrees so you are lined up to stitch a 1/2 inch seam allowance parallel to the fabric’s edge.
-
Step 5
Replace presser foot. With a 1/2” seam allowance, stitch around all four corners of the throw. As you approach your starting point, leave approximately 12” open. As before, turn your throw 90 degrees and stitch 1/2” perpendicular to the edge of the fabric. Clip the corners if you wish.
-
Step 6
Turn your throw right side out, and the opening will magically “pop” closed. Pin the opening in place. Using a ladder stitch, hand sew the opening closed.
-
Step 7
Baste the layers together with safety pins (you should only need 16-20 safety pins for basting... just enough to keep the layers from shifting). Tie your throw with embroidery floss and an embroidery needle. We made 16 evenly spaced ties using square knots, and trimmed the tails to approximately 3/4” long. We also used all threads of the floss, for a nice, thick tie.
-
Step 8
Last but not least, enjoy your throw. Be sure to send us a picture! Don’t forget to use #alewivesfabrics in your social media posts!