

Layered Cake Stands
Extract from Homemade Gifts Vintage Style • By Sarah Moore • Published by Kyle Books


About
Homemade Gifts Vintage Style
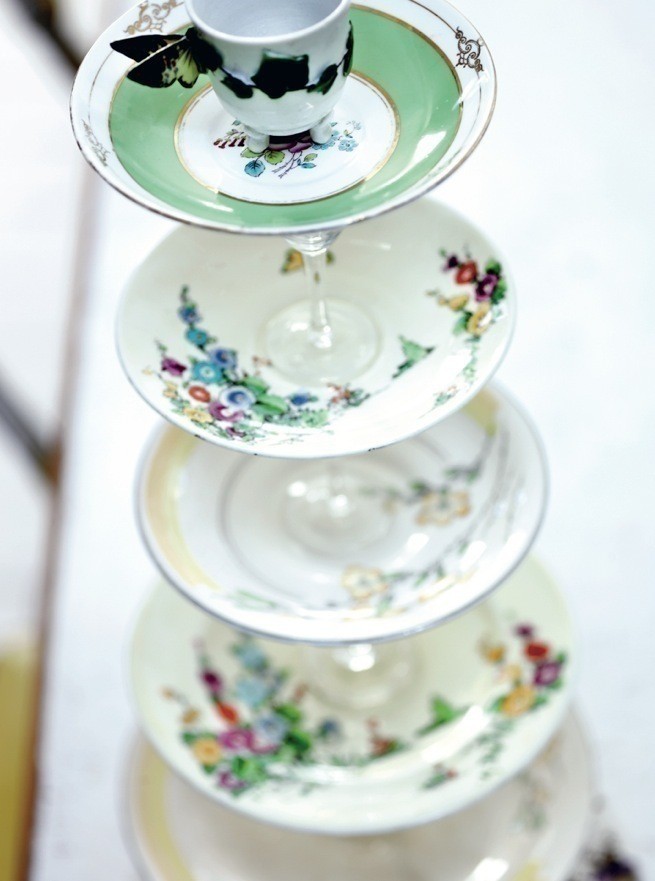
These are so effective and really very simple to make: the time-consuming part is collecting all the plates and glasses together. Old-fashioned tea and dinner services were full of plates and dishes that we don’t use now. There were special dishes for bread and butter, muffins, stands to go under terrines and teapots and countless different plates for each course of the meal. Incomplete dinner services and tea sets and pretty individual plates can be found everywhere and these lovely stands can be made of graduating-sized pieces from two to about seven layers high.
You can use little liqueur glasses, candlesticks, bud vases, teacups, cut glass pots or tiny shot glasses to sandwich between each layer. You can go for a totally eclectic look if
you need a present in a hurry, or carefully rummage around shops and markets and your dresser to find a selection that are a match made in heaven. It is probably a good idea not to use any really precious pieces, as gluing together a whole set of early, hand-painted, priceless porcelain does not have quite the right preservation principles we should have in mind.
Homemade Gifts Vintage Style by Sarah Moore is published by Kyle Books, priced £16.99. Readers can buy the book at the special price of £14.99 inc free p&p (UK mainland only). To order your copy, ring: 01903 828503, quoting ref. KB HGVS/COAK or email: mailorders@lbsltd.co.uk.
-
 witterings favorited Layered Cake Stands
13 May 17:36
witterings favorited Layered Cake Stands
13 May 17:36
-
 MischievousRaven added Layered Cake Stands to Mad hatter - tea room
04 Feb 11:10
MischievousRaven added Layered Cake Stands to Mad hatter - tea room
04 Feb 11:10
-
 KakesKaty added Layered Cake Stands to Mrs Potts parlour
19 Jan 11:06
KakesKaty added Layered Cake Stands to Mrs Potts parlour
19 Jan 11:06
-
 laura_southpaw added Layered Cake Stands to Keep Calm and Party
12 Apr 20:51
laura_southpaw added Layered Cake Stands to Keep Calm and Party
12 Apr 20:51
-
 CraftyCat favorited Layered Cake Stands
28 Mar 02:15
CraftyCat favorited Layered Cake Stands
28 Mar 02:15
-
 Jacqulene C. favorited Layered Cake Stands
22 Nov 15:29
Jacqulene C. favorited Layered Cake Stands
22 Nov 15:29
-
 Emma H. added Layered Cake Stands to Steampunk Tea Party
17 Jul 16:48
Emma H. added Layered Cake Stands to Steampunk Tea Party
17 Jul 16:48
-
 Libby W. added Layered Cake Stands to Homewares
22 Apr 19:59
Libby W. added Layered Cake Stands to Homewares
22 Apr 19:59
-
 Cat Morley added Layered Cake Stands to Cath Kidston's Kitchen
17 Mar 11:58
Cat Morley added Layered Cake Stands to Cath Kidston's Kitchen
17 Mar 11:58
-
 Rebecca M. favorited Layered Cake Stands
05 Jan 17:55
Rebecca M. favorited Layered Cake Stands
05 Jan 17:55
-
Step 1
Decide how many layers you would like and assemble the plates you are going to use. Choose a theme, style, age or colour of plate if you have time to plan the stand. A serving, main course, starter, side and tea plate from the same set make a really simple stand. Whatever plates you choose, arrange them largest first and gradually getting smaller, with something interesting to go on the top if you like – a teacup, sugar bowl or even a little vase looks lovely. Choose the glass stackers that go in between each layer and check that they all fit inside or outside the lip on the base of whichever plate they are to support, and that they have an even rim so you can glue all the way around.
-
Step 2
Clean and dry everything really well. Place the first stacker right in the middle of the largest plate and use a wipe-off marker pen to draw a circle around the base of it. Turn the next plate upside down and stand the stacker on its head in the centre of the plate’s base. Draw a circle around the rim of the stacker. Repeat this process with every layer of plate and stacker so that you have all the positions of the pieces marked.
-
Step 3
Then, starting with the largest plate, squeeze a plentiful, even amount of glue around the base of the first stacker and place it inside the marked circle. Make sure that you do not glue over the marker pen line or you will not be able to wipe it off when everything is stuck together.
-
Step 4
Let each layer dry before attaching the next layer. Finally, finish the stack with a single plate or a teacup and saucer or vase at the top.
-
Step 5
Make a box that fits the stand so that it can be transported safely. The finer the glassware that you use the more delicate the stand will be. Pile it up high with cakes, biscuits and sandwiches or use it as a stand for jewellery, trinkets and baubles.
Comments

