


About
Stencils with a limitless side of awesomesauce, or something.
If you own a projector or have the funds to go get a poster size version of your image made, you probably won't need this tutorial. There are other ways of doing it, but I enjoy this and if you use a canvas it's a neat way to use your photos and decorate a space.
If you are into graffiti, this is a sweet way to make some huge stencils to throw up in a very little amount of time.
I say so-so on difficulty only because it's a little time consuming. There is another way to make regular, reusable stencils by burning them out, and I'll post that one later as it's my favorite.
-
 Bloodyhiccup added Large Scale Stencils From Photographs to Stencil
19 Feb 20:18
Bloodyhiccup added Large Scale Stencils From Photographs to Stencil
19 Feb 20:18
-
Bloodyhiccup favorited Large Scale Stencils From Photographs
19 Feb 20:17
-
 carrie.ring favorited Large Scale Stencils From Photographs
09 Oct 15:54
carrie.ring favorited Large Scale Stencils From Photographs
09 Oct 15:54
-
 Steffi J. favorited Large Scale Stencils From Photographs
31 Jan 22:27
Steffi J. favorited Large Scale Stencils From Photographs
31 Jan 22:27
-
 Emma H. favorited Large Scale Stencils From Photographs
27 Jun 16:14
Emma H. favorited Large Scale Stencils From Photographs
27 Jun 16:14
-
 Markee R. added Large Scale Stencils From Photographs to Andy Warhol Factory Party
19 Jun 12:59
Markee R. added Large Scale Stencils From Photographs to Andy Warhol Factory Party
19 Jun 12:59
-
 Pimke added Large Scale Stencils From Photographs to Deko
03 Mar 14:35
Pimke added Large Scale Stencils From Photographs to Deko
03 Mar 14:35
-
 Shauna R. added Large Scale Stencils From Photographs to Stencil Making
01 Nov 23:28
Shauna R. added Large Scale Stencils From Photographs to Stencil Making
01 Nov 23:28
-
Joann S. favorited Large Scale Stencils From Photographs
26 Oct 20:39
-
michelle a. favorited Large Scale Stencils From Photographs
13 Jul 08:34
-
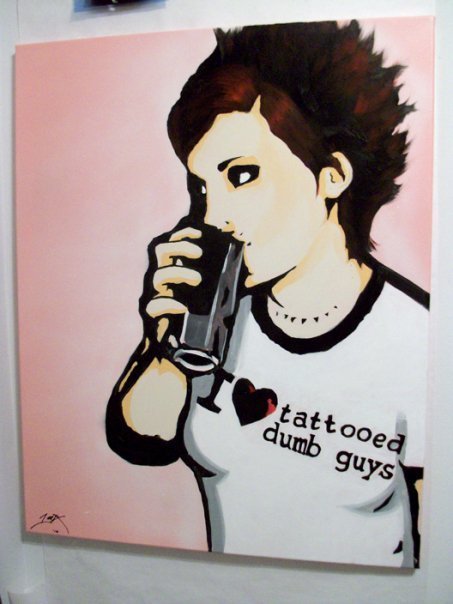
 Step 1
First things first: Choose your photo.
This is the one I used. It's me during my [misspent] sophomore year of college eleven years ago.
Not that much has changed, mind you.
Don't judge ;)
-
Step 2
After you choose your photo, you want to make it black and white and simplify it as much as possible. I use "Threshold" in the Edit Image menu of Photoshop, which you can get a free trial version of if you want it, but I'm sure there are apps or whatnot to stylize it with.
-
 Step 3
Now, there is a magical program called The Rasterbator. It's free, it's extremely small, ridiculously straightforward, and it's entirely useful for all kinds of projects.
A raster image is the opposite of a vector, it's made up of tiny dots. What this program does is take your picture and enlarge it to the specifications you ask of it based on a piece of printer paper, which is 8.5x11".
I made mine big enough to use on a 24x36" canvas, so it used nine pieces of paper when printed: three up, three across.
Trim off white edges.
-
 Step 4
Because the stencil isn't one big piece of paper, I spray glued all of mine down to the piece of cheap roll paper underneath. That kept it from falling apart when I started cutting, like it would if I'd just tape the edges.
But what I found was better is to use clear packing tape (it's wider) and make one layer covering the whole back of the stencil ones the edges are taped and held in place. Keeps it all together, it's still thin, but sturdy and flexible.
-
 Step 5
Outline the general shapes of the image in Sharpie so you know where to cut. Don't worry if it's not perfect, you can clean up edges later.
-
 Step 6
Get a good old fashioned sharp object and go to town. Cut out all the outlined pieces.
NOTE, and this is REALLY important if you are new to stenciling!
Be mindful of where your cutting the design. Make sure all places you cut have bridges. It sucks to cut out one piece only to realize that you took a crucial piece of the design with it. See in the pic how my hand isn't connected to my arm and my arm isn't connected to my shirt? Otherwise it would just look like a big hole with an arm shaped outline :) -
 Step 7
After it's all cut out, decide where you want it.
I used mine for a painting, so I lined it up where I wanted it on a spray painted canvas. Lightly spray adhesive on the back and press all edges down to keep spray paint from getting underneath.
-
 Step 8
Peel off the stencil! Paper stencils usually only get one good use, but it's always sad when they curl up and rip removing them. That's okay, though, because now you have a sweetass custom design on something else!
-
 Step 9
Paint in some detail to make it pop and enjoy! :)


CO + K User