Ladder Plant Stand
Extract from Woodworking for the Weekend • By Mark Griffiths • Published by Ivy Press


About
Woodworking for the Weekend
I had a wooden ladder that had seen better days – what few rungs it still had were too rotten to stand on. Instead of throwing it out, along with three old scaffolding planks, it could be transformed into a stand for planters with cascading and climbing plants to thrive. Trying to buy something similar in a shop can be expensive, yet it’s easy to build yourself. Besides – you will also have the pleasure of making your own unique planter stand. It has to be a worth a few hours spent in the workshop or garage.
Choosing your materials
The ladder I chose for this project was missing a few rungs as a result of many years of hard work. One had broken away just at a point where I intended to place a shelf support, but to not fit a shelf at this point would make my rack too small. You can substitute another rung that won’t be needed, or purchase dowel from a DIY centre that has the same diameter as your rung. The wood won’t look the same, so consider an opaque paint finish.
Old scaffolding planks are the perfect choice for the shelves. They are made from good-quality 3-cm-/1¼-in-thick timber that is suitable for outdoor use. Any solid wooden boards of a similar thickness will do as an alternative. You’ll also need 2.5 × 5-cm/1 × 2-in. boards for shelf supports.
-
 Sandi G. favorited Ladder Plant Stand
11 Jan 05:54
Sandi G. favorited Ladder Plant Stand
11 Jan 05:54
-
 Kaiulani W. favorited Ladder Plant Stand
29 May 18:36
Kaiulani W. favorited Ladder Plant Stand
29 May 18:36
-
 RareJewel favorited Ladder Plant Stand
07 May 10:42
RareJewel favorited Ladder Plant Stand
07 May 10:42
-
 C.J. M. added Ladder Plant Stand to DIY The Room
23 Apr 17:49
C.J. M. added Ladder Plant Stand to DIY The Room
23 Apr 17:49
-
 Tess added Ladder Plant Stand to House
22 Apr 04:28
Tess added Ladder Plant Stand to House
22 Apr 04:28
-
 Harmonee.seal added Ladder Plant Stand to Gardening Fun
18 Feb 17:30
Harmonee.seal added Ladder Plant Stand to Gardening Fun
18 Feb 17:30
-
Harmonee.seal favorited Ladder Plant Stand
18 Feb 17:30
-
 Amber L. favorited Ladder Plant Stand
13 Apr 06:42
Amber L. favorited Ladder Plant Stand
13 Apr 06:42
-
 neimie favorited Ladder Plant Stand
10 Feb 04:37
neimie favorited Ladder Plant Stand
10 Feb 04:37
-
 Jacqueline G. favorited Ladder Plant Stand
23 Dec 22:57
Jacqueline G. favorited Ladder Plant Stand
23 Dec 22:57
You Will Need
-
Step 1
Decide on the height you want your plant stand to be, which might be determined by the quality of the ladder you have to use. You’ll need two equal sections of the ladder, so take that into consideration when deciding the final height. Using a tape measure and pencil, measure and mark where the ladder will need to be divided in half, then cut it in half with the handsaw. If you don’t need to replace a rung, move on to step 3; to replace a rung to support a shelf, follow step 2.
-
 Step 2
To replace a rung, borrow one from another part of the ladder where you don’t want to attach a shelf. Cut one end of the chosen rung with the handsaw, making the cut close to the ladder’s side rail, then wiggle the rung so that it comes out. Smooth the cut end with a wood rasp, then slip the rung into the two holes left in the ladder’s side rails by the missing rung. If you don’t have a snug fit, secure the rung in place by driving a screw through each side rail into the ends of the rung.
-
 Step 3
Line up the two side rails side by side. Check that the rungs are parallel with each other. If they are not, measure, mark and cut the ladder ends with the handsaw until they match. At this point, the ends of the four side rails should all be cut at equal right angles (the ends will be shaped later on to sit level on the ground).
Tips
I like the look of the top ends extending above the top shelf, but you can shorten them if you feel they will be in the way when watering the plants. -
 Step 4
Position the two equal ladder sections on their edges in an A shape that you find pleasing to the eye: not so tight that the effect of the diagonals is lost, but not so wide that the ladder sections look as though they will do the splits. With a tape measure and pencil, mark the distance between the opposing rungs where you want shelves, with a minimum of two – one at the top and one at the bottom – and make a note of the measurements.
Tips
An extra pair of hands can be helpful for either steadying the ladders or holding the tape measure. -
 Step 5
For each shelf, add 30 cm/12 in. to the measurement so the shelf has a 15-cm/6-in. overhang on each end, measure and mark the board and, using the handsaw, cut the board to length. To add some detail and prevent injuries, cut off the corners.
Tips
To make sure all the corners are the same, after cutting off the first corner, use the scrap corner piece as a template to measure and mark the remaining corners. -
 Step 6
To make supports for each shelf, using the handsaw, cut four lengths of 2.5 × 5-cm/1 × 2-in. board that are 1 cm/½ in. shorter than the width of the shelf. Repeat for each shelf, so you have four supports per shelf.
-
 Step 7
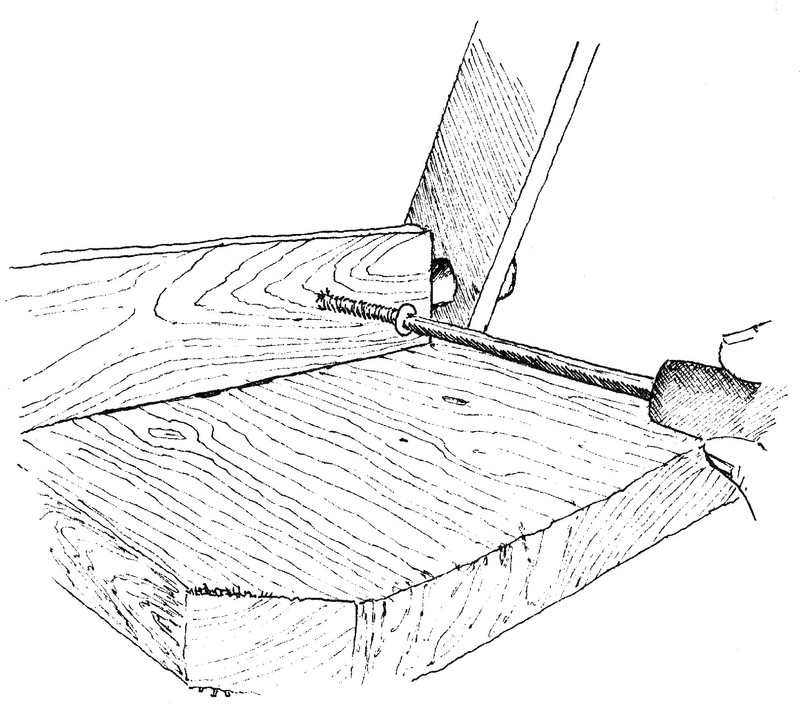
Clamp a shelf support, with the thin edge facing up, to a scrap board and drill two 10-mm/3⁄8-in. holes one-quarter of the way into the side edge, about 2.5 cm/1 in. from the end. Now, fit a 4-mm/3⁄16-in. bit in the drill and continue the hole right through. (This will allow you to fit a slightly shorter screw into the edge so all the screws used in the project will be the same size.) Repeat for each shelf support.
Tips
If you don’t have a depth guide for your drill, wrap a piece of masking tape around the drill bit at the desired depth to act as a guide when you are making the first hole one-quarter of the way into the edge.If you don’t have a depth guide for your drill, wrap a piece of masking tape around the drill bit at the desired depth to act as a guide when you are making the first hole one-quarter of the way into the edge.
-
 Step 8
Working one at a time, reposition each shelf support so the wide side is facedown, clamp in place, and drill one 4-mm/3⁄16-in. hole in the centre of the block.
-
 Step 9
Measure in 15 cm/6 in. from the end of the shelf and attach one of the shelf supports, driving screws through the face with two holes. Measure the ladder rung’s thickness from the inside edge of the secured support towards the shelf’s centre, then secure a second support here. Repeat on the other end of the shelf, then repeat on all the shelves.
-
 Step 10
With the ladder sections resting on their sides, fit all the shelves in place. If everything looks okay, start driving in the screws. Drive in one screw through the shelf support into the rung. Drive at least two screws through each shelf’s top into the rung.
Tips
You can use nails instead of wood screws if you prefer, but screws provide a stronger joint than nails, and are easier to remove if you want to disassemble the project. -
 Step 11
With the stand upright, lay a 2-cm/¾-in. woodblock against the bottom of the ladder. Draw a pencil mark along the top of the block onto the end of the stand’s legs. Trim the legs with the handsaw along these marks so the feet sit flush with the floor. Finally, round off the ladder tops with a rasp. The ladder plant stand is finished and ready for decoration and flowerpots.
Tips
For a little more originality, you can make plant boxes. Using some odd lengths of decking, I made several boxes from different lengths to fit the shelf length. Most wood decking has been pretreated for weather. Work out the quantity and sizes of boxes you require. Cut the parts to size with a handsaw, and simply nail together.