


About
My First Knitted Scarf, Completed At Last!
Note to self: do not wait for a spontaneous Amtrak trip in January to commence knitting an ambitiously complicated and time-consuming scarf, because suddenly it will be March and scarf-wearing season nearing its end! But, no matter–art for art’s sake, or craft for craft’s sake. I am so enamored with cable knitting, maybe due to the fact that I have elegant bamboo cable needles or because such a simple process produces beautiful patterns.
This particular pattern is called “lattice cable” and utilizes basic cable stitches and twist cable stitches, putting it at the “intermediate” level, but once you have cable down, learning twist cable is pretty easy. What it isn’t is one of those quick weekend projects or 2-hour scarves. Cables take time because of all the finger-dances involved and 75-inches (the length of this thing) is a LOT of knitting.
Below is the FULL TUTORIAL on how to make this scarf from start to finish, including the blocking process and fringe-addition at the end.
Cable Stitch Abbreviations
C4B (Cable 4 Back)-slip the next 2 stitches onto cable needle and hold at back of work; knit next 2 stitches from left-hand needle and then knit 2 stitches from cable needle.
C4F (Cable 4 Front)-slip the next 2 stitches onto cable needle and hold at front of work; knit next 2 stitches from left-hand needle and then knit 2 stitches from cable needle.
T4F (Twist 4 Front)-slip the next 2 stitches onto cable needle and hold at front of work; purl next 2 stitches from left-hand needle and then knit the 2 stitches from cable needle.
T4B (Twist 4 Back)-slip the next 2 stitches onto cable needle and hold at back of work; knit the next 2 stitches from left-hand needle and then purl the 2 stitches from the cable needle.
-
 Essence added Knitted Scarf to To Knit
28 Jul 15:58
Essence added Knitted Scarf to To Knit
28 Jul 15:58
-
Essence favorited Knitted Scarf
28 Jul 15:58
-
 Karen P. favorited Knitted Scarf
09 Feb 05:14
Karen P. favorited Knitted Scarf
09 Feb 05:14
-
Belle W. favorited Knitted Scarf
02 Jul 13:13
-
 noche-estrellada favorited Knitted Scarf
03 Sep 12:15
noche-estrellada favorited Knitted Scarf
03 Sep 12:15
-
 Step 1
This particular cable pattern calls for a multiple of 24 stitches, which is the exact number of stitches I casted on for the project; it makes the scarf about 6 inches wide if you use the Landscape yarn, or a yarn equal in weight (those that call for needles between sizes 11 and 13).
Cast on 24 stitches.
1st row (right side): k2, p8, C4B, p8, k2.
2nd row: p2, k8, p4, k8, p2.
3rd row: T4F, p4, T4B, T4F, p4, T4B.
4th row: k2 [p2 k4] 3 times, p2, k2.
5th row: p2, T4F, T4B, p4, T4F, T4B, p2.
6th row: k4, p4, k8, p4, k4.
7th row: p4, C4B, p8, C4F, p4.
8th row: k4, p4, k8, p4, k4.
9th row: p2, T4B, T4F, p4, T4B, T4F, p2.
10th row: k2, [p2, k4] 3 times, p2, k2.
11th row: T4B, p4, T4F, T4B, p4, T4F.
12th row: p2, k8, p4, k8, p2.12 rows=3 inches. In other words, keep knitting!!!! Repeat these 12 rows until the scarf measures approximately 75 inches, or shorter or longer depending on your preference. But yeah, keep knitting! Try to have someone like Safety Cone make the process extra exciting, you know, by standing upside down in a ball of yarn:
-
Step 2
Finishing
For this particular pattern, I prefer to bind off purlwise. You do this by purling the first two stitches, then **using the left-hand needle, lift the first stitch over the second and drop it off the needle. Purl the next stitch** and continue in between ** ** until there is one stitch left. Secure the last stitch by snipping the yarn, leaving a 2-inch tail and then thread a tapestry needle with it. Pull the yarn tightly to secure it.
-
 Step 3
Blocking
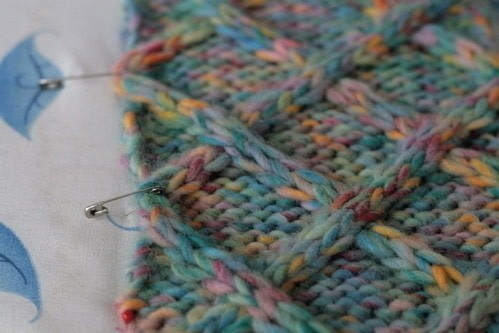
Blocking is the process by which you pin out your knitted project so that it stretches back to its correct shape (it will naturally curl as you knit, no matter how good your tension is). Blocking often requires the use of an iron, but not in the case of a wool cable-knit piece. Frankly, blocking scares me because in a matter of seconds I could see myself ruining the scarf, so I was happy to learn that wool + cable = “cold-water blocking,” which means that it’s almost impossible to mess up. Hooray!On a blocking board, or piece of foam core (I used an ironing board and could only do 1/2 at a time), pin all edges of the scarf down, especially where the cable hits the edges. (I didn’t have enough pins, so I used safety pins, which I think worked better!) Using a spray bottle filled with cold water, drench the scarf and use a cloth to pat it just to make sure the water is in there. Leave to dry completely (overnight).
Remove all the pins when it’s dry.
-
 Step 4
Making Fringe
With the same yarn, cut 48 pieces each measuring 11 inches.
-
 Step 5
With a tapestry needle, fold two pieces in half and thread the loop first into the needle.
-
 Step 6
On one of the edges at the end of the scarf,
-
 Step 7
Insert the loop/hole of the needle from the right side (cable) to the wrong side, like you see below.
-
 Step 8
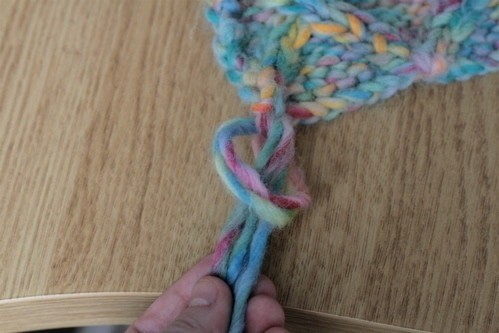
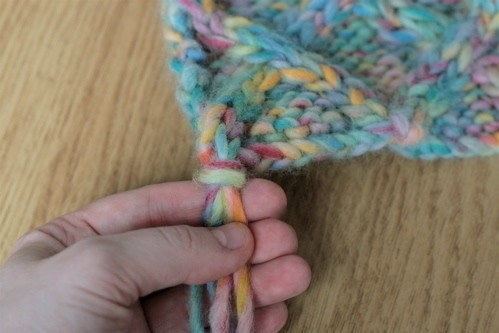
Remove the needle and then take the 4 ends and feed them into the loop,
-
 Step 9
pulling tightly to secure.
-
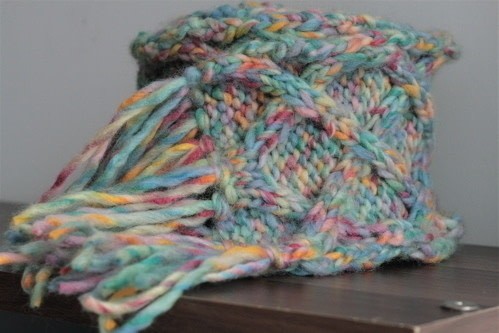
 Step 10
Continue in this way, using 24 pieces (12 sets of 2) on each of the 2 ends of the scarf. You’re done! …..50+ (?) hours later.
It’s beautiful!


Comments

