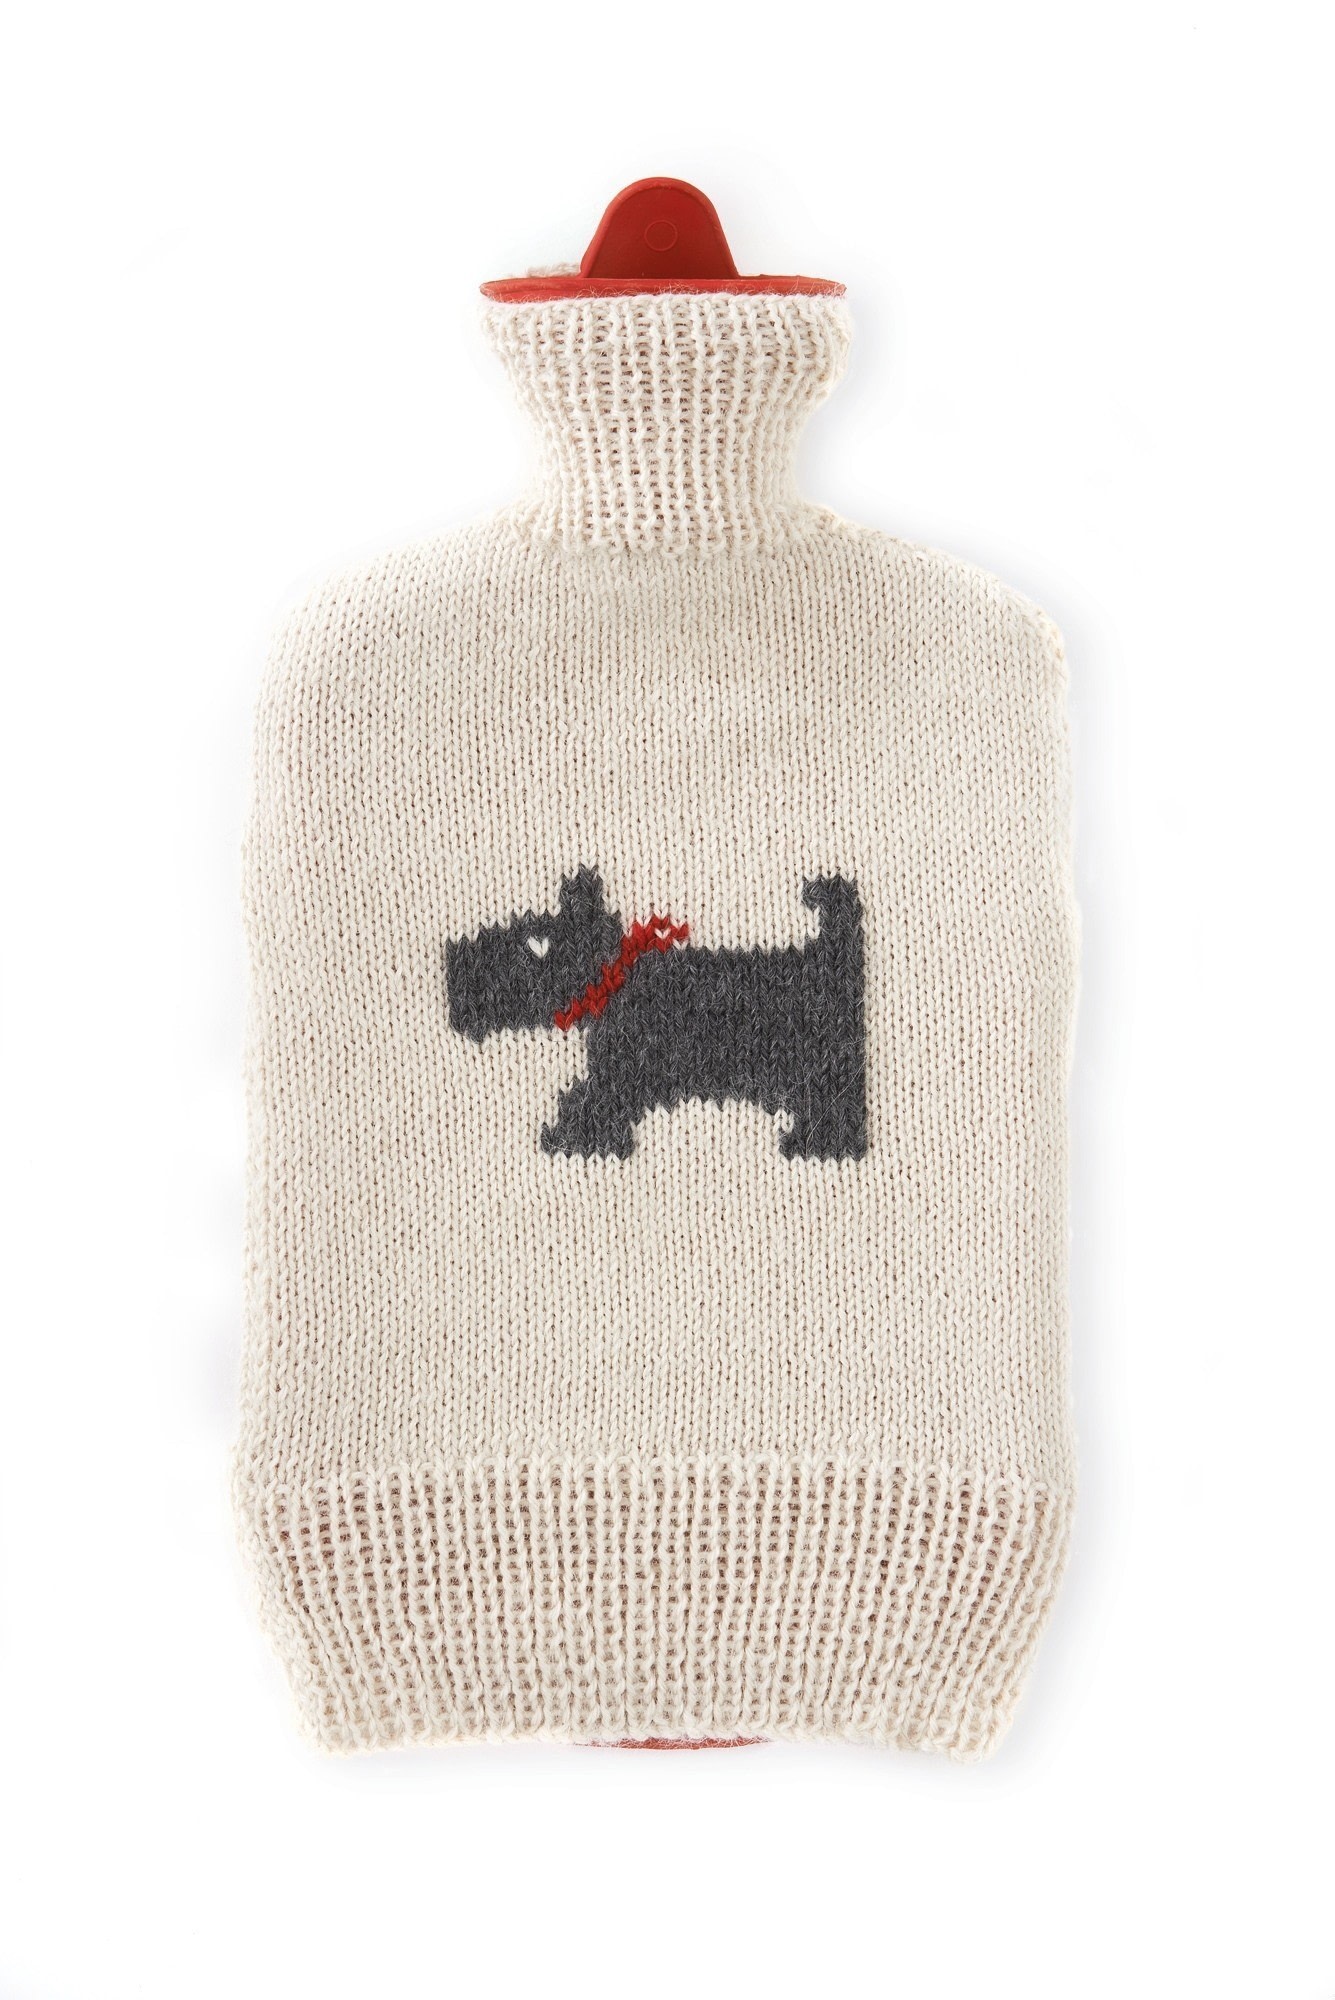
Knit Hot Water Bottle
Extract from Knit Yourself Calm • By Betsan Corkhill • Published by Search Press

About
Knit Yourself Calm
Curl up with a hot water bottle on a cold winter’s night and you’ll be warm and cosy in no time. Personalise your cover with duplicate stitch to create a slightly textured and bold effect. Use it to stand out from
the crowd!
Tension (gauge)
27 sts and 37 rows measure
10 x 10cm (4 x 4in) in st st using 3.25mm (UK 10, US 3) needles
Measurements
19.5cm (8in) wide and 28cm (11in) from base to start of neck ribbing when stretched over the bottle;
to fit standard 2L hot water bottle
Yarn notes
I used Sublime Superfine Alpaca, a 100% alpaca yarn. The colours I used are Tusk (430), Flannel (434) (oddments only) and a 2m (2yd) length of Taylor (460).
Downloads
- 116566_2F2017-07-03-134544-Hot+Water+Bottle+chart.pdf 89.5 KB [ Download ]
-
 js-m crafts favorited Knit Hot Water Bottle
13 Feb 10:40
js-m crafts favorited Knit Hot Water Bottle
13 Feb 10:40
-
 JadeSucksAtLife favorited Knit Hot Water Bottle
03 Mar 17:24
JadeSucksAtLife favorited Knit Hot Water Bottle
03 Mar 17:24
-
 Super Madcow favorited Knit Hot Water Bottle
21 Jul 23:10
Super Madcow favorited Knit Hot Water Bottle
21 Jul 23:10
-
 Betty Makes... favorited Knit Hot Water Bottle
06 Jul 18:27
Betty Makes... favorited Knit Hot Water Bottle
06 Jul 18:27
-
 Search Press published her project Knit Hot Water Bottle
05 Jul 09:00
Search Press published her project Knit Hot Water Bottle
05 Jul 09:00
You Will Need
-
Step 1
Front
Lower rib
Using yarn A and 3.5mm (no UK equivalent, US 4) needles, cast on 53 sts.
Row 1: (K1, P1) to the last st, K1.
Row 2: (P1, K1) to the last st, P1.
Rows 3–20: rep rows 1 and 2 nine times more, increasing 1 st at the end of the last row (do this by Pfb in the last st) (54 sts). Continue with Main body. -
Step 2
Main body
Change to 3.25mm (UK 10, US 3) needles. Work 74 rows in st st, placing a stitch marker on the 16th st of row 27. -
Step 3
Neck shaping
Row 75: K1, skpo, K to last 3 sts, K2tog, K1 (52 sts).
Row 76: P.
Rows 77–78: rep rows 75 and 76 once more (50 sts).
Row 79: K1, skpo, (2 sts on right-hand needle) lift the second stitch on the right needle over the first stitch to cast off 1 stitch then cast off 4 more sts, K to last 3 sts, K2tog, K1 (43 sts).Row 79: K1, skpo, (2 sts on right-hand needle) lift the second stitch on the right needle over the first stitch to cast off 1 stitch then cast off 4 more sts, K to last 3 sts, K2tog, K1 (43 sts).
Row 80: cast off 5 sts, P to the end (38 sts).
Row 81: cast off 3 sts, K to the end (35 sts).
Row 82: cast off 3 sts, P to the end (32 sts).
Rows 83–84: rep rows 81 and 82 once more, decreasing 1 st at the end of row 84 (do this by P2tog over the last 2 sts) (25 sts).
Change to 3.5mm (no UK equivalent, US 4) needles and continue with Neck rib. -
Step 4
Neck rib
Row 1: (K1, P1) to the last st, K1.
Row 2: (P1, K1) to the last st, P1.
Rows 3–24: rep rows 1 and 2 eleven times more (or until long enough to cover neck of hot water bottle). Cast off in rib, leaving a long tail of yarn. -
Step 5
Back
Follow all instructions as given for Front, omitting the stitch marker. -
 Step 6
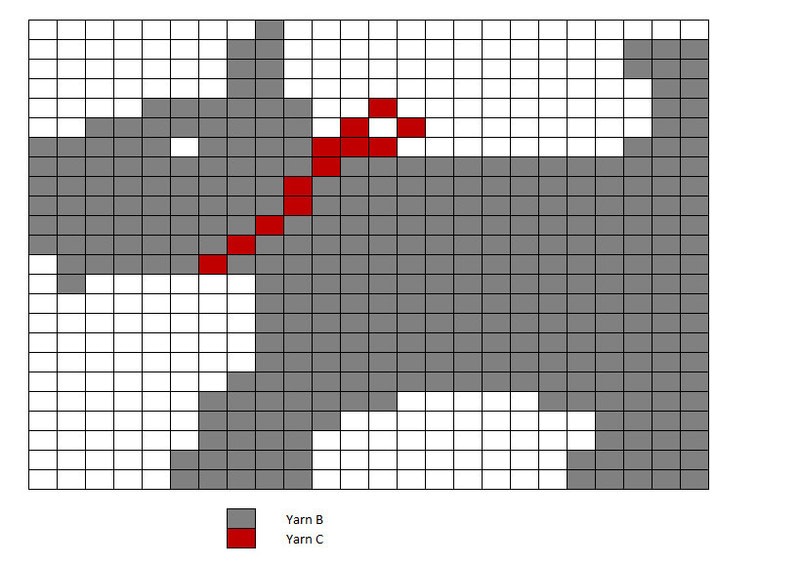
Duplicate stitch
Using the chart below, use duplicate stitch (or Swiss darning) to stitch the motif onto the stocking (stockinette) stitch base, using yarn B and yarn C. Start at the marked stitch (on row 27).
Begin at the bottom right corner of the chart and work in rows. -
 Step 7
To finish
Spray block pieces and leave to dry completely. Sew the side seams using mattress stitch and place on hot water bottle.Row 80: cast off 5 sts, P to the end (38 sts).
Row 81: cast off 3 sts, K to the end (35 sts).
Row 82: cast off 3 sts, P to the end (32 sts).
Rows 83–84: rep rows 81 and 82 once more, decreasing 1 st at the end of row 84 (do this by P2tog over the last 2 sts) (25 sts).
Change to 3.5mm (no UK equivalent, US 4) needles and continue with Neck rib. -
Step 8
Neck rib
Row 1: (K1, P1) to the last st, K1.
Row 2: (P1, K1) to the last st, P1.
Rows 3–24: rep rows 1 and 2 eleven times more (or until long enough to cover neck of hot water bottle). Cast off in rib, leaving a long tail of yarn.Back
Follow all instructions as given for Front, omitting the stitch marker.Duplicate stitch
Using the chart below, use duplicate stitch (or Swiss darning) to stitch the motif onto the stocking (stockinette) stitch base, using yarn B and yarn C. Start at the marked stitch (on row 27).
Begin at the bottom right corner of the chart and work in rows.To finish
Spray block pieces and leave to dry completely. Sew the side seams using mattress stitch and place on hot water bottle. -
 Step 9
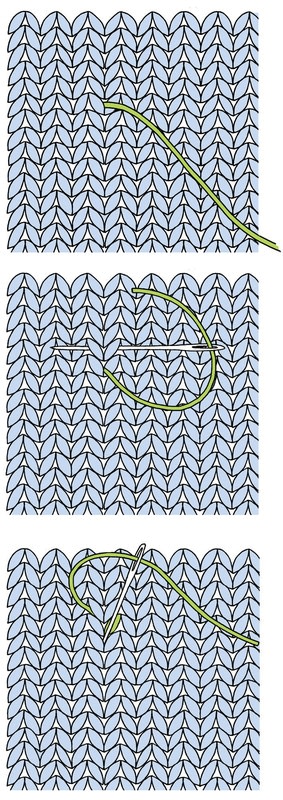
Duplicate Stitch
Duplicate stitch (also known as Swiss darning) allows you to add small areas of colour to your knitting, duplicating the original stitches. It creates a slightly raised effect.1 Thread your needle with a long piece of the contrast yarn and bring it up through the point of the ‘V’ of the first stitch being duplicated.
2 Take the needle under the ‘V’ of the stitch above it.
3 Take the needle back through the point of the ‘V’ being worked. One stitch has been duplicated.
4 Repeat across the row for each area of colour, following any charts provided.
-
Step 10
Blocking
Blocking describes the method of stretching, shaping and moulding a finished piece of knitting or crochet work using some form of water. It gives your work a much neater and more professional finish as it relaxes the fibres and evens out your stitches.
Blocking can also increase the size of your work to the correct size (but it cannot make your work smaller); mould your designs to a specific shape; ‘open up’ the designs in lacy crochet work to emphasise the stitches and patterns; help curled edges lie flat and improve the overall drape of your fabric.
There are three main methods of blocking: spray blocking, steam blocking and wet blocking, each of which is described below. -
Step 11
What tools and equipment do I need?
• rust-proof pins with glass heads (plastic heads can melt if using the steam method of blocking), or blocking pins
• blocking wires (optional). These can be inserted along the edges of your work to keep them straight and are often used when blocking shawls
• a tape measure
• a spray bottle filled with cold water, or a steam iron (or handheld steamer), or a basin filled with cold water
• a towel
• a flat, padded surface that is large enough to hold a piece of knitting. This could be a purpose-made folding blocking board, interlocking foam pieces, an ironing board or even a carpet covered with plastic and a towel. -
Step 12
Spray blocking
1 Spray your work with cold water until it is damp but not completely saturated.
2 Using rust-proof glass-headed pins or blocking pins, pin out your knitted pieces onto a blocking board to the dimensions specified in your pattern. Gently ease the fabric into place, making sure that you do not distort the stitches. Make sure edges are straight or curved, as required.
3 Once your work is completely dry, remove the pins.
4 If the desired result is not achieved, repeat steps 1–3 again.