

King Of Hearts Mini Book
Extract from Making Mini Books • By Kathleen McCafferty • Published by Lark Crafts

About
Making Mini Books: Big Ideas for 30+ Little Projects
Designer: Erica Ekrem
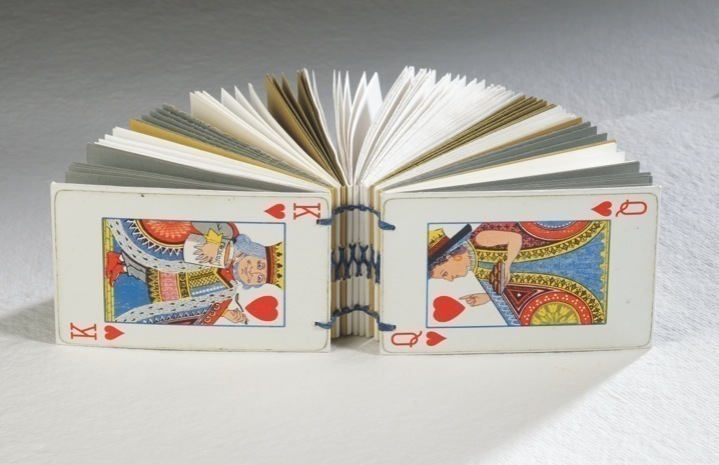
Why not stack the deck in your favor? Vintage playing cards reveal a note-worthy King and Queen of Hearts. Which side will you write in first?
Finished Dimensions
23⁄8 x 31⁄2 inches (6.1 x 8.9 cm)
-
 Tashianna S. favorited King Of Hearts Mini Book
11 Apr 11:42
Tashianna S. favorited King Of Hearts Mini Book
11 Apr 11:42
-
 rosa r. favorited King Of Hearts Mini Book
24 Aug 17:54
rosa r. favorited King Of Hearts Mini Book
24 Aug 17:54
-
 Emma H. favorited King Of Hearts Mini Book
27 May 13:09
Emma H. favorited King Of Hearts Mini Book
27 May 13:09
-
 Emma N. favorited King Of Hearts Mini Book
20 Sep 10:32
Emma N. favorited King Of Hearts Mini Book
20 Sep 10:32
-
 DocDoolittle added King Of Hearts Mini Book to Bookies
18 Sep 11:42
DocDoolittle added King Of Hearts Mini Book to Bookies
18 Sep 11:42
-
Mignon D. favorited King Of Hearts Mini Book
21 May 19:33
-
 yiv favorited King Of Hearts Mini Book
28 Apr 09:41
yiv favorited King Of Hearts Mini Book
28 Apr 09:41
-
Patricia J. favorited King Of Hearts Mini Book
31 Mar 01:20
-
 Vanessa B. added King Of Hearts Mini Book to Home DIY
23 Mar 16:38
Vanessa B. added King Of Hearts Mini Book to Home DIY
23 Mar 16:38
-
Philippe T. favorited King Of Hearts Mini Book
22 Mar 17:14
You Will Need
-
Step 1
Creating the Covers
Find a pair of vintage playing cards. Cut the book boards to match the size of the cards. Cover the raw boards with your choice of text-weight paper. Center and glue the playing cards to the fronts of the cover boards. Center and glue the endsheet paper to the inner side of the cover boards.
-
Step 2
Making the Text Blocks
To figure the dimensions of the pages, choose one of the cover boards and measure it. Subtract 1⁄8 inch (3 mm) from the horizontal (short) side. Multiply the vertical (tall) side measurement times two, then subtract 1⁄4 inch (6 mm) from the total. Cut 70 sheets of writing paper to the size you calculated.
Separate the paper into piles of five sheets. Stack each pile and fold in half to make a signature, creasing with the bone folder. There will be 14 total signatures.
-
Step 3
Assembling the Journal
4 To create a hole-punch guide, cut a piece of cardstock to match the page size. Fold in half. Measure 3⁄8 inch
(9.5 mm) from the top and bottom of the sheet and mark on the fold line. Measure 1⁄2 inch (1.3 cm) on the inside of both of these measurements and mark. Use an awl to punch holes at the marks. -
Step 4
Center the guide vertically in the middle of each signature and punch holes in each of the signatures.
-
Step 5
Sew the text block together using the long stitch binding technique with kettle stitches to link the ends of each signature together. As you enter the pair of center sewing stations, draw the thread into the nearest side of the previous signature’s center stitch and loop the thread around, grabbing it, then enter back through the hole in the current signature. This will create an alternating pattern in the center sewing stations. Continue sewing in this manner. Thread the final signature and tie off.
-
Step 6
Punch holes in the cover boards to attach them to the text block. To do this, center the text block inside the covers and use an awl to punch a hole 1⁄8 inch (3 mm) from the outside of the board in each end of the covers to line up with the top and bottom sewing stations.
-
Step 7
Attach the covers. Choose an outer signature and begin by fastening approxi- mately 10 inches (25.4 cm) of thread to the thread inside the signature. Draw the fastened thread through the bottom (or top) hole to the outside of the signature. Draw the thread along the outside of the cover and through the hole. Wrap
around the board and through the hole twice. Draw the thread back toward the spine and into the same hole in the signature, tie off, and cut. Repeat to fasten each inside corner of the covers to the text block.
