


About
An accidental project with only 2 seams to sew!
Very easy Kimono top by Minnie Burton
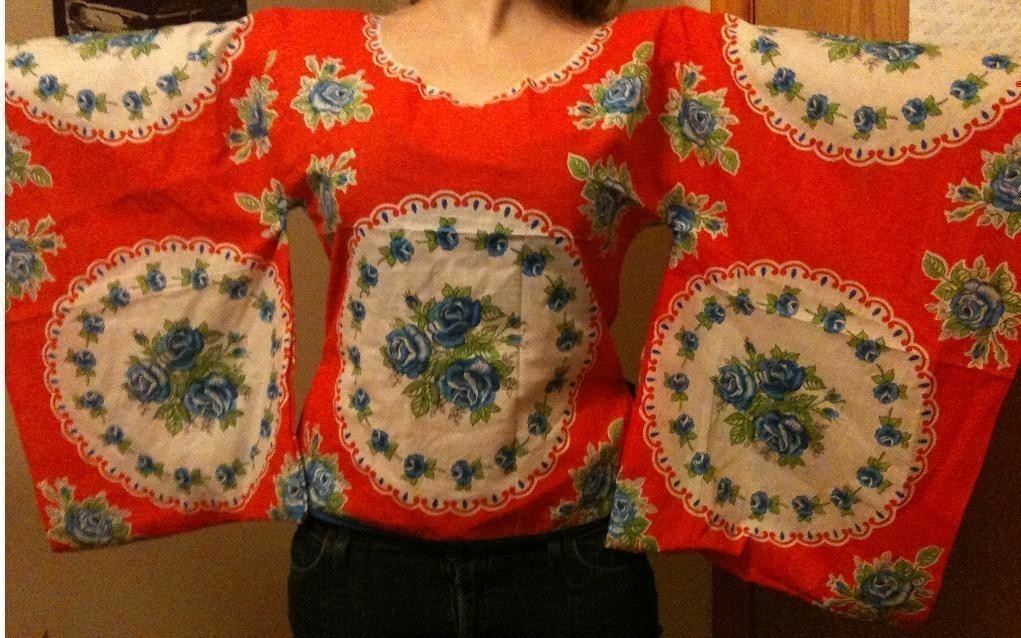
I am no expert! This is how I made my kimono style top! It was originally a table cloth that I was planning to make into a full circle skirt but I cut the waist too big! So I toyed with the idea of making it a poncho style top, but then inspiration struck and I wanted a gypsy style kimono! :D
My illustrations for directions are designed on MS Paint so please over look the god awful shaky hand drawn diagrams. They may not look neat but they hopefully will work!
In my diagrams the pink material represents the wrong side of the fabric. All sewing is done right sides together unless otherwise stated!!
-
 Ms Dorito favorited Kimono Poncho Top For Beginners
12 Jun 00:01
Ms Dorito favorited Kimono Poncho Top For Beginners
12 Jun 00:01
-
 Brittney S. added Kimono Poncho Top For Beginners to Clothing
07 Jul 05:44
Brittney S. added Kimono Poncho Top For Beginners to Clothing
07 Jul 05:44
-
 Kaitlynn L. favorited Kimono Poncho Top For Beginners
28 Feb 03:31
Kaitlynn L. favorited Kimono Poncho Top For Beginners
28 Feb 03:31
-
 dadiva favorited Kimono Poncho Top For Beginners
22 Jan 20:19
dadiva favorited Kimono Poncho Top For Beginners
22 Jan 20:19
-
 Mary P. added Kimono Poncho Top For Beginners to Frida
12 Nov 20:10
Mary P. added Kimono Poncho Top For Beginners to Frida
12 Nov 20:10
-
 Tamara D. added Kimono Poncho Top For Beginners to Sew Tops
03 Sep 21:43
Tamara D. added Kimono Poncho Top For Beginners to Sew Tops
03 Sep 21:43
-
 spychohead added Kimono Poncho Top For Beginners to refashion
11 Oct 21:08
spychohead added Kimono Poncho Top For Beginners to refashion
11 Oct 21:08
-
Dawn C. added Kimono Poncho Top For Beginners to Tops & Shirts
29 Aug 15:07
-
 shelly.anderson.547 added Kimono Poncho Top For Beginners to Sewing
13 May 04:10
shelly.anderson.547 added Kimono Poncho Top For Beginners to Sewing
13 May 04:10
-
shelly.anderson.547 favorited Kimono Poncho Top For Beginners
13 May 04:10
-
 Step 1
1. You need to find a square of material that you want your top to be.(Fig 1) I strongly recommend a cotton for this project. My square was 1 metre 20cm x 1 metre 20cm and plenty big enough but you may want a slighter larger square if you are a slightly larger lady! :D
-
 Step 2
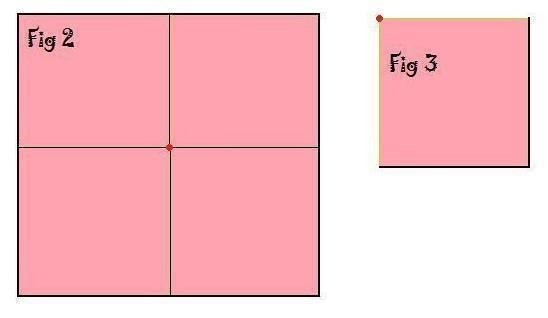
2. Fold you fabric into quarters making sure all folds are even! (Fig 2+3)
-
 Step 3
3.Then with the middle of the fabric as a guide draw an arc (Fig 4)(this will be cut along and result in a circle in the middle of your square)
-
 Step 4
4.The circle in the square will go over your head and rest on your shoulders. Mine was slightly off the shoulders but not much! (Fig 5)
-
 Step 5
5. Then when you are happy that you can get the circle over your head and it is the right size to fit comfortably on your shoulders you need to fold it in half. (Fig 6) The semi circle created by folding it in half will be your neckline.
-
 Step 6
6. You then need to measure the fullest part of your bust. Mine was 40 inches. So I halved that to get 20 inches added a seam allowance of 2 inches, (an inch either side), and then marked this on the folded material where I wanted the sleeves to begin. I then did exactly the same for the hip measurement. [The bust markers and waist markers are the red dots.] (Fig 7)
-
 Step 7
7. You then need to find a way you want the bust and hip measurement to meet. You could sew a straight line from the bust markers to the bottom of the top (therefore no need for waist markers,) resulting in a square shaped top! Or make a curved line resulting in a top that will fit your body closer! I chose the latter. (fig 8)
-
Step 8
8. When you have decided how the top will be sewn at the sides you need to sew from your bust marker to your waist marker (or just from the bust marker in a straight line to the bottom of your top) to create the side seams.
9. At this point you should try on the top and see if it is comfortable. Does it need to be let out? Or taken in? *WARNING* the sleeves probably will not behave themselves as this point but please don’t worry we’ll sort the sleeves later just check the fit of the top to your upper torso. When you are happy you can attempt the sleeves. Make sure you are happy with the top before making the sleeves you will see why in a second! -
 Step 9
10. Next you carefully trim along the side seams you have just sewn to separate the sleeves from the main part of the top. (Fig 9)
-
 Step 10
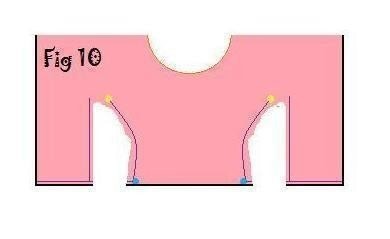
11. You then need to lay the top flat and from the point where the armpit will sit on your top cut the sleeves to straight square kimono sleeves. (Fig 10)
-
 Step 11
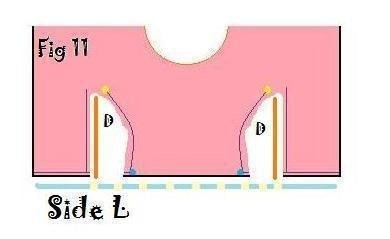
12. Then you need to sew a seam along line L and Line D. (Fig 11) *obviously not sewing along the line where you will need your body to fit into the top.
-
 Step 12
13. Now look at Fig 12. This is the area that has been left with raw edges. Therefore I suggest using bias binding in a matching or contrasting colour to finish the edges.


Versions


Comments


