About
For this project I combined instagrams with the trademark look of a polaroid
For this project I combined instagrams with the trademark look of a polaroid. This is a great project to bring your instagram pictures into your home for everyone to enjoy or just to display any pictures at all!
-
 Emma H. favorited Instagram Polaroid Blocks
29 Mar 01:13
Emma H. favorited Instagram Polaroid Blocks
29 Mar 01:13
-
 isis.nallely favorited Instagram Polaroid Blocks
31 Jan 03:45
isis.nallely favorited Instagram Polaroid Blocks
31 Jan 03:45
-
 dippydiscoball added Instagram Polaroid Blocks to Wishlist
12 Nov 03:48
dippydiscoball added Instagram Polaroid Blocks to Wishlist
12 Nov 03:48
-
dippydiscoball added Instagram Polaroid Blocks to To-make list
12 Nov 03:47
-
 sheletor s. favorited Instagram Polaroid Blocks
11 Nov 21:39
sheletor s. favorited Instagram Polaroid Blocks
11 Nov 21:39
-
 amyistheparty favorited Instagram Polaroid Blocks
05 Nov 17:59
amyistheparty favorited Instagram Polaroid Blocks
05 Nov 17:59
-
 Chudames favorited Instagram Polaroid Blocks
03 Nov 21:23
Chudames favorited Instagram Polaroid Blocks
03 Nov 21:23
-
 Machelle & M. published her project Instagram Polaroid Blocks
02 Jul 18:23
Machelle & M. published her project Instagram Polaroid Blocks
02 Jul 18:23
You Will Need
-
Step 1
The first thing you’ll want to do is decide which pictures you’d like to display and how many. I choose to do 36 photos. Either get your photos from your Instagram profile or crop any picture you want into a square. I found that ordering my pics on 5″ x 7″ prints was the most inexpensive way to go.
-
Step 2
Open it in your photo editing program and place the pictures onto it, lining it up with the guides/boxes, you’ll have two pictures on the template. Save as a JPEG (or PNG, etc) and then replace both photos with two different ones and save that. Continue doing this until you have all your pictures saved in this format.
Log on to your favorite photo printing website and order the prints (on 5×7).
-
 Step 3
While you wait for your photos to arrive/be ready for pick up go to the home improvement store and get a 2×4. Either take it home and cut it yourself or have someone in the store do it for you. Make a cut every 4″. Now you are left with wood blocks that measure 1.5″ x 3.5″ x 4″.
-
Step 4
When you get your photos, cut 1″ off the bottom of them and then cut them in half right in between the photos. Each photo should be 3.5″ x 4″.
I used Mod Podge to adhere each photo onto each block.
-
 Step 5
Decide how you would like your photos displayed, how many rows by how many columns, etc. and figure out how big of an area you’ll need. I did 4 rows of 8. Each block is 3.5″ wide and I wanted 2.5″ between each one on the same row. The blocks are 4″ long and I wanted 6″ between the rows, so my rectangular area was 45.5″ x 34″.
Measure from your ceiling however far down you think the top of your photos should be placed. Mine went above my couch so I wanted them pretty high, I came down from the ceiling only 6″. Decide were the center of your display will be and measure out from that 22.75″ in both directions.
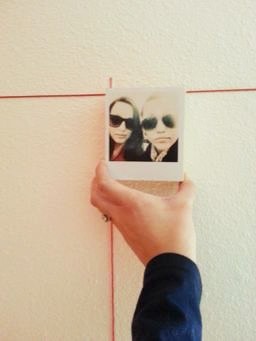
Take a piece of string/yarn and tape it to the wall, matching it up with the marks you have made. Do it the other way on the left hand side. Now measure down from the top yarn the distance to the top of your next row. Mine was 14″. Make some marks and tape another piece of string along them. I did that two more times so I’d know where to match up the top of every row. I measured in from the left side, 6″, marked and taped string. I did this 6 times. The following shows how the string should look on your wall:
-
 Step 6
This is the easiest method I have found since you only need to make a few small marks and then tape your string on each end. When you’re done you just remove the string!
I used Command velcro strips to put my blocks on the wall. They are sturdy but don’t leave marks or take off paint when you remove them!
-
 Step 7
I actually cut each set into thirds, since I didn’t need much sticking power and I wanted to get the most out of a pack I could.
Now match your blocks up with the corners of the string (the x’s in the following diagram) and stick them to the wall!
-
 Step 8
You can take the string down and you’re done!
-
 Step 9
All done!