https://www.cutoutandkeep.net/projects/how-to-use-crimp-tubes-tutorial • Posted by Shop Showcase


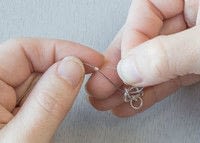
String beads onto your stringing wire. Then string the crimp tube and your clasp onto the wire, Take the wire back through the crimp tube.*Leave the wire attached to the wire spool so as to avoid your beads falling off and wasting wire.

Note the wire going through the clasp loop and then back through the Crimp Tube.

Push the crimp tube up towards the clasp making about a 2mm loop.*Don’t make the loop too tight or it will wear the wire out and inhibit movement of the clasp.

Holding the two wires separated in one hand, place your tube in the inner position and crimp it making a crease in the middle of the tube with one wire on each side of the crease.

Note the crease in the center of your crimp tube.

Place the crimp tube on it’s side in the outer position of your crimp tool and gently crimp down. When you do this the tube will fold at the crease.

Slide beads up towards the crimp tube over the wire tail to cover it.*It’s always best to string the wire tail through 2-3 beads at the end to keep the wire from sliding out of the crimp over time.

With one end finished, this is what your project will look like.

Repeat step 1 for the other clasp end.

Leaving a long (2-3 inch) wire tail, string 2-3 beads over the wire tail.

Pull the tail wire, gently working it back and forth, to tighten the wire and bring the remaining beads close to the crimp tube.

Repeat Step 3 Place your tube in the inner position and crimp it making a crease in the middle of the tube with one wire on each side of the crease.

Note the crease in the center of your flattened crimp tube.

Repeat Step 4 Place the crimp tube on it’s side in the outer position of your crimp tool and gently crimp down. When you do this the tube will fold at the crease.

Trim tail wire.