About
Learn how-to pick up stitches for a log cabin blanket with Yarnia, Portland
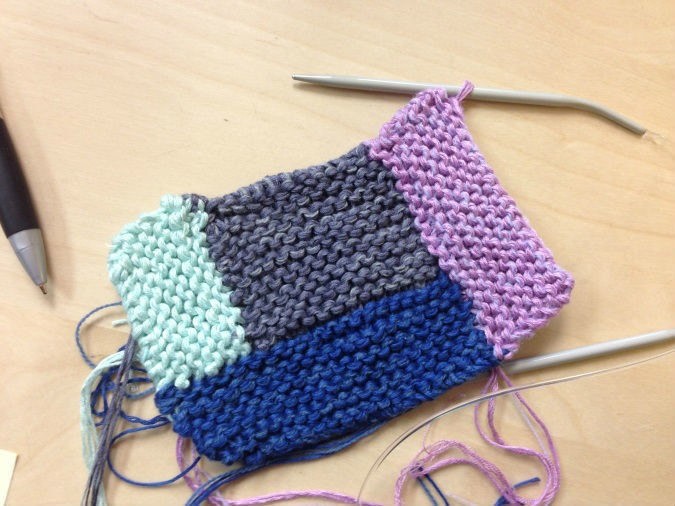
A few weeks ago, we talked about the construction of a Log Cabin Blanket. While the concept is pretty straightforward, there’s one thing that keeps many people from ever attempting one of these: how do you pick up live stitches along the edge, when you’re starting the next color?
Picking up stitches is an invaluable skill to learn. Once you advance to knitting garments, it comes up all the time: when you’re adding the brim of a hat that is knitted perpendicular to the main body; finishing a tank with clean, defined lines around the collar and sleeves, or reinforcing the top of a market bag with a border.
A log cabin blanket is a great project to learn this skill with, because you’ll always be picking up stitches along a clean edge, one stitch per row, and it will feel exactly the same every single time.
As you learned in this post, you finish each section of a log cabin blanket by binding off nearly all the stitches in the final row of your current section — all stitches but one, that is.
-
 Alex B. favorited How To Pick Up Stitches For A Log Cabin Blanket
18 Apr 08:12
Alex B. favorited How To Pick Up Stitches For A Log Cabin Blanket
18 Apr 08:12
-
 Shop Showcase published her project How To Pick Up Stitches For A Log Cabin Blanket
21 Jan 19:34
Shop Showcase published her project How To Pick Up Stitches For A Log Cabin Blanket
21 Jan 19:34
You Will Need
-
 Step 1
First things first, insert your needle into the hole just below the last row you worked, from front to back.
-
 Step 2
Then, take the new color you’re about to pick up, and drape it over the part of your needle that’s sticking out the back side of your work, leaving at least a 5-6″ tail.
-
 Step 3
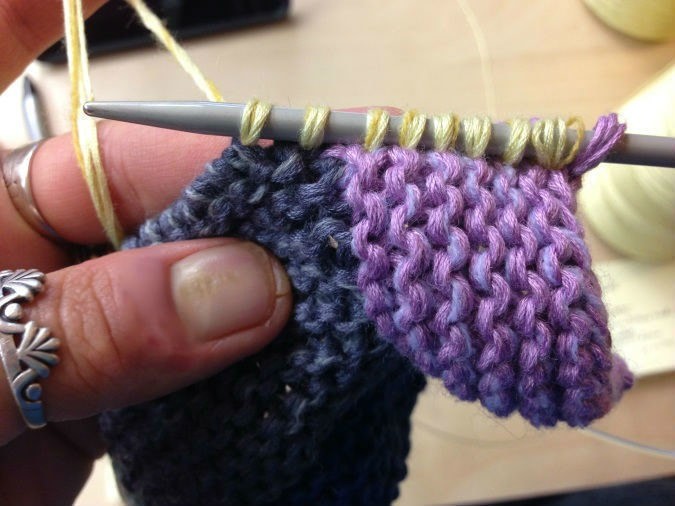
Here, I’ve bound off all but one of the purple stitches from that last section. Now we’ll be making a 90 degree turn, and picking up stitches along the side edge of that same purple section, and then continuing along the grey section of that same edge.
-
 Step 4
Then, using the fingers of your left hand to keep this (yellow) yarn taut, use the needle to pull that new yarn through the fabric, up towards you, so that it becomes a new loop on your needle. (If this feels tricky, you can also use a small crochet hook to reach through the fabric, grab the yellow strand, and pull it up towards you. Once you’ve pulled it through to the right side of the fabric, you can slip it on your needle. Same deal!)
-
 Step 5
Then, do it again. Find the next hole along that edge, stick your needle through it from front to back, and use it to pull that new yarn up and back through the fabric towards you, forming a loop that adds on to the needle. After doing this a few times, the new yarn will be secured from those first few stitches, and you won’t have to use the fingers from your left hand as much to keep it taught. (In fact, for all you continental knitters out there, I hold this new yarn in my left hand the same way I do when I’m continental knitting, and use my right hand to maneuver the needle to pick these stitches through the fabric, the same way that I do when I’m picking a stitch to knit it!)
-
 Step 6
Even when I finish picking up stitches from the side edge of the purple section, I just continue right along into the holes of the grey section, forming a new ridge of yellow that spans both these parts.
-
 Step 7
Once you have picked up the stitches along the entire edge of that row, it will look like this:
-
 Step 8
(You’ll notice that that purple stitch — the last stitch from the previous edge — is still hanging out there. You can either eliminate this by first pulling yellow through that purple loop before you even stick your needle in to the fabric to pull up your first stitch, but even if you don’t I find that it’s not terribly noticeable; keeping that purple stitch as-is allows you to keep that first stitch nice and tight, and once this stitch becomes yellow on the next row and you secure the new yellow tail nice and tight, that little jog is barely even visible.)
-
 Step 9
Now, once you’ve picked up all the stitches along that new edge, you’ll turn your work around and begin knitting right back down the row, continuing the garter stitch pattern of the log cabin blanket. Here is what the wrong side of your work will look like:
-
 Step 10
Once you get to the end of that next row, you’ll be back at the tail from that new-ish section you’ve just started (in our case, yellow). Now that you have a full 2 rows under your belt, we can tie this tail to the purple tail that remains from our previous section, securing it so it won’t unravel, and making that first yellow stitch become nice and tight.
An alternative method (since you’ll have LOTS of ends to weave in when this is all over!) is to work that tail in while you pick up the first 5 stitches of that new section. This may feel like too much to juggle if you’re just starting out with picking up stitches, but once you have the hang of it, give it a try: when you stick the needle in the fabric to pick up your second yellow stitch, scoop up both the working yarn, and the tail, at the same time. Picking up both of these for the first 5 or so stitches will secure that tail enough so that later on, you can come back and just snip it down and call it good.
So now that you’ve got all your stitches live on your needle, you’ll work your desired number of garter stitch rows. And then? Do it all over again.
-
 Step 11
And again, and again, and again. Until it’s the size of a blanket!