


About
How to make your own piping and bias tape
Piping! That's such a great detail to add to any design and so easy to make as well.
Even if it's available in a lot of colours, wouldn't it be great to make your own from any kind of fabric you have: prints, matching or contrasted colours...
Let's see how to make piping and bias tape.
-
 Brenda A. favorited How To Make Your Own Piping
26 Jun 07:11
Brenda A. favorited How To Make Your Own Piping
26 Jun 07:11
-
 Essica a. added How To Make Your Own Piping to How to make your own collection
20 Sep 07:34
Essica a. added How To Make Your Own Piping to How to make your own collection
20 Sep 07:34
-
Essica a. favorited How To Make Your Own Piping
20 Sep 07:34
-
 Chudames favorited How To Make Your Own Piping
31 Jul 00:10
Chudames favorited How To Make Your Own Piping
31 Jul 00:10
-
Jacinto M. commented on How To Make Your Own Piping
25 Jul 18:50
-
 Anael MarsW favorited How To Make Your Own Piping
28 Apr 18:54
Anael MarsW favorited How To Make Your Own Piping
28 Apr 18:54
-
 clarisse.cramer favorited How To Make Your Own Piping
25 Aug 19:58
clarisse.cramer favorited How To Make Your Own Piping
25 Aug 19:58
-
 Penny F. added How To Make Your Own Piping to Clothing/Shoes
22 Jul 15:22
Penny F. added How To Make Your Own Piping to Clothing/Shoes
22 Jul 15:22
-
Suzi T. favorited How To Make Your Own Piping
16 Jul 13:58
-
 Theswitchbladetype favorited How To Make Your Own Piping
05 Jul 06:08
Theswitchbladetype favorited How To Make Your Own Piping
05 Jul 06:08
You Will Need
-
 Step 1
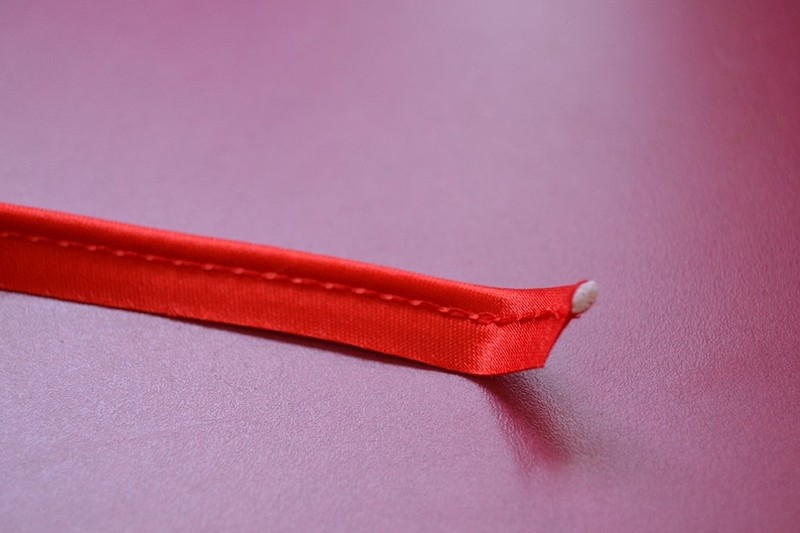
This is some store-bought piping. You can see how it's made: a cord is sandwiched between a bias strip of fabric and there is a stitching line very close to that cord. The strip of fabric beeing cut on the bias allows for a lot of flexibility in the piping, making it great to outline any curve seam line.
-
 Step 2
Cut a square piece of fabric. I made mine 25 cm x 25 cm (10" x 10") but you can make it as big or small as you want. With this size, I was able to make a 2,4 m strip of bias (2 1/4 yards).
-
 Step 3
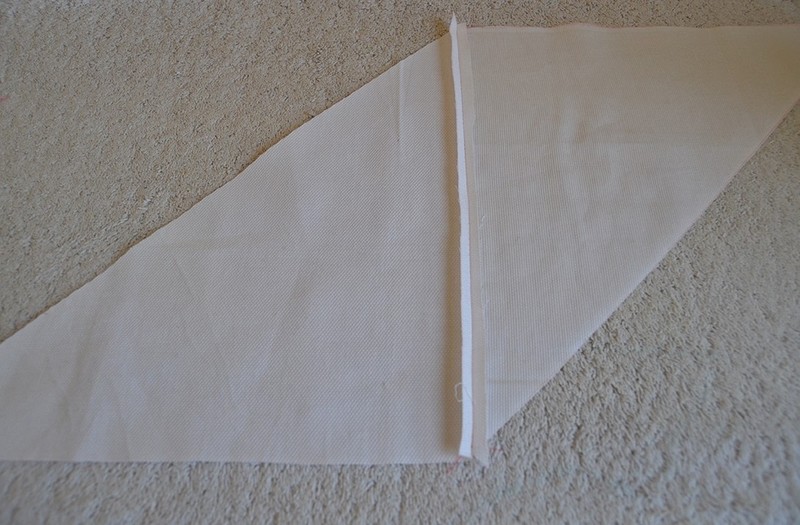
Cut the square in half diagonally. This will give the bias.
-
 Step 4
With right sides together, stitch the sides together (the straight ones, not the diagonal ones!) very close to the edge.
-
 Step 5
Press the seam allowances open with the tip of the iron.
-
 Step 6
Draw parallel lines every 2,5 cm (1") starting at the top (along the bias) on the wrong side of the fabric. The last line might be slighty smaller (mine's 2,2 cm), that's because my seam allowances were a little bit too deep.
-
 Step 7
That's the tricky part, at least for me. With right sides together, bring the edges together and match the lines along the seam line. The first row of each side should be offset, like on the picture. Pin together and stitch very close to the edge.
-
 Step 8
After the tricky part, the fun one! Now that you have a tube, start cutting the first offset row following the continuous line until the end.
-
 Step 9
Now you have the strip of fabric cut on the bias and you need your cord.
-
 Step 10
Place the cord on the wrong side on the bias, fold the bias in half to sandwich the cord and secure it in place with pins.
-
 Step 11
With a zipper foot, stitch as close as possible to the cord (possibly with a matching thread! I'm using a constrating one so you see it better).
-
 Step 12
There you go! You made your own piping! Now use it in some great outfits!
-
 Step 13
Here are some piping examples. I just love it!


Comments


