About
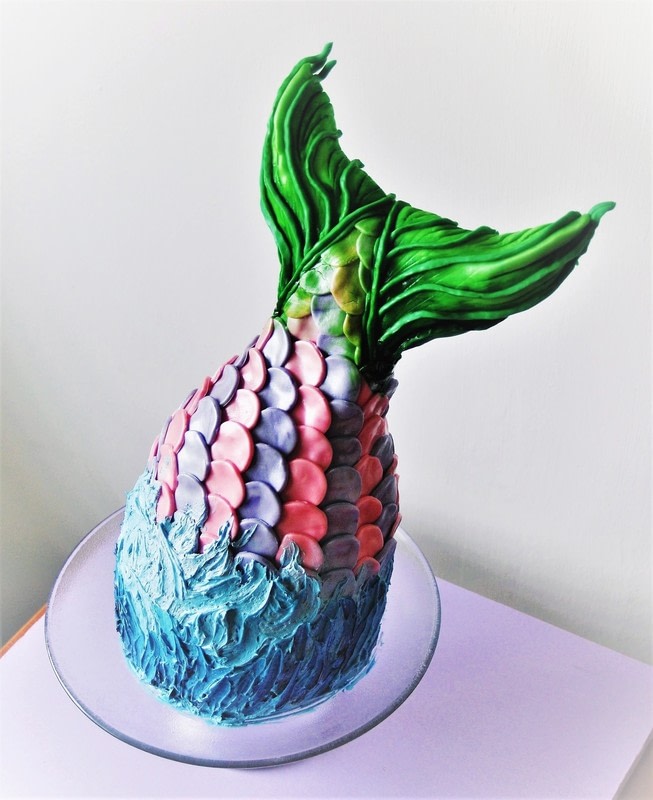
Scale up your cake decorating skills with this fabulous under the sea cake
Everyone knows a mermaid lover, make them this amazing mermaid cake and you’re gonna be set for life. Ok, I’ll be honest, this mermaid cake is not for the faint-hearted. It’s a total balancing act and caused me more than a few heart palpitations. It also takes a lot a of time and patience. But, if you stick with it the rewards are huge! A real show stopper to make everyone take notice of your fantastic skills.
Tags
-
 Mikayla B. favorited How To Make A Splashing Mermaid Cake
18 Sep 04:39
Mikayla B. favorited How To Make A Splashing Mermaid Cake
18 Sep 04:39
-
 Emma H. favorited How To Make A Splashing Mermaid Cake
01 Mar 21:32
Emma H. favorited How To Make A Splashing Mermaid Cake
01 Mar 21:32
-
 JadeSucksAtLife favorited How To Make A Splashing Mermaid Cake
24 Feb 22:41
JadeSucksAtLife favorited How To Make A Splashing Mermaid Cake
24 Feb 22:41
-
 PienderZ added How To Make A Splashing Mermaid Cake to mermaid party
22 Jan 20:53
PienderZ added How To Make A Splashing Mermaid Cake to mermaid party
22 Jan 20:53
-
 Wrap Champion published her project How To Make A Splashing Mermaid Cake
23 Nov 09:00
Wrap Champion published her project How To Make A Splashing Mermaid Cake
23 Nov 09:00
-
Step 1
Line 4, 7-inch cake pans with parchment paper.
In a bowl, whisk together 4oz each of butter, self-raising flour, sugar, 2 eggs and 3 tbsp of boiling water. Pour into a lined, cake pan. Repeat for the other 3 pans
Bake at 180C/160 fan for 30-35 minutes, until a skewer comes out clean.
Repeat the recipe 2 more times, this time baking in a lined oven tray. Bake at 180C/160 fan for 18-20 minutes.
Remove from the pans and leave to cool. When cool, wrap in cling film and place in the freezer.
-
 Step 2
Melt 50g of chocolate over a bain marie, in a large bowl. When it’s melted, mix in the rice krispies.
Remove the bowl of krispie treats from the heat and allow to cool for a few minutes.
While it’s cooling, sketch out the shape of the tail on parchment paper. Keep in mind that it will get slightly bigger when it’s coated in fondant. Place it on a baking tray, pencil side down.
-
 Step 3
Cover this outline with rice krispie mix, building up in layers. Between the layers, place 2 cake dowels, these will attach the tail to the cake.
To shape the kripsies into a 3D tail, wet your fingers slightly with cool water, this will stop it sticking. When you’re happy with the shape, place it in the fridge to cool for 10 minutes.
-
Step 4
Melt the remaining chocolate over a bain-marie. After 10 mins, spoon the chocolate over your tail, focusing on any areas that appear loose.
The extra chocolate serves as an edible cement, keeping everything together. Return to the fridge.
-
Step 5
Colour one third of the fondant green. slightly marbled and roll it out to 1/3 cm thick.
Remove the tail from the fridge and coat the back lightly with a layer of frosting, place on top of the green fondant and using a knife, trim the excess fondant to 1 cm larger than the tail, all the way round. Wet the edge and press gently into the tail, pulling the fondant up to attach to the sides.
-
Step 6
Roll out the remaining green fondant and cover the top of the tail in the same way. When it’s attached pinch slightly to create a rise at the outer edges of the tail. Using the blunt edge of a knife, create little scores moving from the ends to the centre. Put to one side.
You should have left over green fondant from the tail, colour this to a darker shade of green and cover with cling film for later.
-
Step 7
Split the remaining fondant into 2 equal parts. Colour one pink and one purple, lightly marbled.
This fondant will be cut into discs roughly 1 inch in diameter. I used the cap from my silver spray but anything similar will work great.
We'll do this in small batches of 10 at a time so that the fondant doesn’t dry out before we use it. The shape of the cake has a lot of curves so we want to be able to really mould the fondant around it.
-
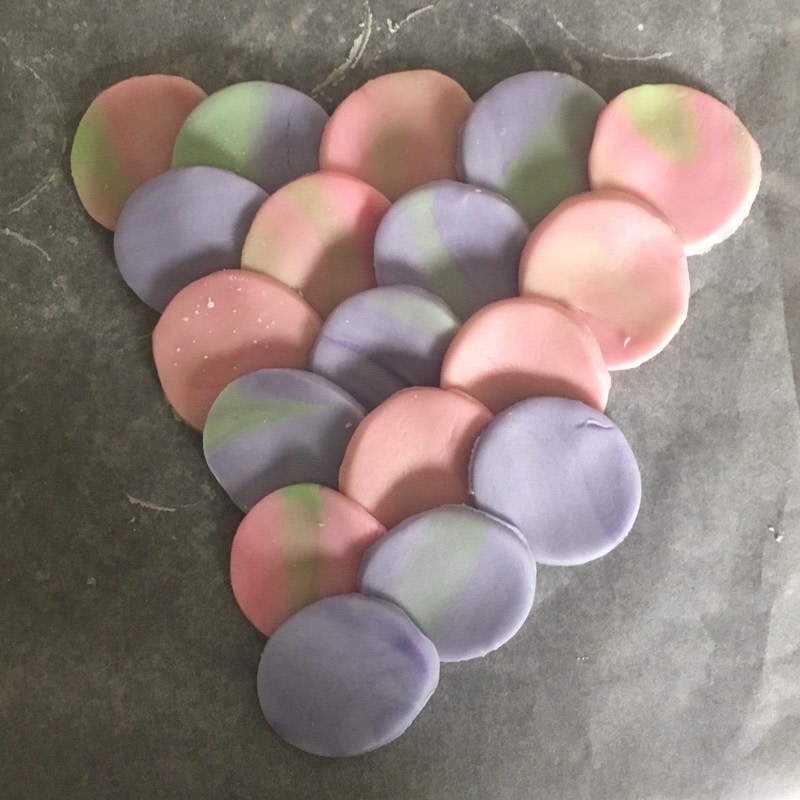
 Step 8
Break off a small piece each of pink and purple fondant and a tiny ball of green. Roughly mix a small ball of the green into both the pink and purple until the green is marbled through.
Roll out to 2mm thickness and cut 10 discs each of purple and pink. Lay these out in a triangle, overlapping the layers.
When you reach a size to fit neatly into the tail, trim the sides and attach to the tail with a little frosting.
-
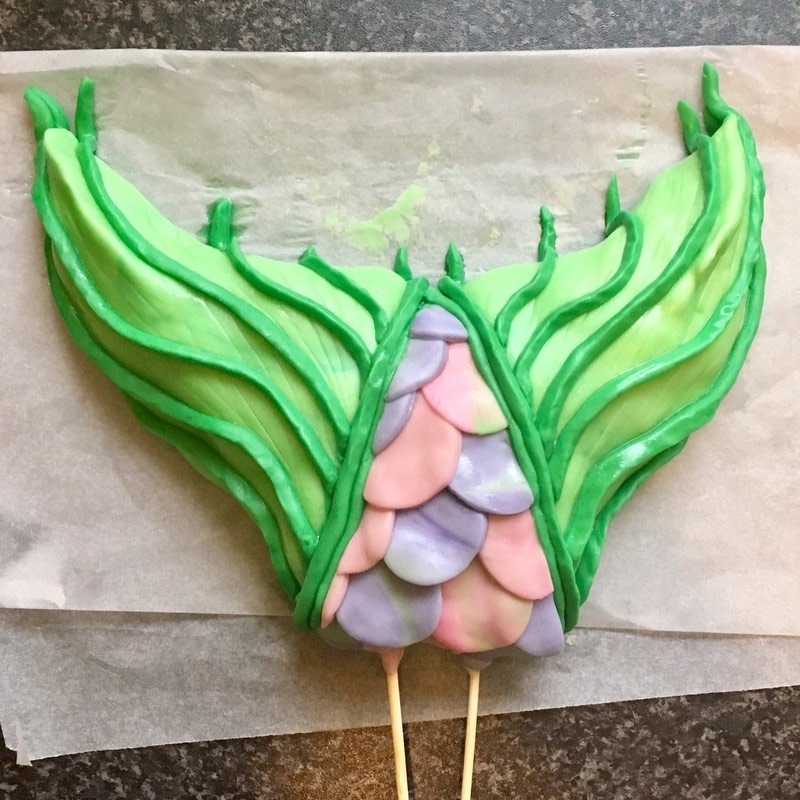
 Step 9
Roll strips of green fondant and attach to the edges of the triangle, flattening down with the end of a spoon. These can be attached simply by wetting the fondant as it should still be rather soft.
I keep a set of paintbrushes that are solely for food and use these to brush on a little water each time. Roll out further strips of dark green and attach them along the tail, sweeping from the end in towards the triangle scales. Finally, attach another 2 strips of green to the edges of the triangle to hide the joints.
-
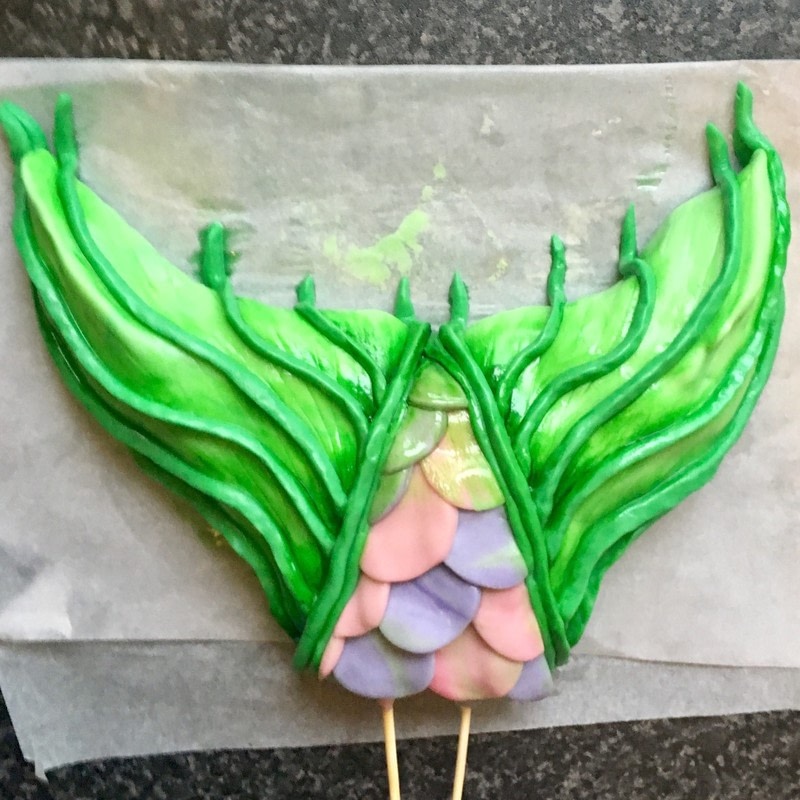
 Step 10
Lastly for this evening, use a mix of alcohol and green food colouring to add shading to the tail, just like you can see in the picture.
Leave everything to dry over-night, preferably somewhere dry and cool.
-
Step 11
Remove the sponges from the freezer at least 2-3 hours before you start decorating. Cut the flat sponges into circles that decrease in inches; 6, 6, 5, 4.
Build the cake from the bottom, a layer of frosting between each sponge to secure them, building from the largest to the smallest,.
Insert 2 cake dowels, equal distance apart from the top to the bottom, reference the tail, you want these dowels to compliment the 2 in the tail, not block them. Place in the fridge to chill for 30 minutes.
-
 Step 12
Remove from the fridge and carefully carve the sponge into shape. Keep referencing back to the fondant tail, you don’t want to carve the top any smaller than the base of the tail.
Coat the entire cake in a layer of frosting, smooth all round and return to the fridge for 30 minutes. When chilled, slot the fondant tail on top.
Slide another dowel right behind the tail for added support. Cover the top with a piece of dark green fondant, securing with a little water. Return to the fridge.
-
 Step 13
This part is really easy but seriously time consuming. In batches of roughly 10 each, cut discs in both pink and purple, same size as before.
Cover the uncut fondant in film any time you’re not using it. Attach the discs to the cake in a tile pattern starting from the top, circling around to the bottom, alternating colours.
Use a little water on the back of each disc to help them stick. Keep going until you reach the bottom 2 sponges, these don’t need to be covered because they will serve as the waves.
Use the painting technique from earlier to paint the sides into a more pointed shape..
Return the cake to the fridge.
-
 Step 14
Colour the remaining frosting pale blue. Coat the bottom 2 sponges with the pale blue frosting and use the end of a spoon to ‘brush’ upward, creating a wave texture.
Colour the remaining frosting darker blue and repeat the spoon trick to add this on top of the pale blue.
Use the end of your spoon to apply blue food colouring, neat, on to the very bottom of the cake, sweeping up to make waves.
Finally, spray lightly with edible, metallic, silver shimmer.
-
 Step 15
And… you’re done! Congratulations! I would recommend storing in the fridge until the big unveil and make sure to give yourself a wee pat on the back, you’ve earned it.