


About
Houndstooth Shoes DIY
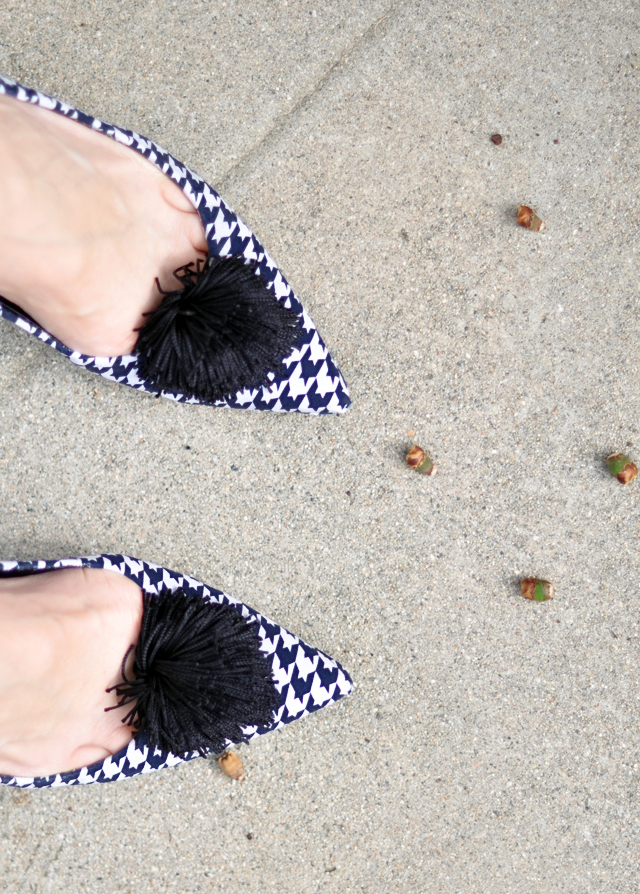
Houndstooth is by no means a new textile, however, it has hit the fashion trend radar once again and seems to be popping up in every magazine I open as of late. Most blame Lady Gaga and her outrageous head-to-toe houndstooth ensemble. And she may have brought it to the masses attention but the dress & shoes she was wearing were from the Salvatore Ferragamo Autumn/Winter 2011 collection wherein Houndstooth was one of the main prints seen in fine and exaggerated proportions. Chanel & YSL touched on it as well for 2011 {and it's a Staple for Gwen Stefani} but Ferragamo sold it this season, in my opinion. I recommend watching the runway show, it's GORGEOUS. I would wear every single look. You can buy Ferragamo's gorgeous snakeskin Houndstooth shoes for $950 OR you can make your own. Here's how...
Tags
-
 Beth Ann E. favorited Houndstooth Shoes
09 Dec 04:44
Beth Ann E. favorited Houndstooth Shoes
09 Dec 04:44
-
 Teresa S. favorited Houndstooth Shoes
30 Apr 11:34
Teresa S. favorited Houndstooth Shoes
30 Apr 11:34
-
 Cleopatras C. favorited Houndstooth Shoes
15 Nov 09:19
Cleopatras C. favorited Houndstooth Shoes
15 Nov 09:19
-
 Rachel O. favorited Houndstooth Shoes
22 Sep 02:56
Rachel O. favorited Houndstooth Shoes
22 Sep 02:56
-
 Anne H. favorited Houndstooth Shoes
29 Jun 17:46
Anne H. favorited Houndstooth Shoes
29 Jun 17:46
-
 Sarah Kim added Houndstooth Shoes to TO DO
31 May 12:05
Sarah Kim added Houndstooth Shoes to TO DO
31 May 12:05
-
Sarah Kim favorited Houndstooth Shoes
31 May 12:05
-
 Delf added Houndstooth Shoes to Gwen Stefani
12 Mar 14:49
Delf added Houndstooth Shoes to Gwen Stefani
12 Mar 14:49
-
Carmen H. favorited Houndstooth Shoes
08 Jan 09:08
-
 cristinakilljoyway favorited Houndstooth Shoes
03 Jan 13:38
cristinakilljoyway favorited Houndstooth Shoes
03 Jan 13:38
You Will Need
-
 Step 1
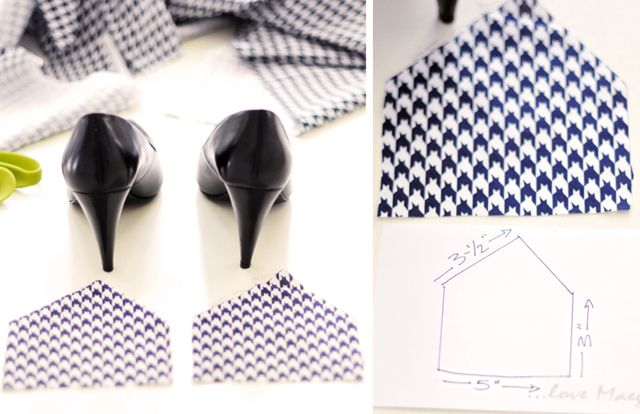
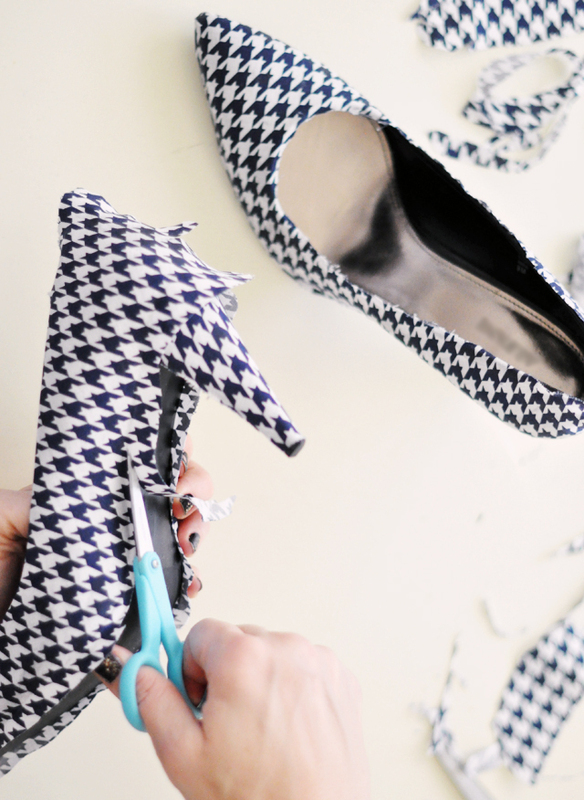
Cut out two irregular shapes {a pentagon of sorts}. My measurement is for a 3" heel. Adjust for longer or shorter heels. **Make sure your print/pattern direction is the same on both.
-
 Step 2
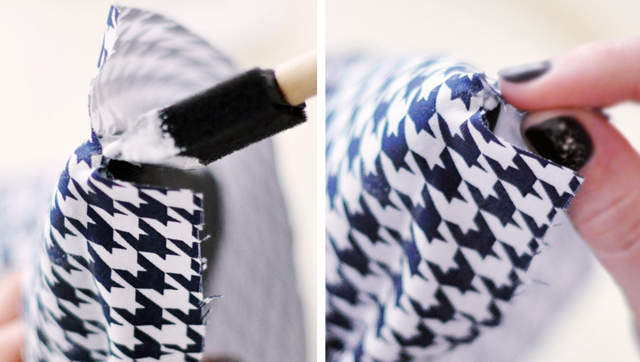
Using your sponge brush, lay on a relatively thick layer of Mod Podge to your heel. Do one at a time.
-
 Step 3
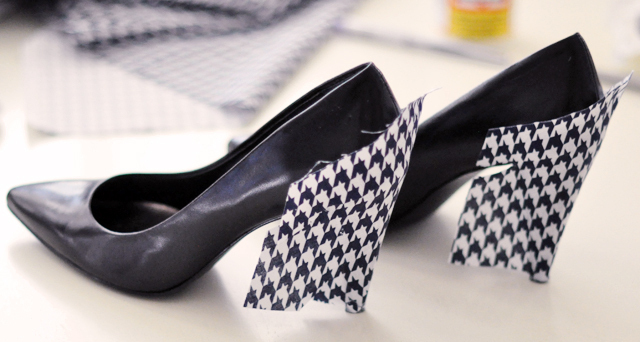
With the triangle side up, place your fabric on your heel and smooth out.
-
 Step 4
Cut a slit in the fabric {on either side} where the heel meets the shoe in order for the fabric to lay smoothly. **If your fabric is buckling anywhere else, make a similar slit to smooth it out. Let dry. Once dry, trim the edges leaving about 1/8" around each of the sides.
-
 Step 5
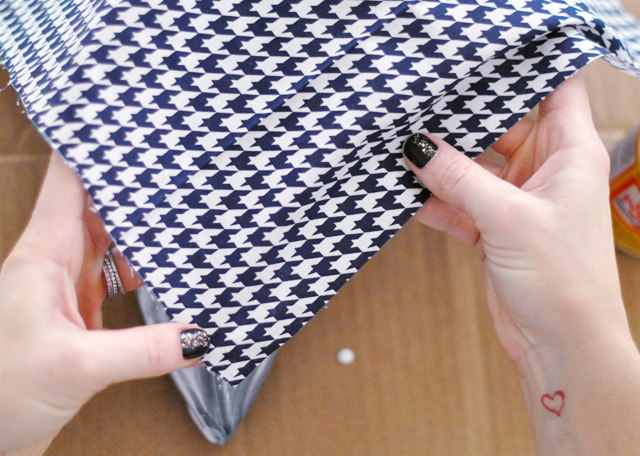
Next up is your toes! FIRST Cut two large rectangles from your fabric. Mine were about 18" x 24" - I wear a 9, measure your shoe accordingly, you should leave ample room for error on all sides. **Mod Podge the front toe of ONE shoe.
-
 Step 6
Decide which direction you want your print to lay. **Remember to match the other shoe the same direction.
-
 Step 7
Giving yourself over an inch of allowance on each side, lay your fabric over your toe and smooth out any bubbles. Do the same to the other shoe, allowing this one to dry and set into place.
-
 Step 8
Once your toes are set enough {they don't have to be completely dry but at least steady and immovable} cut a triangle out from the excess fabric at your toe, leaving at least 1/8" allowance {longer than the sole}. **Press the front down to set in place. {see below}
-
 Step 9
Adding more glue to your edges and toe, fold and glue down each side, creating an envelope flap type of crease... fold over your edges twice to prevent fraying, and/or add more glue.
-
 Step 10
Wrap your fabric loosely under your shoe then carefully cut a small slit in the opening. **Making sure you'll have enough fabric to cover both sides of your shoe, make the slit larger so that each side will lay flat.
-
 Step 11
Beginning with one side and one shoe at a time, add your glue and carefully smooth your fabric over each side. **Wherever it buckles, snip the edge like we did with our heels to allow the fabric to lay smoothly. Just don't snip too far!
-
 Step 12
Once your shoe fabric is set in place, trim off the excess leaving at least 1/4" just to be safe.
-
 Step 13
Glue one side of the back/ankle down then the other flap over it. **Create a nice, clean, fray-free seam by folding over your edge first and centering it with your shoe's real seam.
-
 Step 14
Trim excess fabric around entire shoe to 1/8" or less. **You may choose to cut your fabric just above the shoe's natural sole {so the sole will show} or flap it over the edges. I did both, depending on the area of the shoe.
-
 Step 15
Adding extra Mod Podge to the inner edges {that I left a little less than 1/8"} press down. **Do this around all of your edges.
-
 Step 16
I wasn't sure how exactly to merge the seam of the heel with the seam of the shoe so I created a ribbon to hide it. **Cut a strip about 24" {to be safe} long by 1" wide, glue,fold,glue, fold until you get a ribbon, then cut in half. **You'll need two 6"-12" ribbons for each shoe. **You can also choose a contrasting or solid fabric or ribbon if you like. **Adding a good amount of glue around the seam, I carefully create a bow of sorts to hide the seam. I glued them to the inner side of the heel for extra support.
-
 Step 17
The very back of the print of the heel/shoe lined up perfectly, though the sides do not. I'm okay with that :)


Thanks for sharing!!!!