

About
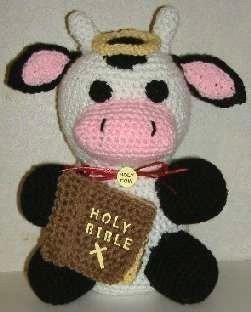
Holy Cow, this cow's got religion! Make it for yourself or for a very special friend!
HOLY COW
*H hook
*4 ply worsted wt. yarn-approx. 2-1/2-3 ozs. white, small amounts of black, brown,
yellow, pink
*Small amount ribbon for tie around neck
*3/8 inch letters, self stick or paper punch letters, paper punch cross or hand cut
*Measures approx. 13” tall
Tags
-
 Key West Witch favorited Holy Cow!
26 Jun 07:35
Key West Witch favorited Holy Cow!
26 Jun 07:35
-
 Rosa added Holy Cow! to cewl things
01 Jul 10:26
Rosa added Holy Cow! to cewl things
01 Jul 10:26
-
 melindaWARD99 added Holy Cow! to my fav list
09 Aug 04:33
melindaWARD99 added Holy Cow! to my fav list
09 Aug 04:33
-
melindaWARD99 favorited Holy Cow!
09 Aug 04:32
-
 PilotMomma added Holy Cow! to Amigurumi
10 Apr 19:53
PilotMomma added Holy Cow! to Amigurumi
10 Apr 19:53
-
PilotMomma favorited Holy Cow!
10 Apr 19:52
-
 Jolanda favorited Holy Cow!
25 Feb 19:24
Jolanda favorited Holy Cow!
25 Feb 19:24
-
 louella.adams.1 favorited Holy Cow!
20 Dec 20:10
louella.adams.1 favorited Holy Cow!
20 Dec 20:10
-
 Kathleen S. favorited Holy Cow!
02 Jun 11:13
Kathleen S. favorited Holy Cow!
02 Jun 11:13
-
Serenity added Holy Cow! to amigurumi
28 Feb 22:48
You Will Need
-
Step 1
HEAD & BODY
RND 1: Stuff as you work. Ch 2, 8 sc in 2nd ch from hk
RND 2: 2 sc in each sc around. (16 sc)
RND 3: *2 sc in next sc, 1 sc in next* (24)
RND 4: *2 sc in next sc, 1 sc in next 2 sc* (32)
RND 5: *2 sc in next sc, 1 sc in next 3 sc* (40 sc)
RND 6: 1 sc in each sc around.
RND 7: *2 sc in next sc, 1 sc in next 4 sc* (48)
RND 8-18: Work even on 48 sc.
RND 19: *Dec over next 2 sc, 1 sc in next 4 sc*
RND 20: *Dec over next 2 sc, 1 sc in next 2 sc*
RND 21: Work even.
RND 22: *Dec over next 2 sc, 1 sc in next sc* (20 sts)
RND 23: Work 1 sc in each st around.
RND 24: 2 sc in each sc around. (40 sc)
RND 25: Rep rnd 7. (48 sc)
RNDS 26-42: Work even on 48 sc.
RND 43&44: Rep rnds 19&20
RND 45: Rep rnd 22 (20sts)
RND 46: (Dec over next 2 sts around) Fasten off leaving long strand. Weave through sts of this rnd and draw hole closed.LEGS
Make 4
RNDS 1-3: With black, rep rnds 1-3 of Head and Body
RNDS 4-10: Work even on 24 sc.EARS
OUTER EAR
This is right side of work. With black, ch 13, 1 sc in 2nd ch from hk, 1 hdc in next ch, 1 dc in next 3 chs, 1 trc in next 2 chs, 1 dc in next 3 chs, 1 hdc in next, 1 sc in last ch. Now you will be working in the base of sts just worked, which are the free loops left from foundation ch. Work 1 sc in the base of sc, 1 hdc in base of next hdc, 3 dc in base of next 3 dc, 1 trc in base of next 2 trc, 3 dc in base of next 3 dc, 1 hdc in base of next hdc, 1 sc in base of last sc. Fasten off leaving a long strand of yarn for sewing. This end of ear will be the inside tip of ear attached to head.
INNER EAR
This is right side of work. With pink, ch 9, 1 sc in 2nd ch from hook, 1 hdc in next 2 chs, 1 dc in next 2, 1 hdc in next 2 chs, 1 sc in last ch. Now working in the free loops of foundation ch as for outer ear, 1 sc in sc, 1 hdc in next 2 hdc, 1 dc in next 2 dc, 1 hdc in next 2 hdc, 1 sc in last sc, fasten off leaving long strand for sewing. This end is also inside tip of ear. Now place wrong side of inner ear against right side of outer ear, with inside tips of ear at same end. Sew inner ear to outer ear. Set ears aside.HEAD PATCH
ROW 1: With black, ch 6, 1 sc in 2nd ch from hk and in each ch across, ch 1, turn
(5 sc)
ROWS 2-5: Work even on 5 sc, ch 1 turn.
ROW 6: Dec over 1st 2 sc, 1 sc in next sc, dec over last 2 sc, ch 1 turn. (3 sts)
ROWS 7: 1 sc in each st across. (3 sc)
ROWS 8-10: Work even on 3 sc.
ROW 11: 2 sc in 1st sc, 1 sc in next sc, 2 sc in last sc, ch 1, turn. (5 sc)
ROWS 12-15: Work even.
ROW 16: (Dec over next 2 sc) twice. Do not work in last sc. This is right side of work. Fasten off. This row will be at front center of head. Sew patch to top center of head, having row 8 centered over rnd 1 of head.HORNS
RND 1: With white, ch 2, 6 sc in 2nd ch from hk.
RND 2: Work 1 sc in each sc around.
RNDS 3-6: Work even on 6 sc.
RND 7: Work 2 sc in each sc around. Fasten off. Sew horns to head at top center of head on each side of patch. Now take ears and sew next to horns on each side. When sewing ears, pinch the tips of ear in half and sew only the tip of pinched part of ears to head. Stuff each horn.SNOUT
RND 1: With pink, ch 13, 3 sc in 2nd ch from hk, (1st 3 sc end group), 1 sc in next 10 chs, 3 sc in last ch. (2nd 3 sc end group)
Working on opposite side of foundation ch, work 1 sc in next 10 sts. Mark each rnd as you work. (26 sc)
RND 2: Work 1 sc in each sc around, working 3 sc in center sc of each 3 sc end group. (30 sc)
RNDS 3-6: Work even on 30 sc. Fasten off.EYES
With Black, ch 2, 6 sc in 2nd ch from hk, join to 1st sc, fasten off.HALO
As worked, this is wrong side of work. Ch 30, join to form circle. 1 sl st in each ch around, join to 1st sl st, fasten off.BIBLE
FRONT & BACK COVER
ROW 1: With brown, ch 10, 1 sc in 2nd ch from hk and in each ch across. (9 sc)
ROWS 2-11: Work even on 9 sc.CENTER PAGE
With yellow, work same as for front and back cover. At this point place all three pieces together and do a few quick sts to keep through all 3 pieces to keep intact. It will be helpful to do vertical sts up and down along where spine will be sewn. Also do some small undetectable sts through all thicknesses of front, back and center page, to keep them from curling all the way open. The object is to allow just a little of the center page along a small portion of the vertical edging and one or both corners to be seen, in order to give the impression of a lot of pages exposed.SPINE
ROW 1: Ch 12, work 1 sc in 2nd ch from hk and in each ch across. (11 sc)
ROWS 2-7: Work even on 11 sc. Spine will be sewn to Bible with the rows running vertical instead of horizontal. Fold piece in half along spine portion of Bible and sew in place along front and back covers. “Holy Bible” may be applied to the front cover of the Bible with a small letter punch set, or with purchased self-stick letters. -
 Step 2
If desired, you can embroider a small indication of a mouth or lips with a simple horizontal straight stitch. Curve it slightly and and make a happy smile!


CO + K User