Santa’s Magic Snow
Extract from Glitterville's Handmade Christmas • By Stephen Brown • Published by Andrews McMeel Publishing

About
Glitterville's Handmade Christmas
Ho Ho Snow
It looks like the white stuff
that falls from the clouds.
Grab milk! Get bread!
To the stores we all crowd!
Watch out! Be careful!
The roads might be slick!
Let’s all build a snowman;
for his arms we’ll need sticks!
It looks like snow, but pink, I know.
I wonder if, on it, my sled would go.
If I lie down upon my back, can I make snow angels?
Will my feet leave tracks?
But how could this be snow,
when the sun’s brightly shining?
A gift from the sky—
who knew my heart’s pining?
Snow in this temperature
has made me suspicious
of this precipitation
that’s oddly capricious.
Wait—what if this flurry’s from magic flakes,
and knowing the recipe is all that it takes?
Then I could make it anytime,
because snow all year is not a crime.
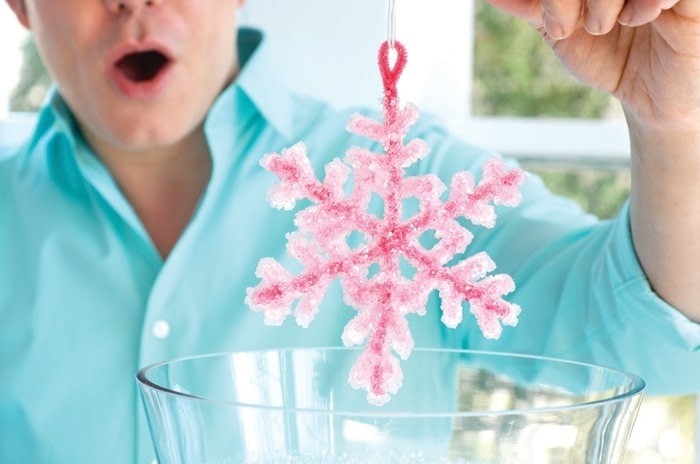
I’m not really sure if I should reference this project as a craft or a scientific experiment, but if you have kids, they will call it magic! All you need are a few items easily found around the house and eight hours’ sleep, then, poof, you have a sparkling snowflake with more facets than the Hope Diamond!
Tags
© 2024 Stephen Brown / Andrews McMeel Publishing · Reproduced with permission. · From Glitterville’s Handmade Christmas by Stephen Brown/Andrews McMeel Publishing
-
 Lee Rose added Santa’s Magic Snow to class ideas
24 Jun 02:00
Lee Rose added Santa’s Magic Snow to class ideas
24 Jun 02:00
-
 Laura S. favorited Santa’s Magic Snow
06 Mar 05:26
Laura S. favorited Santa’s Magic Snow
06 Mar 05:26
-
 Flo Di favorited Santa’s Magic Snow
11 Feb 23:06
Flo Di favorited Santa’s Magic Snow
11 Feb 23:06
-
 Alissa B. favorited Santa’s Magic Snow
10 Jan 18:16
Alissa B. favorited Santa’s Magic Snow
10 Jan 18:16
-
 Rachael H. added Santa’s Magic Snow to Crafting
08 Jan 20:30
Rachael H. added Santa’s Magic Snow to Crafting
08 Jan 20:30
-
Rachael H. favorited Santa’s Magic Snow
08 Jan 20:30
-
Glenda A. favorited Santa’s Magic Snow
07 Jan 13:57
-
 WerewolfCas favorited Santa’s Magic Snow
07 Jan 09:11
WerewolfCas favorited Santa’s Magic Snow
07 Jan 09:11
-
 Andrews McMeel published his project Santa’s Magic Snow
07 Jan 01:01
Andrews McMeel published his project Santa’s Magic Snow
07 Jan 01:01
-
Step 1
Make the base stem of the snowflake. Use scissors to cut an 8½-inch length of hot pink chenille stem. Measure 2 inches from the end of the stem and make a loop by bending the stem and wrapping it around itself, as shown.
-
Step 2
Use scissors to cut two 6½-inch pieces of hot pink chenille stem. Wrap each piece around the center of the base chenille stem, as shown.
-
Step 3
Use scissors to cut six 3-inch pieces of light pink chenille stem. Wrap one piece around each leg of the snowflake, as shown.
-
Step 4
Join the light pink chenille stems together by crossing over the adjoining stems to make an X; then bend the ends down, as shown.
-
Step 5
Use scissors to cut twelve 2-inch pieces of light pink chenille stem and wrap two pieces around each leg of the snowflake, as shown.
-
Step 6
Find a glass container that is large enough for the snowflake to easily fit inside without touching the sides, top, or bottom when suspended. My snowflake is pretty big, which requires a large container. You could use the same process to make a snowflake that is small enough to fit into a glass jar.
-
Step 7
Position a wooden dowel across the top of the glass container and use a small piece of floral stem wire to hang the snowflake. Set aside.
***Steps 8–11 should be done by a supervising adult. -
Step 8
Fill the glass container with enough boiling water to completely cover the snowflake, except for the hanging loop, which should remain above the water. It’s a good idea to temper the glass container to keep it from breaking when the boiling water is added. Do this by rinsing the container with hot tap water before pouring in the boiling water.
-
Step 9
Add 3 tablespoons of Borax for each cup of water in the container and stir carefully with a wooden spoon.
-
 Step 10
Slowly lower the snowflake into the Borax and water solution, resting the dowel across the top. The snowflake should hang freely without touching the sides or bottom of the container.
-
 Step 11
Now for the hardest step of all: Leave the container and snowflake untouched for approximately 8 hours, or overnight. If you wiggle or try to peek at the Magic Snow early, it will disrupt the crystal formations that are growing on the snowflake. When you finally lift the dowel, you will see that your plain chenille snowflake is magically covered in faceted, diamond-like “ice” crystals. Dry with a paper towel and add a piece of pretty ribbon for hanging.