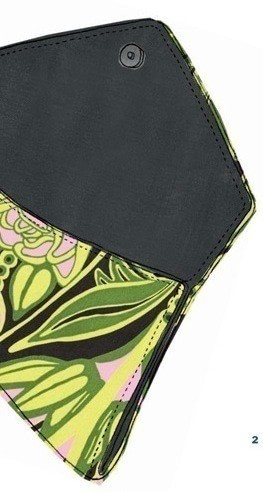
Heather Envelope Style Evening Clutch
Extract from Bag Bazaar: 25 Stylish Bags to Sew in an Afternoon • By Megan Avery • Published by Potter Craft

About
This simple, envelope-style clutch is the perfect mini-accessory for an evening on the town.
-
 Luna D. favorited Heather Envelope Style Evening Clutch
25 Apr 06:40
Luna D. favorited Heather Envelope Style Evening Clutch
25 Apr 06:40
-
 Sveta favorited Heather Envelope Style Evening Clutch
20 Oct 00:11
Sveta favorited Heather Envelope Style Evening Clutch
20 Oct 00:11
-
 Keila M. favorited Heather Envelope Style Evening Clutch
08 Apr 04:15
Keila M. favorited Heather Envelope Style Evening Clutch
08 Apr 04:15
-
 Julie K. favorited Heather Envelope Style Evening Clutch
26 Oct 13:04
Julie K. favorited Heather Envelope Style Evening Clutch
26 Oct 13:04
-
Alecia B. favorited Heather Envelope Style Evening Clutch
01 Aug 16:47
-
 purplestreets favorited Heather Envelope Style Evening Clutch
10 Jul 15:21
purplestreets favorited Heather Envelope Style Evening Clutch
10 Jul 15:21
-
 Casablanca favorited Heather Envelope Style Evening Clutch
16 Apr 09:33
Casablanca favorited Heather Envelope Style Evening Clutch
16 Apr 09:33
-
 Ichigo M. favorited Heather Envelope Style Evening Clutch
06 Sep 20:27
Ichigo M. favorited Heather Envelope Style Evening Clutch
06 Sep 20:27
-
 Kalicia K. favorited Heather Envelope Style Evening Clutch
01 Jul 00:53
Kalicia K. favorited Heather Envelope Style Evening Clutch
01 Jul 00:53
-
Step 1
Prep work:
Create a pattern for the main piece, cut to the dimensions below. You can create the pattern out of posterboard or a large folder.
-
Step 2
Trace 2 of the main pattern pieces onto the fusible interfacing and cut them out.
-
Step 3
With the shiny glue side down, place 1 of the fusible interfacing pieces onto the wrong side of the exterior fabric. Place the other piece of interfacing onto the lining fabric. Press with an iron so each piece of interfacing fuses to the fabrics.
-
Step 4
Cut out both the exterior and lining pieces, using the edge of the interfacing as a guide for where to cut.
-
 Step 5
With right sides together, pin both pieces together along the stitch lines shown in Diagram 1.
-
Step 6
Assembly:
With a 1/4" (6mm) seam allowance, sew the outside fabric piece to the lining piece, along all edges except the bottom, as shown in Diagram 1.
-
Step 7
Turn the clutch right side out, making sure to really poke out the corners. Chopsticks can be particularly handy for this. You want them to be squared off, rather than looking rounded.
-
 Step 8
Make a pen mark at the top of your clutch piece on the lining fabric, 1" [2.5cm] down from the top of the point. Insert the outside side of the magnetic snap here.
-
 Step 9
Fold the bottom open edge of the clutch in 3/4" [2cm]. This will eliminate the raw edges and create a clean, straight line on the bottom of the clutch piece. Once the line is straight, secure it with straight pins, as shown in Diagram 2.
-
 Step 10
Fold the bottom portion of the clutch piece as far up as you would like the pocket to extend. This should be at least 1/3 the height of the whole piece. Fold more for a larger pocket and smaller flap (see Diagram 3). In the example below, the pocket piece is folded up approximately 4" [10cm].
-
Step 11
Fold the flap down and make a pen mark when the outie part of the snap hits the exterior fabric. Insert the innie part of the magnetic snap. Unfold the flap as well as the bottom pocket portion of the bag.
-
Step 12
Topstitch 1/4" [6mm] from the pinned open edge.
-
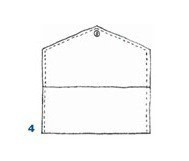
 Step 13
Refold the bottom pocket portion of the clutch and neatly topstitch, starting at the right bottom folded edge and continue around the outside of the bag except for the bottom folded edge, as shown in Diagram 4.
-
 Step 14
Remove all pins and trim all loose threads.