About
Have a Cuppa Tea Card
adorable card for the tea lover in your life!
Downloads
- 114486_2F2016-06-09-035634-Cuppa+Tea+Card+-+Cut+Out+_26+Keep+Project+6.pdf 727 KB [ Download ]
-
 Minna O. favorited Have A Cuppa Suite
10 May 05:23
Minna O. favorited Have A Cuppa Suite
10 May 05:23
-
 Laura L. added Have A Cuppa Suite to Home
29 Oct 13:34
Laura L. added Have A Cuppa Suite to Home
29 Oct 13:34
-
 Reena R. favorited Have A Cuppa Suite
09 Aug 00:51
Reena R. favorited Have A Cuppa Suite
09 Aug 00:51
-
 Pam favorited Have A Cuppa Suite
05 Aug 05:07
Pam favorited Have A Cuppa Suite
05 Aug 05:07
-
 Ninni Ninímél Nalíná ♦ ♏ ♦ favorited Have A Cuppa Suite
02 Aug 16:17
Ninni Ninímél Nalíná ♦ ♏ ♦ favorited Have A Cuppa Suite
02 Aug 16:17
-
Patricia J. favorited Have A Cuppa Suite
18 Jul 00:19
-
 Sam favorited Have A Cuppa Suite
12 Jul 06:10
Sam favorited Have A Cuppa Suite
12 Jul 06:10
-
 Crafterella featured Have A Cuppa Suite
11 Jul 23:00
Crafterella featured Have A Cuppa Suite
11 Jul 23:00
-
 Miss_Fit favorited Have A Cuppa Suite
09 Jul 19:30
Miss_Fit favorited Have A Cuppa Suite
09 Jul 19:30
-
 LUPE68 favorited Have A Cuppa Suite
09 Jul 14:52
LUPE68 favorited Have A Cuppa Suite
09 Jul 14:52
You Will Need
-
 Step 1
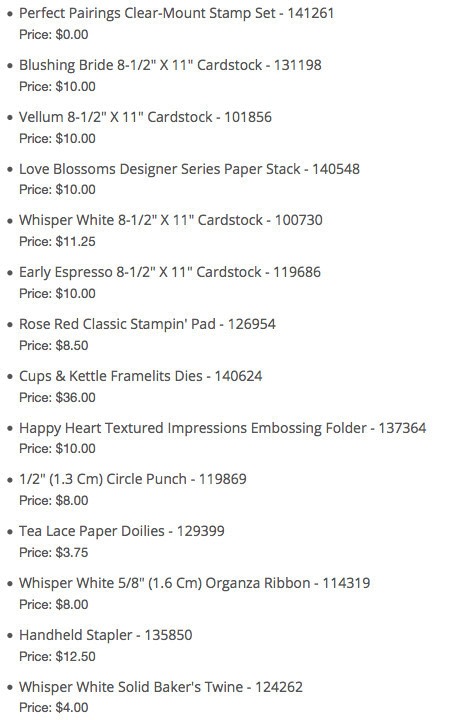
Supply List for Project
-
Step 2
Instructions
1. Fold the Blushing Bride Cardstock in half to create card base.
2. Using the Big Shot and the Cups & Kettle Framelits Dies cut out three tea cups
from the Love Blossoms DSP.
3. Emboss the Blushing Bride card front with Happy Heart Folder and Big Shot.
4. Cut the doily in ½ and glue to the bottom of the front of the card.
5. Wrap the ribbon around the top of the doily and tie to the left side of the card.
6. Glue the first tea cup to the top part of the card.
7. Gently fold (without creasing) the piece of vellum and snip the sides to form a
shape that resembles a tea bag. Punch a ½” circle from Early Espresso scrap,
fold in half and staple to the top of the vellum tea bag.
8. Tape a piece of White Baker’s Twine to the back of the vellum piece and glue to
the back of a second tea cup.
9. Glue this tea bag on top of the first one.
10. Pop up the third tea bag on top of the second one overtop the ribbon.
11. Stamp the words on the scrap piece of Whisper White with Rose Red ink and cut
out with the tea bag framelit. Glue the Baker’s Twine to the back and pop up on
top of the tea cup with a Stampin’ Dimensional.