


About
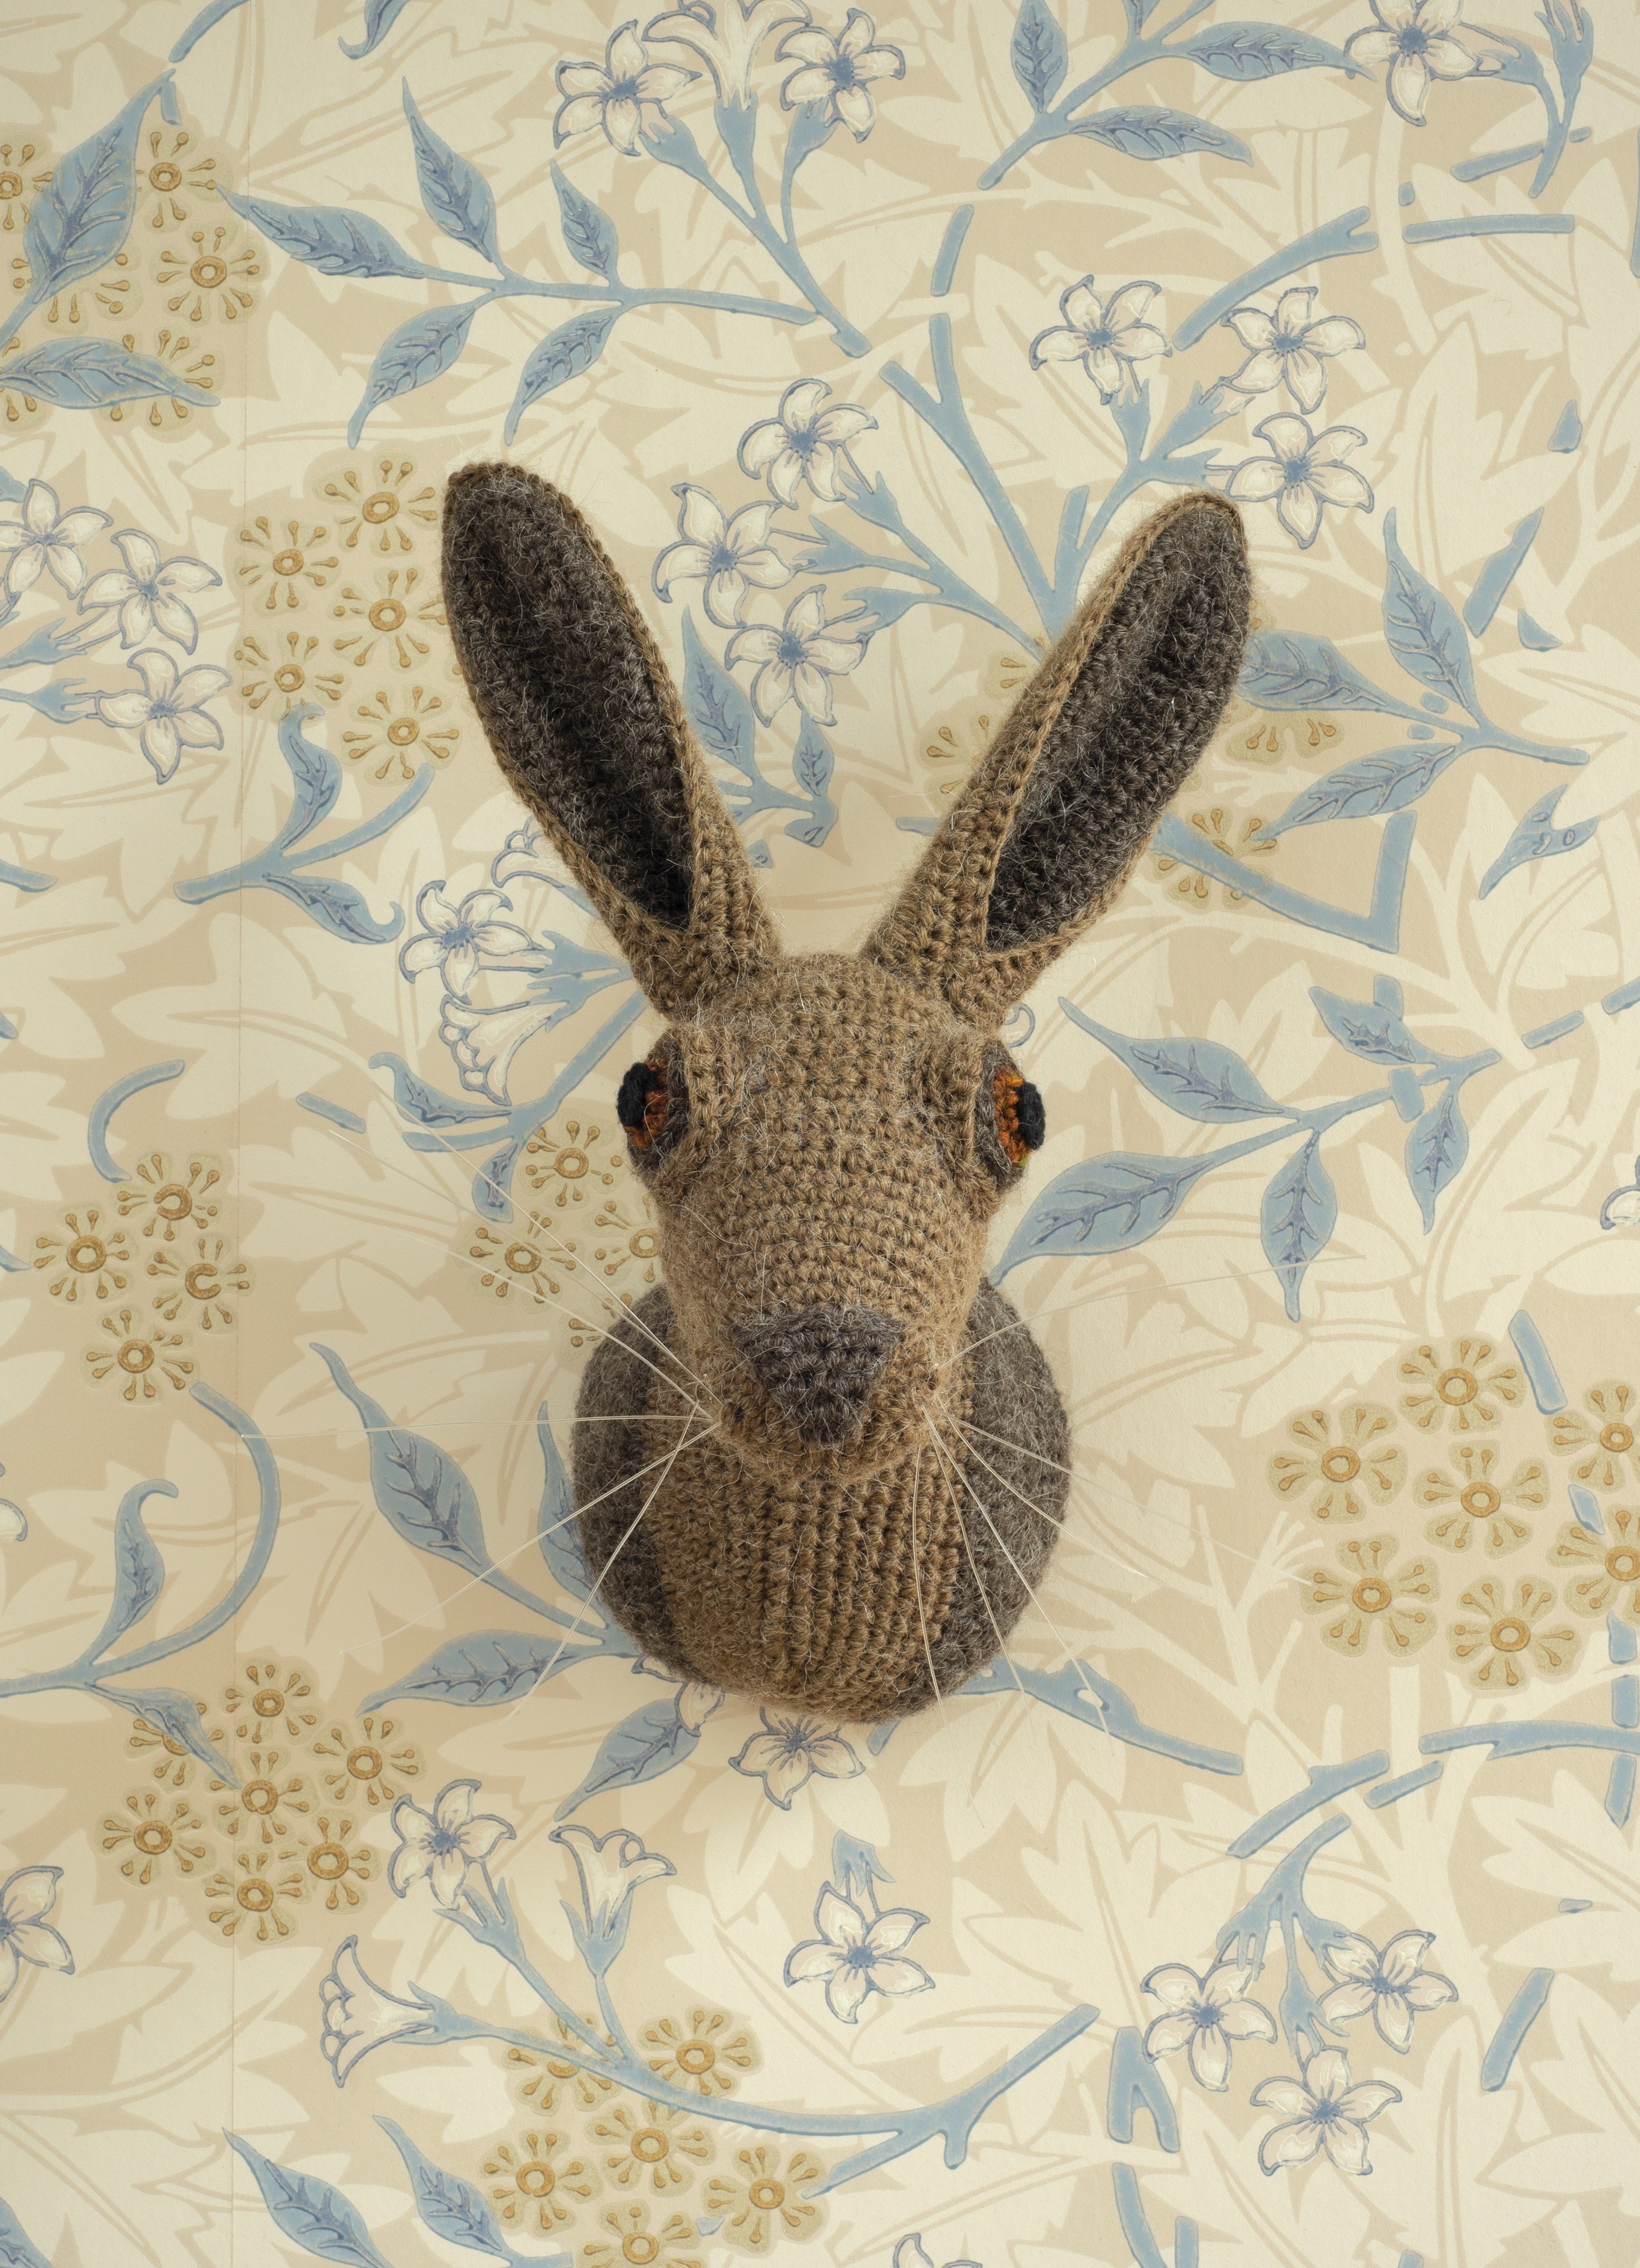
Animal Heads
Textured yarns in earthy shades are used
to make the hare, and the small amount
of golden brown adds warmth to the eyes.
Tweed yarn is ideal for the eyes as the flecks
of colour give an illusion of catching the light.
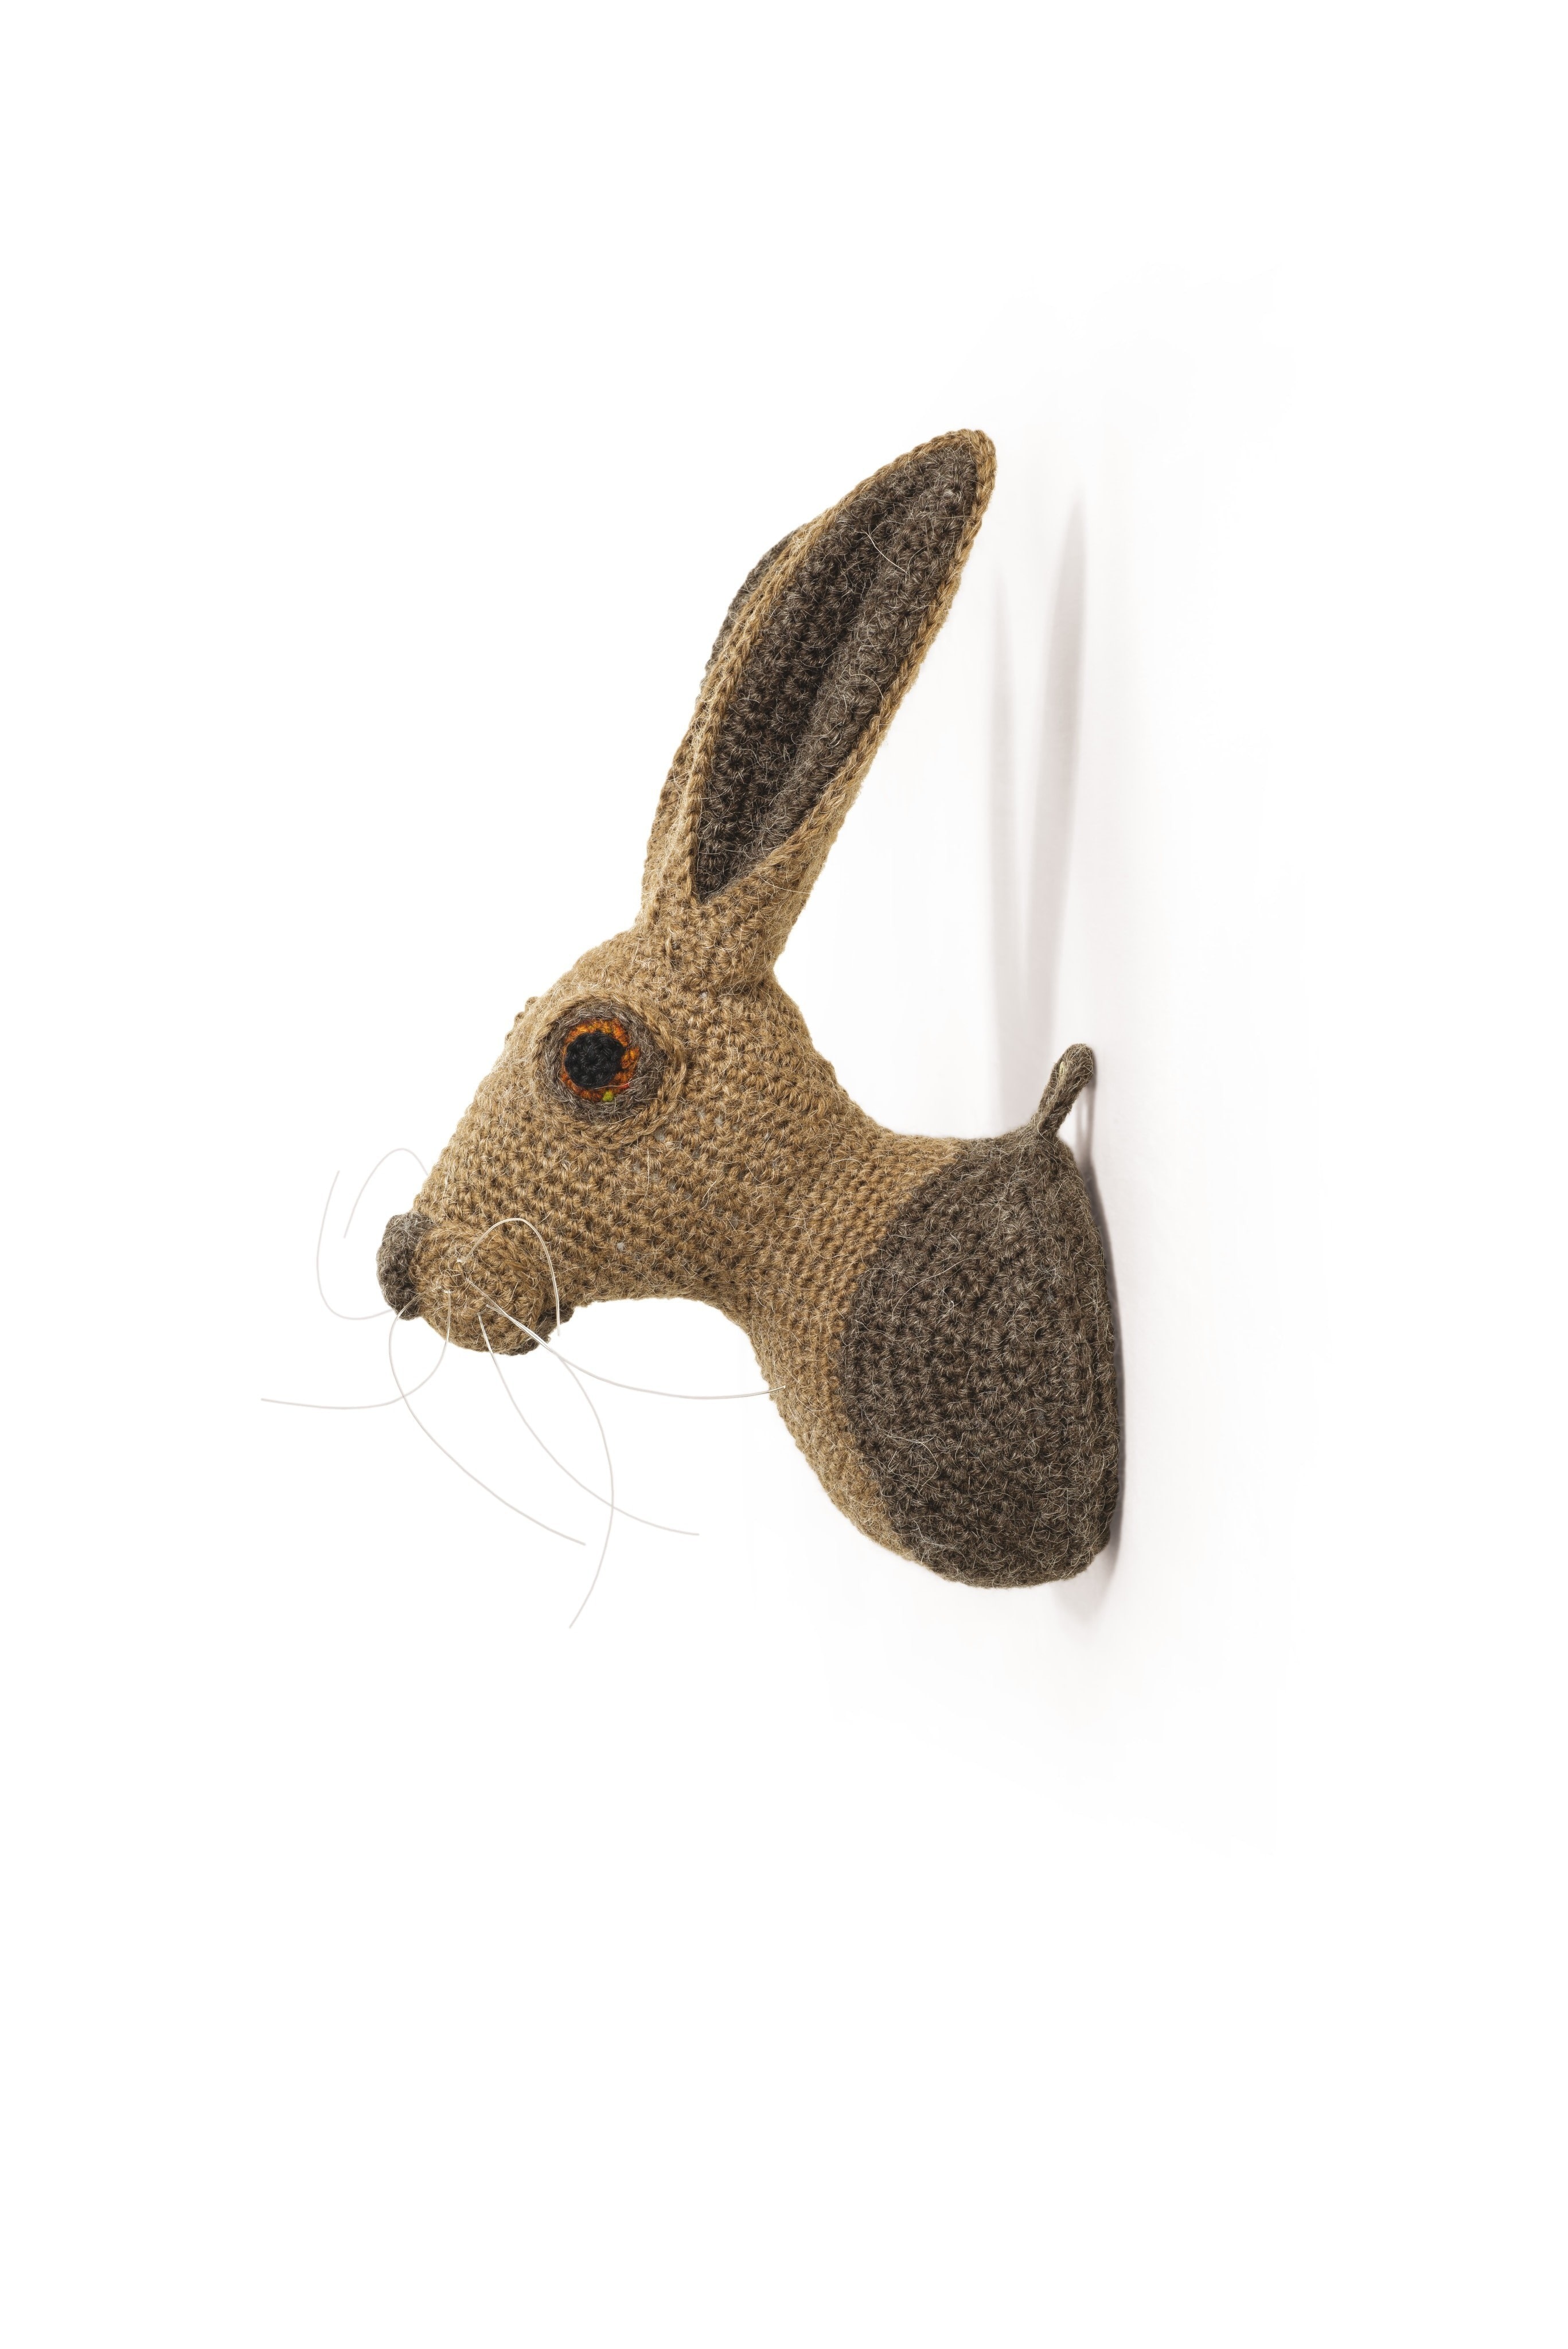
Size
Approximately 63⁄8in (16cm) from the top of the head to the lower edge of
the base (excluding ears)
Tension
22 sts and 24 rows to 4in (10cm) over double crochet using 2.5mm hook
Tags
© 2024 Vanessa Mooncie / GMC Publications · Reproduced with permission. · Animal Heads by Vanessa Mooncie, published by GMC (£14.99, available from www.thegmcgroup.com)
-
 Key West Witch favorited Hare Animal Head
05 May 07:41
Key West Witch favorited Hare Animal Head
05 May 07:41
-
 C.J. M. added Hare Animal Head to Chrochet
20 Apr 13:34
C.J. M. added Hare Animal Head to Chrochet
20 Apr 13:34
-
C.J. M. favorited Hare Animal Head
17 Apr 19:42
-
 satilanna added Hare Animal Head to Crochet
29 Nov 22:33
satilanna added Hare Animal Head to Crochet
29 Nov 22:33
-
 Shortly Blank favorited Hare Animal Head
09 Oct 07:10
Shortly Blank favorited Hare Animal Head
09 Oct 07:10
-
 ZombieUnicorn favorited Hare Animal Head
14 Jan 21:43
ZombieUnicorn favorited Hare Animal Head
14 Jan 21:43
-
Alissa B. favorited Hare Animal Head
08 Jun 18:01
-
 Jenee Nicole added Hare Animal Head to Crochet
28 Apr 05:04
Jenee Nicole added Hare Animal Head to Crochet
28 Apr 05:04
-
 Ashlee P. added Hare Animal Head to Miss Marple
27 Apr 18:28
Ashlee P. added Hare Animal Head to Miss Marple
27 Apr 18:28
-
Len favorited Hare Animal Head
19 Apr 23:02
You Will Need
-
Step 1
Method
The back of the head and the shoulders are crocheted separately. These are then all crocheted together, working in rounds and shaping the chest, neck and face by increasing and decreasing stitches. An edging is worked around the opening at the lower edges of the shoulders to attach the base. The base is made in two pieces, crocheted in rounds. A circular piece of mount board is inserted between the two pieces to complete the base. This is attached
to the hare by crocheting into the stitches of the base and the edging around the opening at the same time. The nose and mouth are worked in rounds and stitched on after stuffing the main piece. The ears are worked in rows and crocheted together, with folded mount board, cut to size, inserted to shape them. The eyeball and socket are crocheted in one piece, worked in rounds. The sockets are shaped by increasing stitches to produce the contouring around the eyes. The front loops of a number of stitches in the sockets are crocheted into, creating
a ridge to form the brow. The whiskers are lengths of nylon that are folded into loops and attached by threading them through stitches in the top lip. -
 Step 2
Back of head
Starting at the back of the head, with 2.5mm hook and A, wind yarn around finger a couple of times to form a ring, insert hook into ring, catch yarn and draw through.
Round 1: 1 ch (does not count as a st), work 6 dc into ring (6 sts).
Round 2 (inc): (Dc2inc) 6 times
(12 sts). Pull tight on the short end of the yarn to close the ring.
Round 3 (inc): (Dc2inc, 1 dc) 6 times
(18 sts).
Round 4 (inc): (Dc2inc), 2 dc) 6 times (24 sts).
Round 5 (inc): (Dc2inc), 3 dc) 6 times (30 sts).
Round 6 (inc): (Dc2inc), 4 dc) 6 times (36 sts).
Round 7: Work 1 dc in each dc.
Fasten off. -
 Step 3
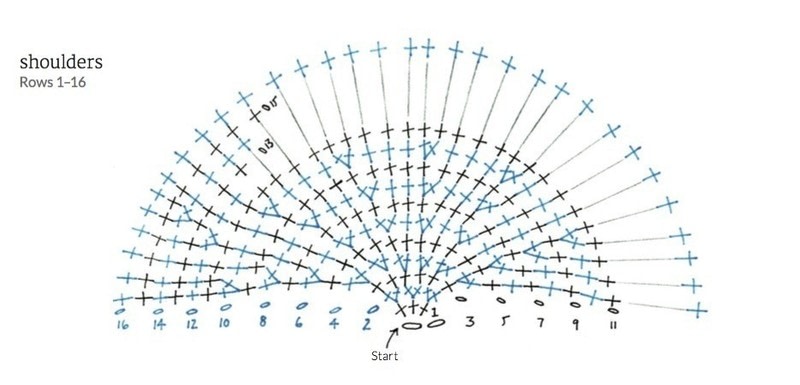
Shoulders (make 2)
With 2.5mm hook and B, make 2 ch.
Row 1: Work 3 dc into the second ch from hook, turn (3 sts).
Row 2 (inc): 1 ch (does not count as
a stitch), (dc2inc) 3 times, turn (6 sts).
Row 3: 1 ch (does not count as a stitch), 1 dc in each dc.
Row 4 (inc): 1 ch (does not count as
a stitch), (dc2inc) 6 times, turn (12 sts).
Row 5: As Row 3.
Row 6 (inc): 1 ch (does not count as
a stitch), (dc2inc, 1 dc) 6 times, turn
(18 sts).
Row 7: As Row 3.
Row 8 (inc): 1 ch (does not count as
a stitch), (dc2inc, 2 dc) 6 times, turn
(24 sts).
Row 9: As Row 3.
Row 10 (inc): 1 ch (does not count as
a stitch), (dc2inc, 3 dc) 6 times, turn
(30 sts).
Row 11: As Row 3.
Row 12 (inc): 1 ch (does not count as
a stitch), 1 dc in first 3 dc, dc2inc, 1 dc
in the next 2 dc, turn (31 sts).
Row 13: 1 ch (does not count as a st),
1 dc in front of the first dc, 1 dc in next
7 dc, turn.
Row 14: 1 ch (does not count as a st),
1 dc in first 4 dc, dc2inc, 1 dc in the next 4 dc, turn (32 sts).
Row 15: 1 ch (does not count as a st),
1 dc in the dc in front of the first dc, 1 dc in next 10 dc, turn.
Row 16: As Row 3. Fasten off. -
 Step 4
Chest, neck and head
Join shoulders
With 2.5mm hook and A, join yarn to the last dc of row 16 of one shoulder piece with a sl st.
Round 1 (RS): Work 1 dc into the same dc as the sl st, work 1 dc into each of the next 31 dc, make 4 ch to go across the chest, work 1 dc into the first dc of row 16
of the other shoulder piece, work 1 dc into the next 31 dc, sl st into the same st as the first dc worked, to join the shoulders at the centre back (68 sts).
Round 2 (dec): Dc2dec, 1 dc in next
30 dc, miss first ch, 1 dc into the next
2 ch, miss the last ch, 1 dc in next 30 dc, dc2dec (64 sts).
Round 3 (dec): Dc2dec, 1 dc in next 28 dc, (dc2dec) twice, 1 dc in next 28 dc, dc2dec (60 sts).
Round 4 (dec): Dc2dec, 1 dc in next
26 dc, (dc2dec) twice, 1 dc in next 26 dc, dc2dec (56 sts).Round 5: Dc2inc, 1 dc in next 25 dc, (dc2dec) twice, 1 dc in next 25 dc, dc2inc.
Round 6 (dec): 1 dc in next 26 dc, (dc2dec) twice, 1 dc in next 26 dc (54 sts).Shape back of neck
Round 7 (inc): (Dc2inc, 2 dc)
3 times, 1 dc in the next 16 dc,
(dc2dec) twice, 1 dc in the next
16 dc, (2 dc, dc2inc) 3 times (58 sts). -
 Step 5
Join centre front of chest
Round 8: 1 dc in next 29 dc; with RS together, join the centre front by working 1 ch (does not count as a st),
1 dc into each of the next 12 dc of each side at the same time, turn the work so the RS is facing, 1 dc in the next 17 dc, finishing at the centre back of the neck (34 sts). Do not fasten off. -
 Step 6
Join back of head to neck
The following is worked in rows:
Row 1 (RS): With RS facing work 1 dc in the first dc of the back of the head to join to the neck, 1 dc into the next 35 dc of the back of the head, sl st into the first dc to prevent a hole appearing in the work; with RS facing, work 1 dc into
the next 2 dc of the neck, turn.Shape sides of head and neck
Row 2 (WS): Miss the first 2 dc, work
1 dc into each of the 36 dc of the back of the head, miss the first dc of the neck, work 1 dc into the next 2 dc of the back of the neck, turn.
Row 3 (RS): Miss the first 2 dc, work
1 dc into each of the 36 dc of the back
of the head, 1 dc into the next 2 dc of the back of the neck, turn.
Rows 4–11: As Row 3.
Row 12: Miss the first 2 dc, work 1 dc into each of the 36 dc of the back of the head, 1 dc into the next dc of the back
of the neck, turn.
Row 13: Miss the first dc, 1 dc into each of the 36 dc of the head, 1 dc into the 5 dc down the left front of the neck, finishing at the centre front. -
 Step 7
Shape front of neck and face
The following is worked in rounds:
Round 1 (RS): Dc2dec, 1 dc into the next 3 dc up the right front of the neck, 1 dc into each of the 36 dc of the head, 1 dc into the 3 dc down the left front of the neck, dc2dec (44 sts).
Round 2 (dec): Dc2dec, 1 dc into the next 2 dc up the right front of the neck, 1 dc into each of the 36 dc of the head, 1 dc into the 2 dc down the left front of the neck, dc2dec (42 sts).
Round 3 (dec): Dc2dec, 1 dc into the next dc of the neck, 1 dc into each of the 36 dc of the head, 1 dc into the next dc of the neck, dc2dec (40 sts).
Round 4 (dec): Dc2dec, 1 dc in the next 36 dc, dc2dec (38 sts).
Round 5 (dec): (Dc2dec) twice, 1 dc into each of the 30 dc, (dc2dec) twice (34 sts).
Round 6 (dec): (Dc2dec) twice, 1 dc
into each of the 26 dc, (dc2dec) twice
(30 sts).
Round 7 (dec): (Dc2dec) twice, 1 dc
into each of the 22 dc, (dc2dec) twice (26 sts). Place a marker in the middle
of Round 7.
Round 8 (dec): (Dc2dec) twice, 1 dc
into each of the 18 dc, (dc2dec) twice (22 sts).
Rounds 9–11: 1 dc in each dc.
Round 12 (dec): (Dc2dec) 11 times
(11 sts).
Sl st to the next st and fasten off, leaving a long length of yarn at the end. Thread the length of yarn onto a tapestry needle and weave through the last round of stitches. Pull tight on the yarn to close the opening and fasten off. -
 Step 8
Edging
With RS facing, 2.5mm hook and B, starting at the centre back, join yarn to the first st at the edge of the right shoulder with a sl st.
Next: Work 1 dc into the same st
as the sl st, work 27 dc evenly across the lower edge of the right shoulder, work 4 dc evenly across the front
of the chest, work 28 dc evenly across the lower edge of the left shoulder, sl st into the same st as the first dc to join (60 sts). Fasten off. This forms the edging to attach the base.
Stuff the head, keeping the front
of the face flat and stuffing firmly up
to the neck. Take care not to overstuff the head. Fill the shoulders and neck with stuffing, filling close to the edging. More stuffing will be added when the base is attached. -
 Step 9
Base
With 2.5mm hook and B, wind yarn around finger a couple of times to form
a ring, insert hook into ring, catch yarn and draw through.
Rounds 1–6: Work Rounds 1–6 of back of head.
Round 7 (inc): (Dc2inc, 5 dc) 6 times (42 sts).
Round 8 (inc): (Dc2inc, 6 dc) 6 times
(48 sts).
Round 9 (inc): (Dc2inc, 7 dc) 6 times (54 sts).
Round 10 (inc): (Dc2inc, 8 dc) 6 times
(60 sts).
Rounds 11–12: 1 dc in each dc. Fasten off.
Make one more piece to match the first. Do not fasten off at the end. -
 Step 10
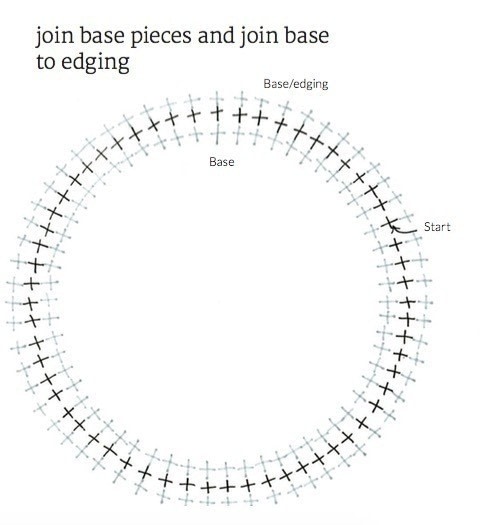
Join base pieces
Place the two base pieces with WS together. Work 1 dc in each of the next 40 dc of both pieces at the same time to join. Slip the circular board in between the pieces and continue to join the two, stretching the work over the board and crocheting into the remaining 20 dc of both pieces at the same time to close. Do not fasten off. -
Step 11
Join base to edging
With the base facing up, work 1 dc in the first dc of the base and, at the same time, into the first dc of the edging at the back of the shoulders to join. Continue to work 1 dc into each of the next 29 dc, inserting the hook first into the base and then into the edging around the shoulders and chest. Add more stuffing before continuing, filling the neck and shoulders firmly, taking care not to overstuff. Work 1 dc into the remaining 30 dc of each piece as before, adding extra stuffing, if necessary, before closing. Sl st to the next st and fasten off. -
 Step 12
Eyes (make 2)
Pupil
With 2.5mm hook and C, wind yarn around finger a couple of times to form a ring, insert hook into ring, catch yarn and draw through.
Round 1 (WS): 1 ch (does not count as
a stitch), 8 dc into ring, sl st to the first dc, turn (8 sts). Pull on the short end of yarn to close the ring.
Join in D.
Iris
Round 2 (inc) (RS): With D, work 1 dc into the back loop only (the loop furthest away from you) of each dc.
The remaining front loops will produce
a neater outline around the pupil.
Round 3: With D, (dc2inc) 8 times (16 sts).
Join in B.
Round 4: With B, work 1 dc in each dc.
Join in A and keep yarn B at the front of the work.Eye socket
Round 5 (inc): With A, (dc2inc, 1 dc)
8 times into the back loops only (24 sts).
Round 6: With A, work 1 dc in the back loops only of the next 12 dc, sl st into the back loops only of the next 12 dc.
Round 7: With A, work 1 dc in the remaining front loop only of each of the next 12 dc of round 5, sl st to the next st.
Fasten off, leaving a long length of A at the end.Finish eye
Next: With B, sl st into the front loop only of each dc of round 4. Sl st to the first st and fasten off.
Nose
With 2.5mm hook and B, wind yarn around finger a couple of times to form a ring, insert hook into ring, catch yarn and draw through.
Round 1: 1 ch (does not count as a st), work 6 dc into ring (6 sts).
Round 2: 1 dc in each dc.
Round 3 (inc): (Dc2inc, 1 dc) 3 times (9 sts).
Round 4 (inc): (Dc2inc, 2 dc) 3 times
(12 sts).
Round 5 (inc): (Dc2inc, 1 dc) 6 times
(18 sts). -
 Step 13
Join top of nose
Flatten the piece to form a triangular shape and sl st together the back loop only of the 9 dc from each side to join.
Fasten off, leaving a long length of yarn at the end. -
Step 14
Top lip (make 2)
With 2.5mm hook and A, wind yarn around finger a couple of times to form a ring, insert hook into ring, catch yarn and draw through.
Rounds 1–4: Work Rounds 1–4 of back of head.
Sl st to next st and fasten off, leaving a long length of yarn at the end. This makes one side of the top lip.
Bottom lip
With 2.5mm hook and B, make 5 ch.
Round 1: 1 dc in the second ch from hook, 1 dc in the next 2 ch, 2 dc in the end ch, 1 dc in the reverse side of the next 3 ch (8 sts).
Round 2 (inc): Dc2inc, 1 dc in the next
2 dc, (dc2inc) twice, 1 dc in the next
2 dc, dc2inc (12 sts).
Round 3: Dc2inc, 1 dc in the next 4 dc, (dc2inc) twice, 1 dc in the next 4 dc, dc2inc (16 sts). Sl st to the first st and fasten off, leaving a long length of yarn at the end. -
 Step 15
Ears (make 2)
Inner ear
With 2.5mm hook and B, make 25 ch.
Row 1 (WS): 1 dc into second ch from hook, 1 dc into next 22 ch, 3 dc into next ch, 1 dc down reverse side of the next 23 ch, turn (49 sts).
Row 2 (inc) (RS): 1 ch (does not count
as a st), 1 dc in the first 24 dc, dc3inc,
1 dc in the next 24 dc, turn (51 sts).
Row 3 (inc): 1 ch (does not count as
a st), dc2inc, 1 dc in the first 24 dc, dc3inc, 1 dc in the next 24 dc, dc2inc, turn (55 sts).
Row 4 (inc): 1 ch (does not count as a st), 1 dc in the first 27 dc, dc3inc, 1 dc in the next 27 dc, turn (57 sts).
Row 5: 1 ch (does not count as a st), 1 dc in the first 28 dc, dc3inc, 1 dc in the next 28 dc, turn (59 sts).
Row 6: 1 ch (does not count as a st),
1 dc in the first 29 dc, dc3inc, 1 dc in
the next 29 dc (61 sts). Fasten off.
Place the inner ear onto the mount board and draw around it twice. Cut the ear shapes out carefully using a craft knife on a cutting mat. Round off the corners so they don’t poke through the crocheted fabric. Lightly score a line down the centre of each ear shape and fold to shape the board. -
 Step 16
Outer ear
With 2.5mm hook and A, make 24 ch.
Row 1 (RS): 1 dc into second ch from hook, 1 dc into next 21 ch, 3 dc into next ch, 1 dc down reverse side of the next 22 ch, turn (47 sts).
Row 2 (inc) (WS): 1 ch (does not count as a st), 1 dc in the first 23 dc, dc3inc,
1 dc in the next 23 dc, turn (49 sts).
Row 3 (inc): As Row 2 of inner ear.
Row 4 (inc): As Row 3 of inner ear.
Row 5 (inc): As Row 4 of inner ear.
Row 6 (inc): 2 ch (to count as first htr), miss first dc, 1 htr in the next 15 dc, 1 dc in the next 12 dc, dc3inc, 1 dc in the next 12 dc, 1 htr in the next 16 dc, turn (59 sts).
Row 7 (inc): 1 ch (does not count as a st), 1 dc in the first 16 htr, 1 dc in the next 13 dc, dc3inc, 1 dc in the next 13 dc,
1 dc in the next 15 htr, 1 dc in the second of 2 ch (61 sts). Do not fasten off. -
 Step 17
Join ear pieces
Place wrong sides of inner and outer ear together, with the inner ear facing up.
Next: 1 ch (does not count as a st), inserting the hook under both loops of each stitch of the inner ear first, then the outer ear to join, work 1 dc in each of the next 30 dc, dc3inc, 1 dc into each
of the next 30 dc (63 sts). Fasten off, leaving a long length of yarn at the end. -
 Step 18
Making up
Mouth
Thread the length of yarn, left after fastening off the oval-shaped bottom lip, onto a blunt-ended tapestry needle. Sew it to the lower part of the front
of the face, positioning it vertically, with the top end of the bottom lip meeting the gathered, last round of stitches
of the face. With the fastened-off length of yarn threaded onto a tapestry needle, attach the top lip pieces, placing them centrally on each side of the gathered front of the face, over the top of the bottom lip and sewing neatly around the edges.Nose
Thread the long length left after fastening off onto a tapestry needle
and sew the straight, top edge along
the round of stitches with the marker. Stitch the lower, pointed end in place between the two top lip pieces, leaving the sides open to indicate the hare’s nostrils. Remove the marker.Eyes
Stitch an eye to each side of the face, so that the first of the raised line of stitches near the back of the head is at the lower edge of the eye. With the length of yarn left after fastening
off, sew all around the outer edges of the eyes, inserting a small amount
of stuffing into the eyeballs before closing the openings.Ears
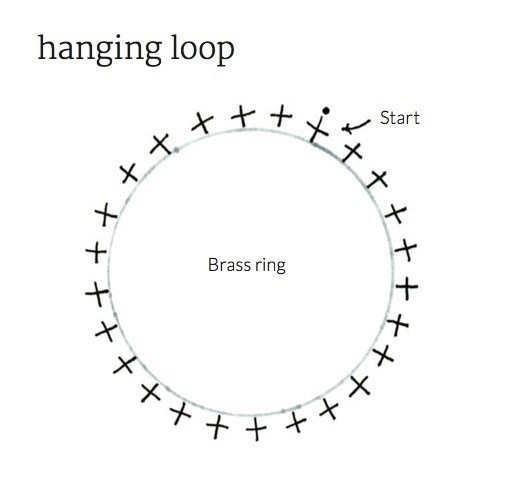
Insert a folded, ear-shaped board into each crocheted ear, so the fold is at the back of the ears and the edges face towards the front. With the length of yarn left after fastening off, sew together the lower edges. Bring the lower corners together to meet in the middle of the inner ear and stitch 5⁄8in (1.5cm) of each side together to shape. Sew each ear neatly to the head, behind the eyes, stitching all around the edges to attach them securely in place.Hanging loop
With 2.5mm hook and B, work 25 dc around the brass ring. Sl st to the first dc and fasten off, leaving a long length of yarn. Thread the length of yarn onto a needle and sew the lower edge of the ring securely to the top of the base. Weave in all the ends of yarn. -
 Step 19
Whiskers
Fold a length of nylon in half to form
a loop. Insert the crochet hook behind a stitch in one of the top lip pieces and back out through to the front, and catch the looped yarn.
Pull the loop a little way through, remove the hook and then thread
the ends of the nylon back through the loop, pulling them tight.
Repeat to attach two more lengths of nylon to the same top lip and the remaining three lengths to the other top lip. Trim the ends to neaten.


Comments


