About
Use basic crochet and sewing to create an adorably spooky ribcage tshirt!
- If you are a relatively crafty person, you may already have the materials on hand to make this shirt! You only need small amounts of everything.
- The only semi difficult part about this project is knowing how to crochet. If you know the basics, like single crochet and half double crochet, you should be ok!
- Please note: I would wash your shirt first (if it's new) to avoid shrinkage after you sew your project onto it. I also would not recommend a shirt with a wide or cut-off neck for the ladies, as the crochet may weigh the shirt down a little bit, causing accidental cleavage exposure!
- Also, once you crochet your heart, you can choose to sew it down to the shirt, or, you can attach a pinback and make it a removable brooch!
- This pattern is written in U.S. crochet terms. Stitch notes: Sc dec (single crochet decrease): Pick up a loop from next st, pick up another loop from st after that, YO, pull thru 1st 2 loops, YO, pull thru last 2 loops.
- Abbreviations:
BLO: back loops only
ch(s): chain(s)
FLO: front loops only
hdc: half double crochet
sc: single crochet
sk: skip
sl st: slip stitch
Tags
-
 Galaxie A. favorited Happy Heart & Ribcage T Shirt
29 Dec 01:36
Galaxie A. favorited Happy Heart & Ribcage T Shirt
29 Dec 01:36
-
 Stephanie N. favorited Happy Heart & Ribcage T Shirt
05 Apr 11:40
Stephanie N. favorited Happy Heart & Ribcage T Shirt
05 Apr 11:40
-
 Kyara S. favorited Happy Heart & Ribcage T Shirt
04 Oct 19:27
Kyara S. favorited Happy Heart & Ribcage T Shirt
04 Oct 19:27
-
 Jenee Nicole added Happy Heart & Ribcage T Shirt to Sewing
28 Apr 07:15
Jenee Nicole added Happy Heart & Ribcage T Shirt to Sewing
28 Apr 07:15
-
 Sabrina Dee Berry favorited Happy Heart & Ribcage T Shirt
06 Jan 20:59
Sabrina Dee Berry favorited Happy Heart & Ribcage T Shirt
06 Jan 20:59
-
 Tierra T. favorited Happy Heart & Ribcage T Shirt
26 Oct 16:17
Tierra T. favorited Happy Heart & Ribcage T Shirt
26 Oct 16:17
-
 Daiy D. favorited Happy Heart & Ribcage T Shirt
15 Apr 07:52
Daiy D. favorited Happy Heart & Ribcage T Shirt
15 Apr 07:52
-
 gypsie_jay favorited Happy Heart & Ribcage T Shirt
12 Sep 16:52
gypsie_jay favorited Happy Heart & Ribcage T Shirt
12 Sep 16:52
-
gypsie_jay added Happy Heart & Ribcage T Shirt to DIY Clothes
12 Sep 16:52
-
 lagrimasDmimo favorited Happy Heart & Ribcage T Shirt
04 Jul 02:29
lagrimasDmimo favorited Happy Heart & Ribcage T Shirt
04 Jul 02:29
-
 Step 1
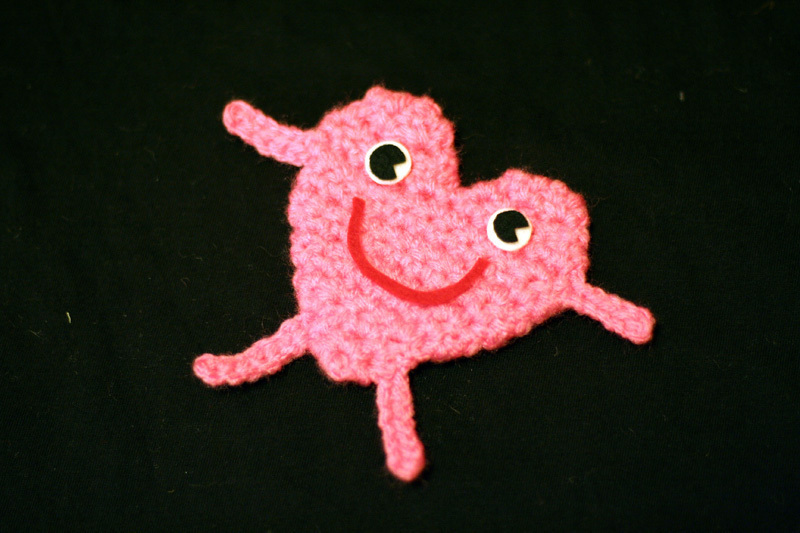
With Pink, you will work a 3D heart. There are many different ways to create a 3D heart, so you can use whatever pattern you like or find. Here’s one I whipped up:
Make a magic circle, or ch 3 and sl st to 1st ch to form ring.
Rnd 1: Ch 1 and work 4 sc into ring. Sl st to 1st sc to join. (4)
Rnd 2: Ch 1, TURN. Work (2 sc) 4 times. Sl st to 1st sc to join. (8)
Rnd 3: Ch 1, turn. Work [(2 sc), 1 sc] 4 times. Sl st to 1st sc to join. (12)
Rnd 4: Ch 1, turn. Work [(2 sc), 2 sc] 4 times. Sl st to 1st sc to join. (16)
Rnd 5: Ch 1, turn. Work [(2 sc), 7 sc] 2 times. Sl st to 1st sc to join. (18)
Rnd 6: Ch 1, turn. Work [(2 sc), 8 sc[ 2 times. Sl st to 1st sc to join. (20)
Rnd 7: Ch 1, turn. Work [(2 sc), 9 sc[ 2 times. Sl st to 1st sc to join. (22)
Rnd 8: Ch 1, turn. Work [(2 sc), 10 sc[ 2 times. Sl st to 1st sc to join. (24)
Rnd 9: Ch 1, turn. Work [(2 sc),11 sc[ 2 times. Sl st to 1st sc to join. (26)
Rnd 10: Ch 1, turn. Work [(2 sc), 12 sc[ 2 times. Sl st to 1st sc to join. (28)
Here’s where you form the top of the heart, one side at at time.
Rnd 11: Ch 1, turn. Work 7 sc evenly, then skip 14 sc, then work 7 sc evenly. Sl st to 1st sc to join. (14)
Rnd 12: Ch 1, turn. [Sc dec in FLO, sc dec in FLO, 3 sc evenly] 2 times. Sl st to 1st sc to join (10)
Rnd 13: Ch 1, turn. [Sc dec in BLO, sc dec in BLO, 1 sc evenly] 2 times. Sl st to 1st sc to join. (6) Break off leaving 8 inches of yarn. Weave through remaining 6 sts, pull closed, and finish off. If you want your heart to have a little stuffing in it, now is the time to stuff. I left mine un-stuffed.
Now you will work on the other side of the heart.
Rnd 11: Join at the 1st skipped sc of the previous Rnd 11. Work 1 sc in this sc, and in each remaning sc. SL st to 1st sc to join. (14)
Rnds 12-13: Repeat previous Rnds 12-13. Weave in all ends.
If you want your heart to have arms and legs (and a face): Join your yarn wherever you want an arm and/or leg. Ch 7, sk 1st ch, and sl st in remaining 6 chs. Sl st one more time back into the heart to join limb. Break off and weave in ends. Length of limbs is easily adjustable by adding or subtracting chs and sl sts. I think limbs make the heart funnier because they look like little veins and arteries, but a plain heart is probably cuter with a cleaner look. If you want to glue, stitch, or paint a face on the heart, now is the time!
-
Step 2
Placing the heart on the shirt in the right place will help you plot out your ribcage. Put the t-shirt on, place the heart where you want it to go, and mark the center of that spot with a pin (careful!), chalk, or invisble ink pen. If you want to sew the heart to your shirt, do that now with matching thread. If you want your heart to be removable, it’s a good idea to still mark the right spot on the shirt so you don’t forget, and then glue or stitch on your pinback.
-
 Step 3
Sternum:
With White, ch 6.
Row 1: Sk 1st 2 chs and work 4 hdc evenly across.
Rows 2-27: Ch 1, turn. Work 4 hdc evenly across. 27 rows for me equaled approx. 10 inches long. If you want your spine to be longer, you can keep going. Break off and weave in ends.
-
Step 4
Ribs:
All the ribs have the same basic pattern, just different lengths.
With White, make magic circle, or ch 3 and sl st to 1st ch to form ring.
Rnd 1: Ch 1 and work 1 sc into ring. Then work 3 hdc into ring. Don’t join rounds.
Rnd 2: Work 4 hdc evenly around. Continue to work hdc evenly and form a tube until you’ve reached the desired length. Then sc in next st, and sl st in following st. Break off leaving about 8 inches of yarn for sewing.
4 inch tube: Make 2.
6 inch tube: Make 2.
7 inch tube: Make 2.
You can make more ribs in longer lengths, but I’m sticking with 3 pairs of ribs for this basic pattern. It will already look like you’re hosting a tamponathon.
-
Step 5
Assembly:
Weave in the starting-tails of the ribs to keep things tidy, but keep the 8 inch ending-tails for sewing.
-
 Step 6
Sew each rib to the sternum with the ending-tails, starting with the 4 inch ribs on top, the 6 inch ribs next, and the 7 inch ribs last. I leave a row or two of hdc on the sternum sticking out, and then attach the 4 inch ribs. About half way down the sternum, I attach the 7 inch ribs. Then I attach the 6 inch ribs in the middle. At this point, your project will look like a facehugger from Aliens.
-
Step 7
Pin the sternum to your shirt. You may want to put the shirt on first and mark where you want the top and bottom of the sternum.
-
 Step 8
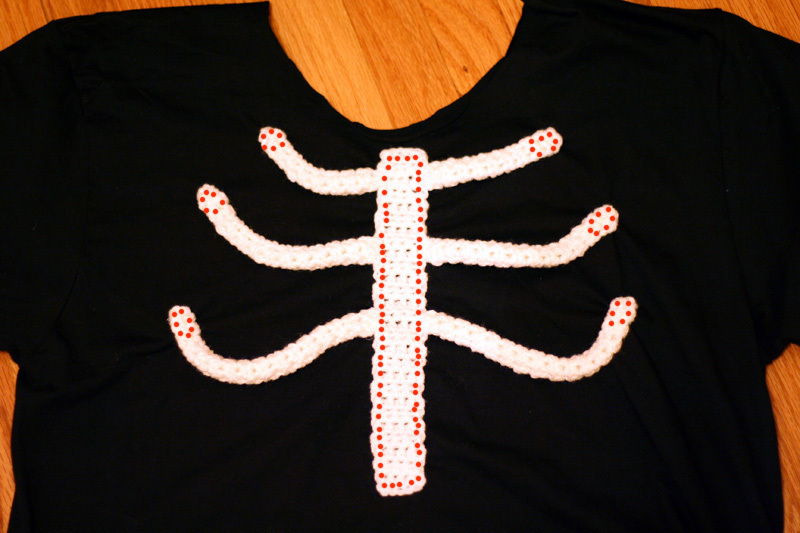
Sew the sternum to the shirt. Check out the chart. The red dots show where I put my stitches. You want to anchor it pretty well.
After sewing the sternum down, your ribs will be hanging freely. Play with the placement a little bit and mark where you want the ends of the ribs to be. Sew the ends of the each rib securely to the shirt.
-
 Step 9
Put it on and have fun! I would recommend hand-washing and air-drying to preserve your hard work!


Comments