About
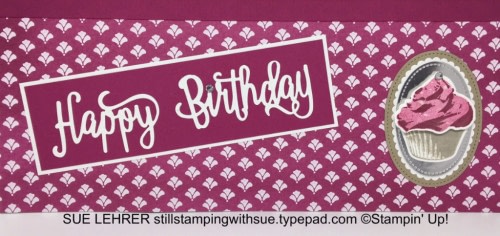
The cupcake looks good enough to eat!
This is a happy birthday scrapbook page that features a yummy cupcake. Did you know by simply switching the top and bottom layouts, you will get a different layout. When you do that, you save time by not having to create a whole new layout.
Downloads
- 2017-12-09-205513-Happy+Birthday+Cupcake+Scrapbook+Page.png 465 KB [ Download ]
-
 JadeSucksAtLife favorited Happy Birthday Cupcake Scrapbook Page
21 Feb 13:37
JadeSucksAtLife favorited Happy Birthday Cupcake Scrapbook Page
21 Feb 13:37
-
 Susan L. published her project Happy Birthday Cupcake Scrapbook Page
13 Jan 09:00
Susan L. published her project Happy Birthday Cupcake Scrapbook Page
13 Jan 09:00
-
Step 1
Supply List for the Happy Birthday Cupcake Scrapbook Page:
141498
Sweet Cupcake Photopolymer Stamp Set
$21.00145411
Neutrals Best 12" X 12" Cardstock Pack
$13.50100730
Whisper White 8-1/2" X 11" Cardstock
$9.00144243
Berry Burst 8-1/2" X 11" Cardstock
$8.00144318
Fresh Florals Designer Series Paper Stack
$22.00132178
Silver Foil Sheets
$4.00144083
Berry Burst Classic Stampin' Pad
$6.50
126975
Crumb Cake Classic Stampin' Pad
$6.50
143263
Big Shot
$110.00143700
Happy Birthday Thinlits Die
$20.00141474
Cupcake Cutouts Framelits Dies
$27.00145372
Stitched Shapes Framelits Dies
$30.00141706
Layering Ovals Framelits Dies
$35.00144133
Berry Burst 1/2" Finely Woven Ribbon
$7.00144217
2017-2019 In Color Bitty Bows
$8.50144220
Rhinestone Basic Jewels
$5.00141897
Clear Wink Of Stella Glitter Brush
$8.00104332
Snail Adhesive
$7.00138309
Fine-Tip Glue Pen
$7.00104430
Stampin' Dimensionals
$4.00 -
 Step 2
The top half of the layout has three areas for journaling and/or photographs. The layers are:
3 3/4" x 5 1/4" Whisper White Cardstock
4" x 5 1/2" Berry Burst Cardstock
The center one includes:4 1/4" x 5 3/4" Silver Foil Sheet
Two Berry Burst bows from the In-Color Bitty Bows were added in the corners. -
 Step 3
The bottom half of this layout is a 5" x 12" Berry Burst piece of the Fresh Florals Designer Series Paper Stack (DSP). A 12 inch piece of the Berry Burst 1/2" Finely Woven Ribbon is attached to the top of the DSP with SNAIL Adhesive.
The Happy Birthday Thinlits Die was cut through the Big Shot on Whisper White Cardstock. It is easy to cut apart to change it from a two-line to a one-line sentiment. It is attached with a Fine Tip Glue Pen to a 2" x 7" piece of Berry Burst Cardstock and matted with a 2 1/4" x 7 1/4" piece of Whisper White Cardstock. A Rhinestone Jewel is added to the "i".
-
 Step 4
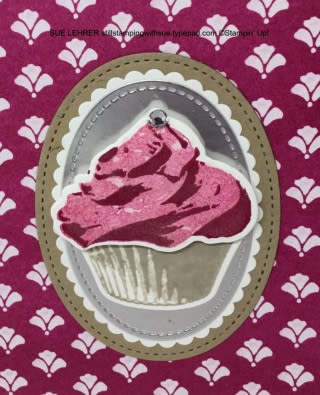
I used two images, so it would two-step stamping (and go with our theme). Crumb Cake Ink was used for the cupcake base. Berry Burst Ink was used for the cupcake top. The first images for the top and bottom of the cupcake were inked up and then stamped off once on scratch paper and then stamped on Whisper White Cardstock. The second images were inked up and stamped on top of the first images with full-strength ink. The Cupcake Cutout Framelit Dies were used to cut out the top and bottom of the cupcake images through the Big Shot.
Here are the layers on the cupcake embellishment. They were all put through the Big Shot to cut the shapes and adhered together with SNAIL Adhesive.
Bottom Layer - Crumb Cake Cardstock cut with an oval from the Stitched Shapes Framelits Dies.
Second Layer - Whisper White Cardstock cut with a scallop from the Layering Ovals Framelits Dies.
Third Layer - Silver Foil Sheet cut with an oval from the Stitched Shapes Framelits Dies.The cupcake bottom was attached with SNAIL Adhesive. The cupcake top was attached with Dimensionals. Clear Wink of Stella was added to the cupcake top and it was finished off with a Rhinestone Jewel.